


Step 6: Production
Let GoldFynch’s powerful Production Wizard walk you through the process of producing your files! Also learn how to download and share your productions, check production logs, and set up custom parameter profiles for load files to use in your productions.
This handy checklist can help track your productions both in and outside of GoldFynch. Learn more about the production checklist here
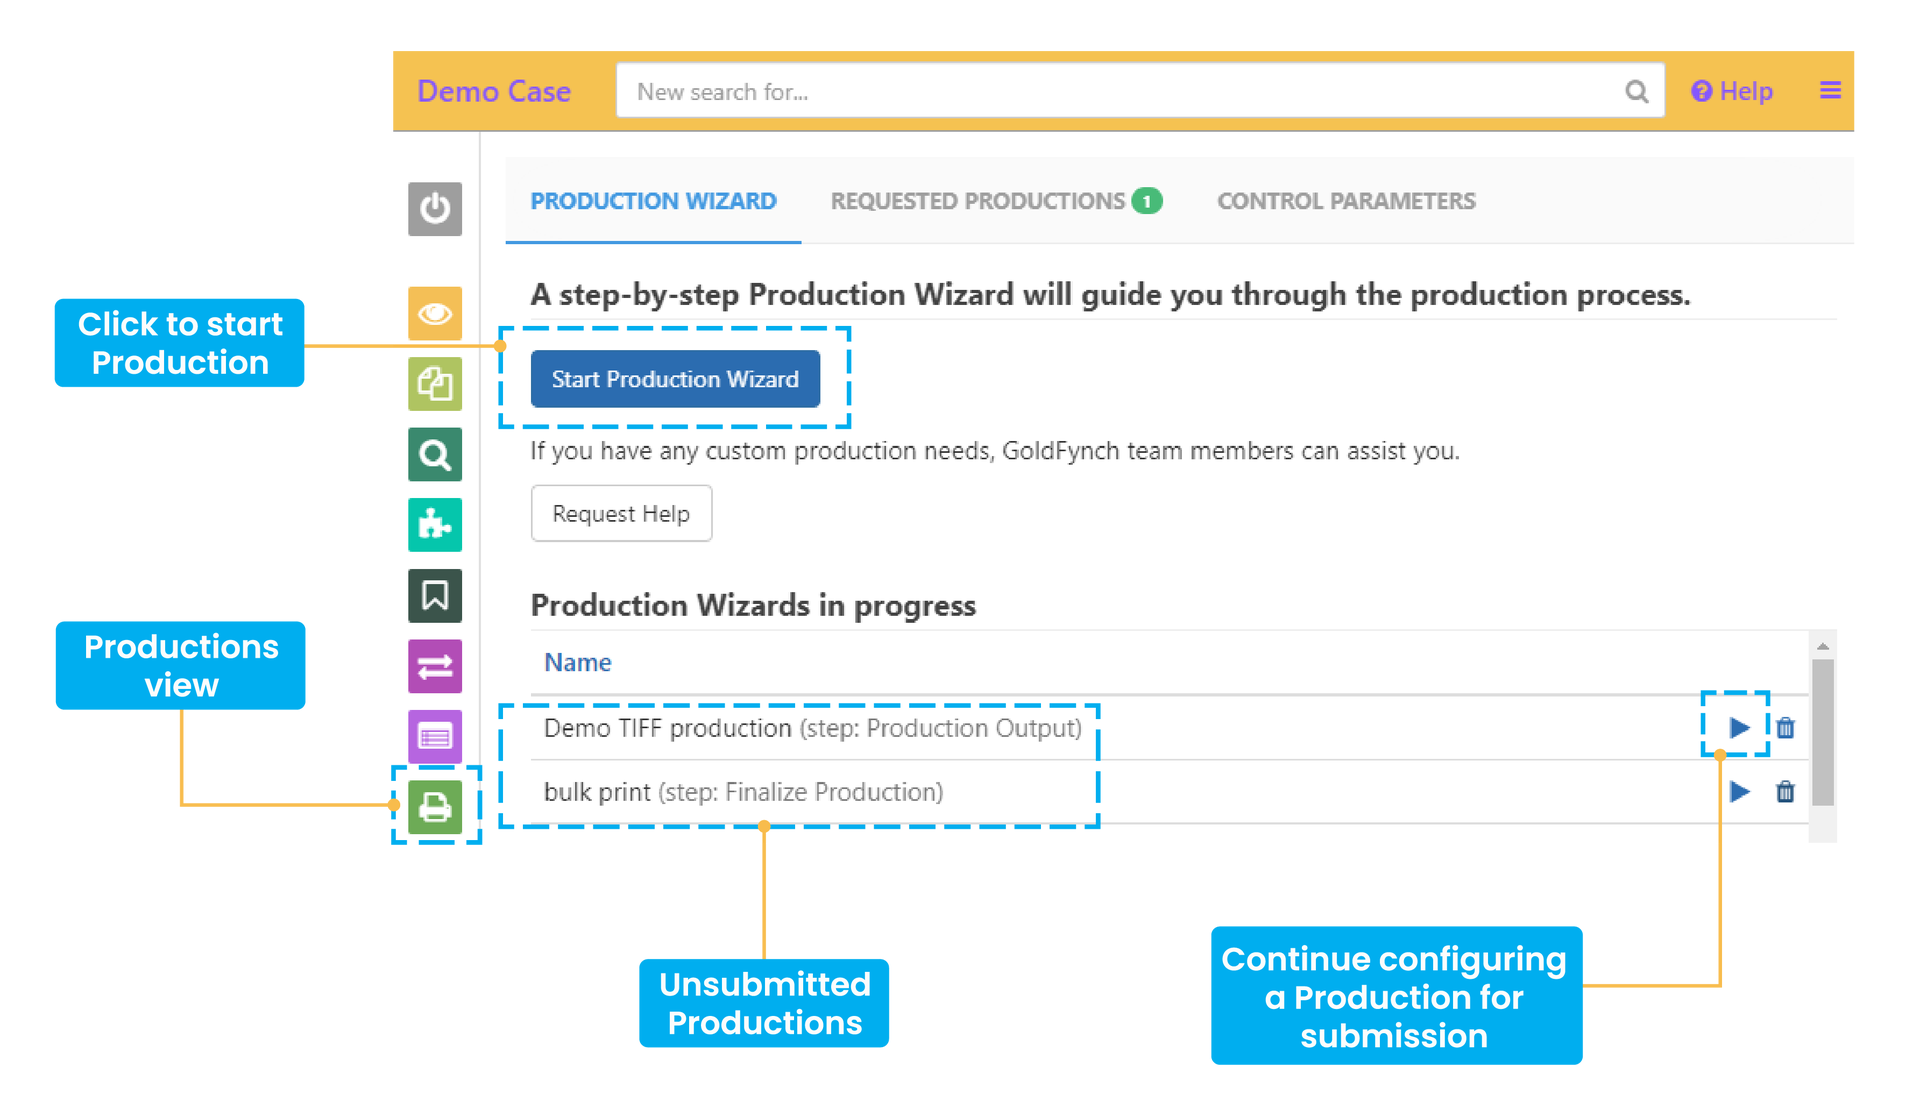
Producing files using GoldFynch’s Production Wizard
Get started by navigating to the ‘Productions’ view of GoldFynch and clicking on the ‘Start Production Wizard’ button.
Check out the GoldFynch manual for an in-depth look into the production process.
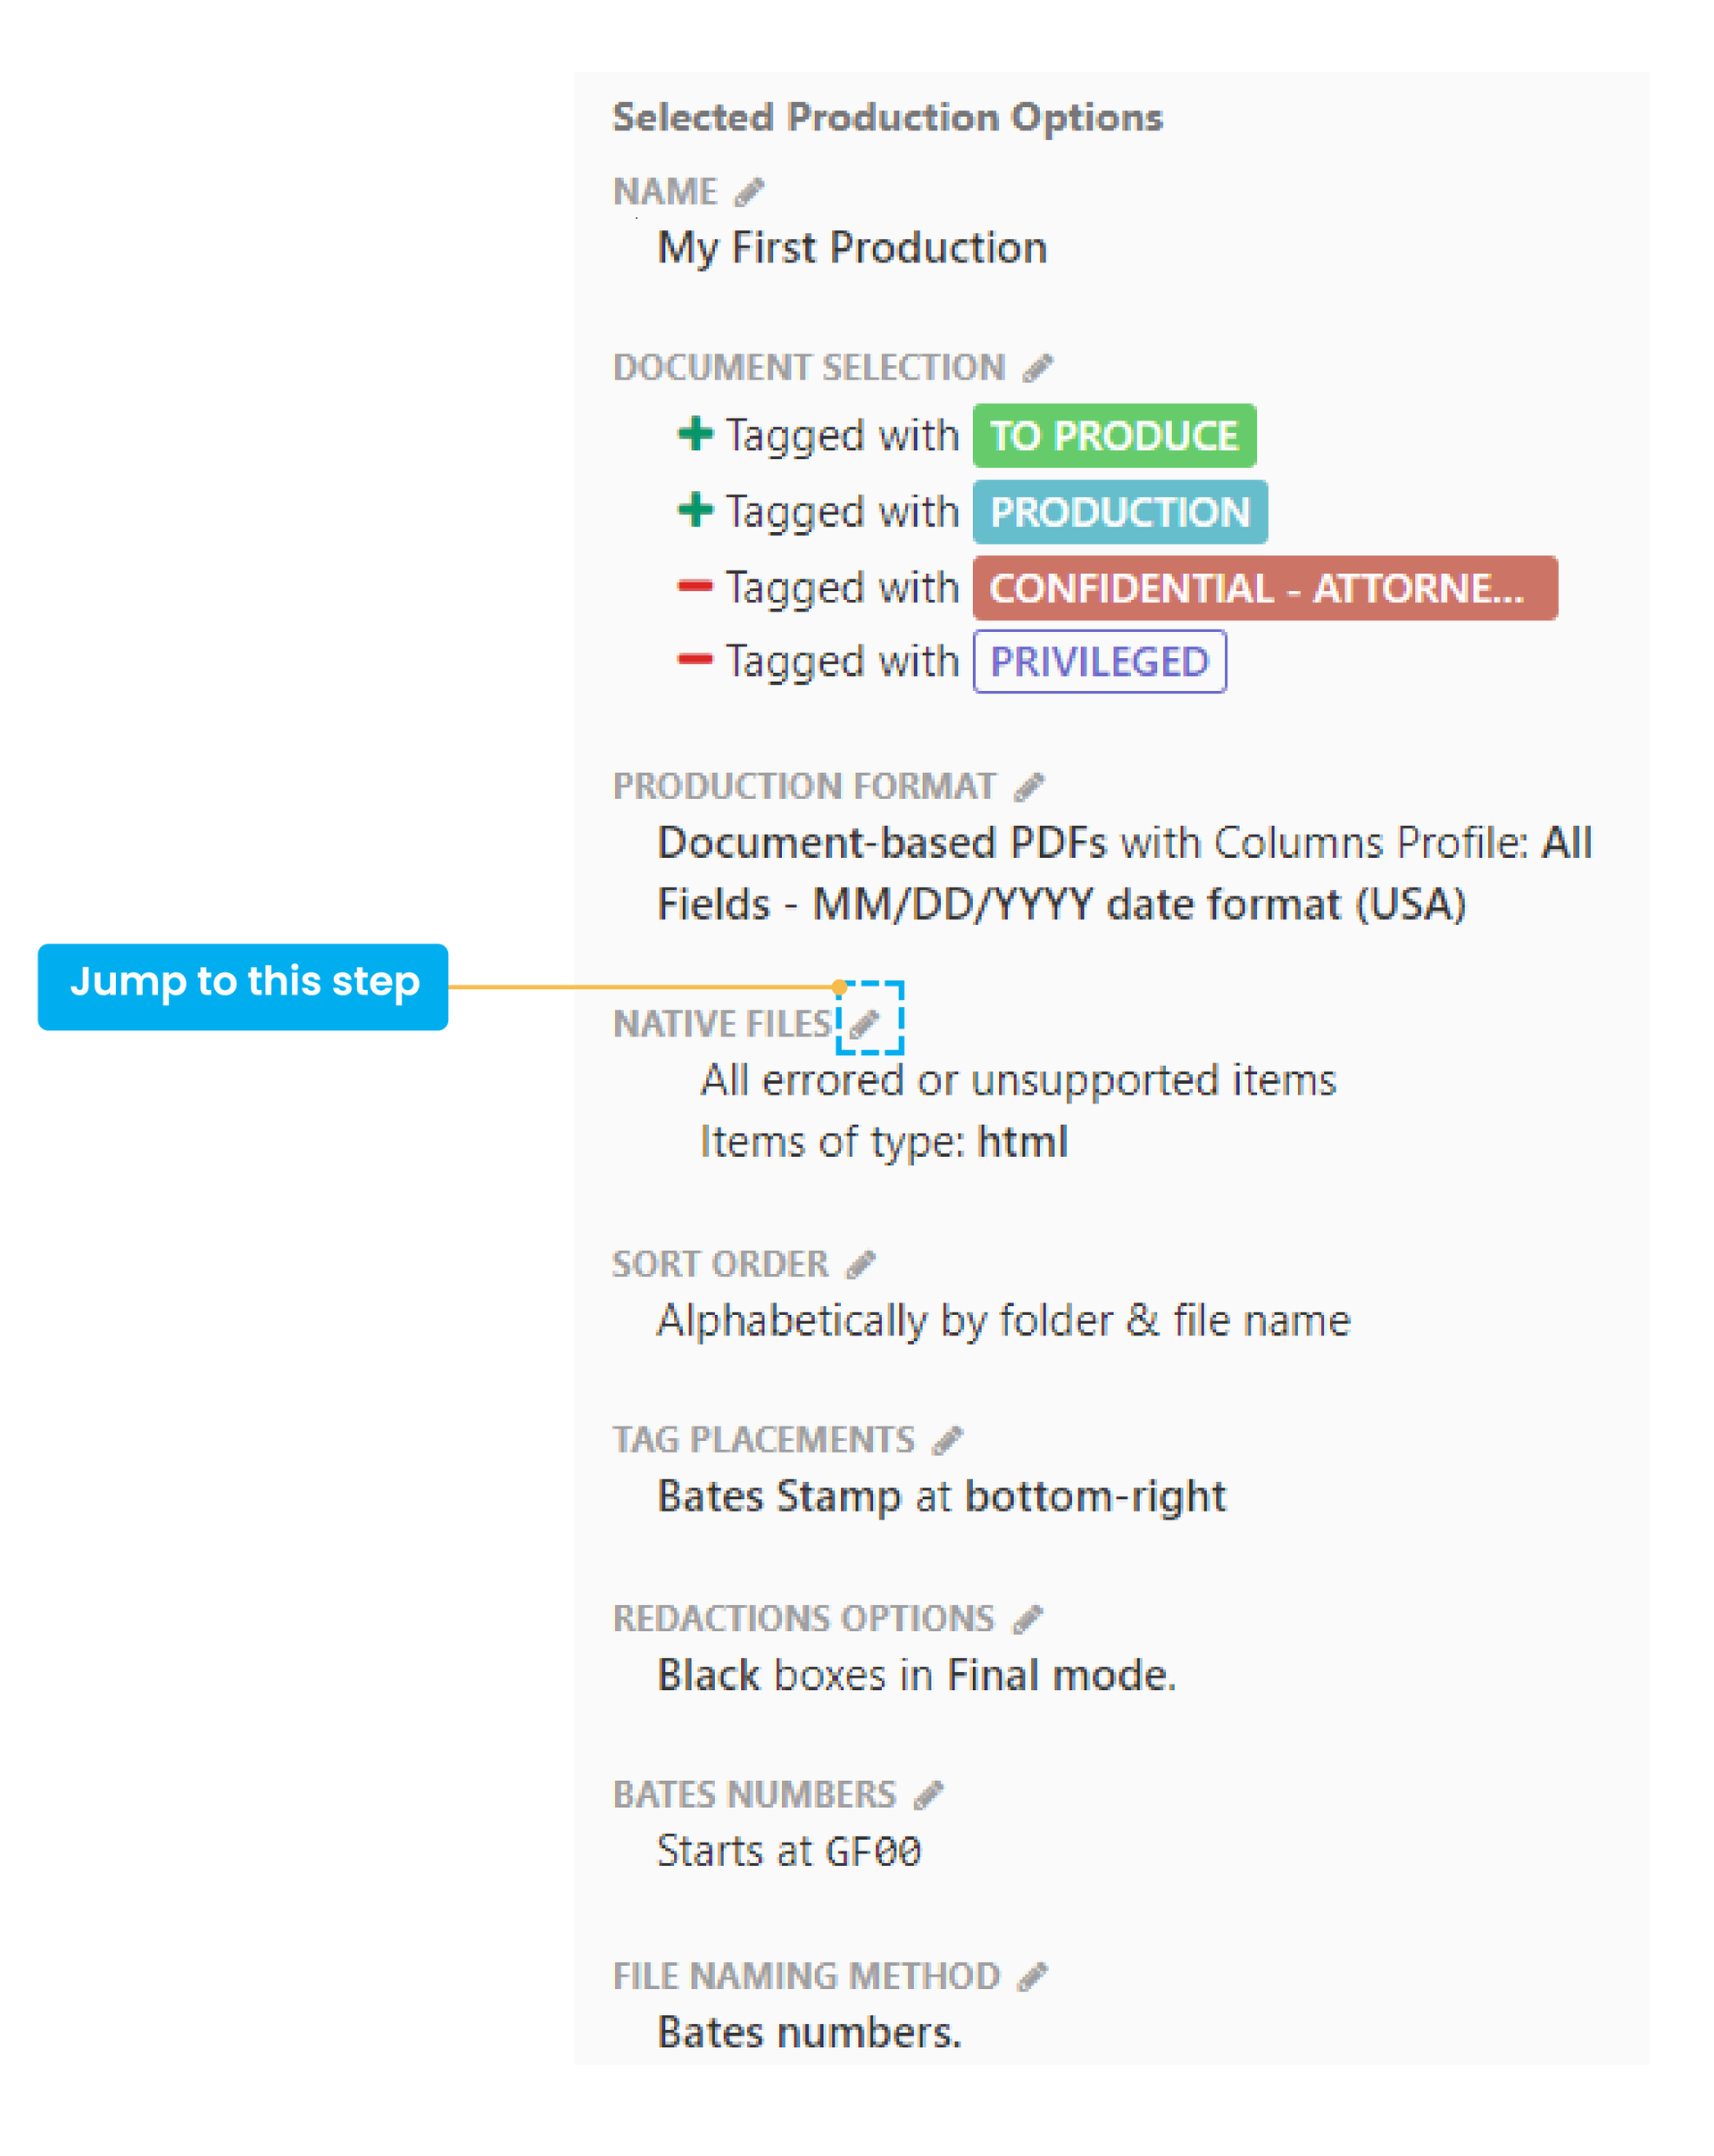
Selected Production Options box
This box gives you a summary of your production’s configuration, automatically updating as you make changes to different steps of production.
Click on the edit icon (the pencil) to jump to any other step of production at any time.
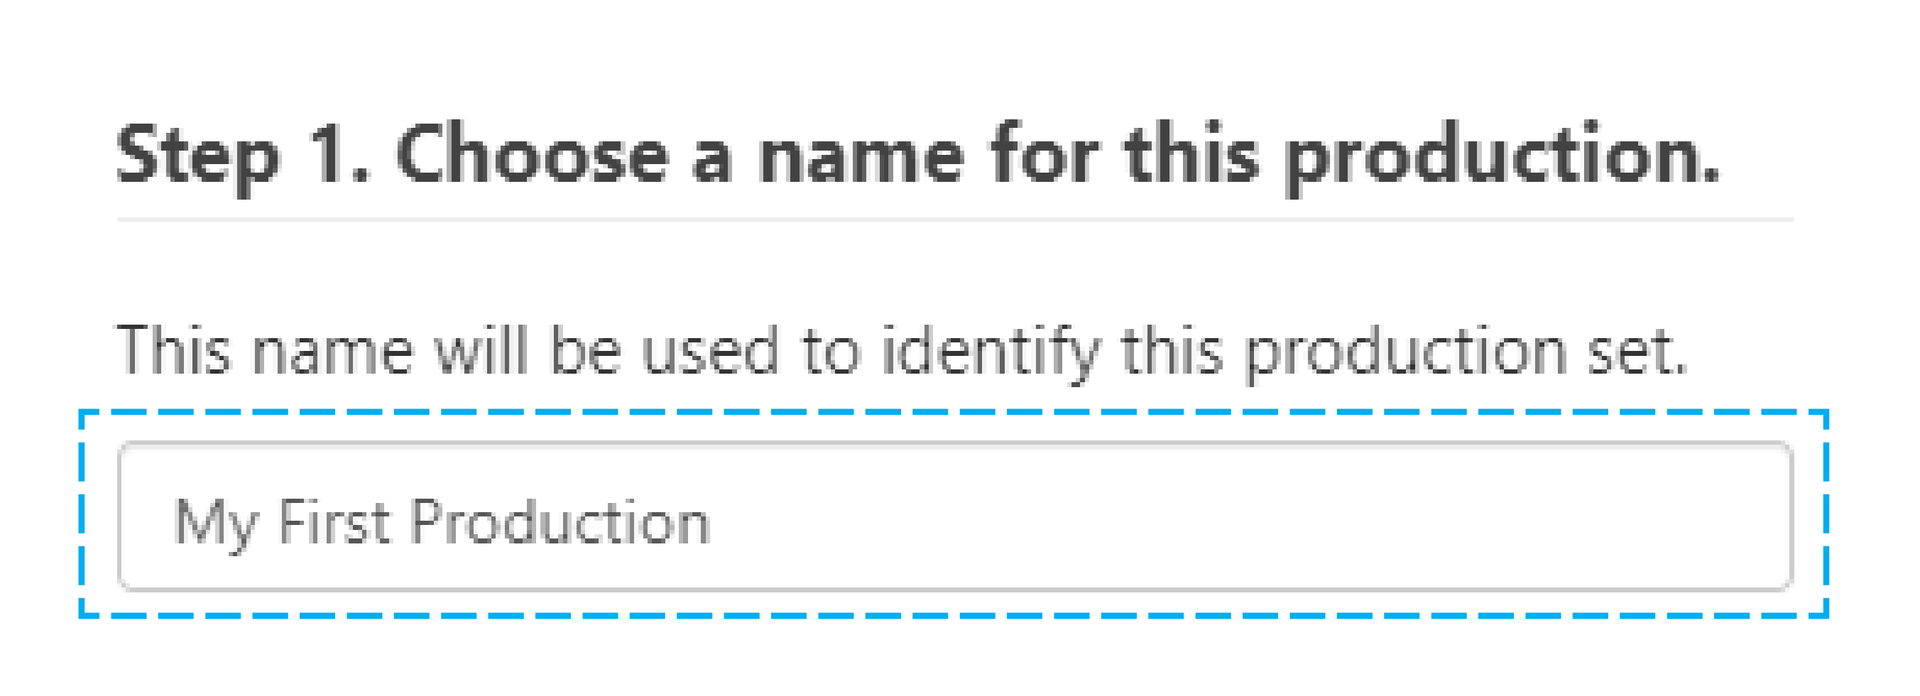
Step 1. Name your production
Step 2. Choose the files for your production
- Select tags/saved searches to include the files that they are attached to/their current search results. Select then check their “inverted” checkbox to omit their files.
- Choose how you would like previously produced to be handled
- To include all files in your case in the production don’t make any selections.
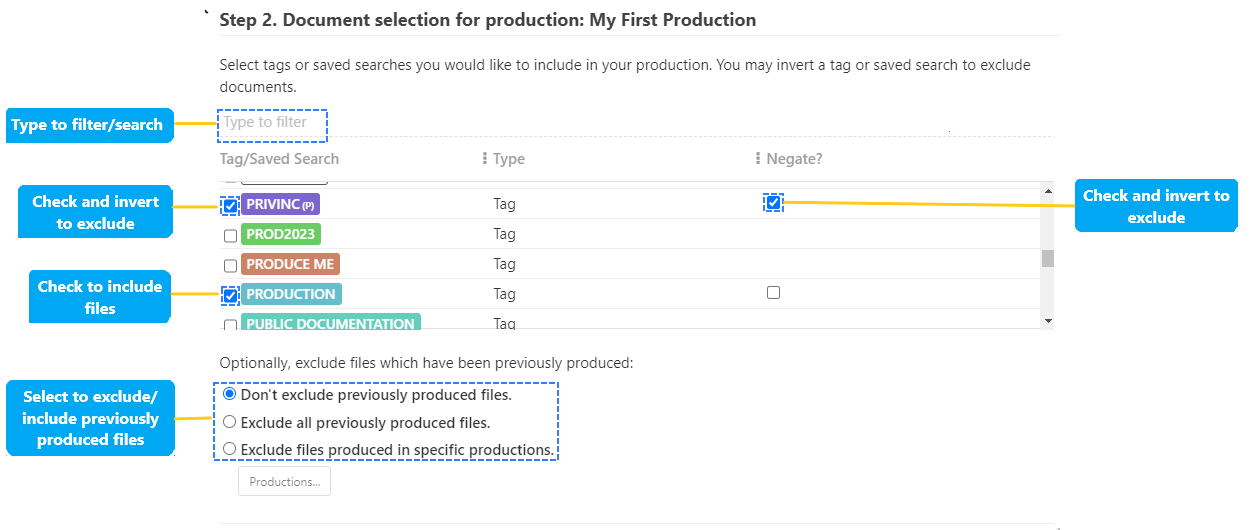
Learn more about tagging and inverted tags here.
Step 3. Choose an output format for your production
Choose a production format. You will be given further options based on each choice - select one on each row:
- Load file based formats, With the natives of all files and no images. Alternatively, with images as TIFFs, JPEGs or PDF documents and optionally natives of all files.
- Non-load file formats with documents converted into PDFs options include: as a single large document, one PDF per page, one PDF per document, one PDF per family
- As purely native productions with a flat directory structure
If it is a load file format, select a Control Parameter profile to use
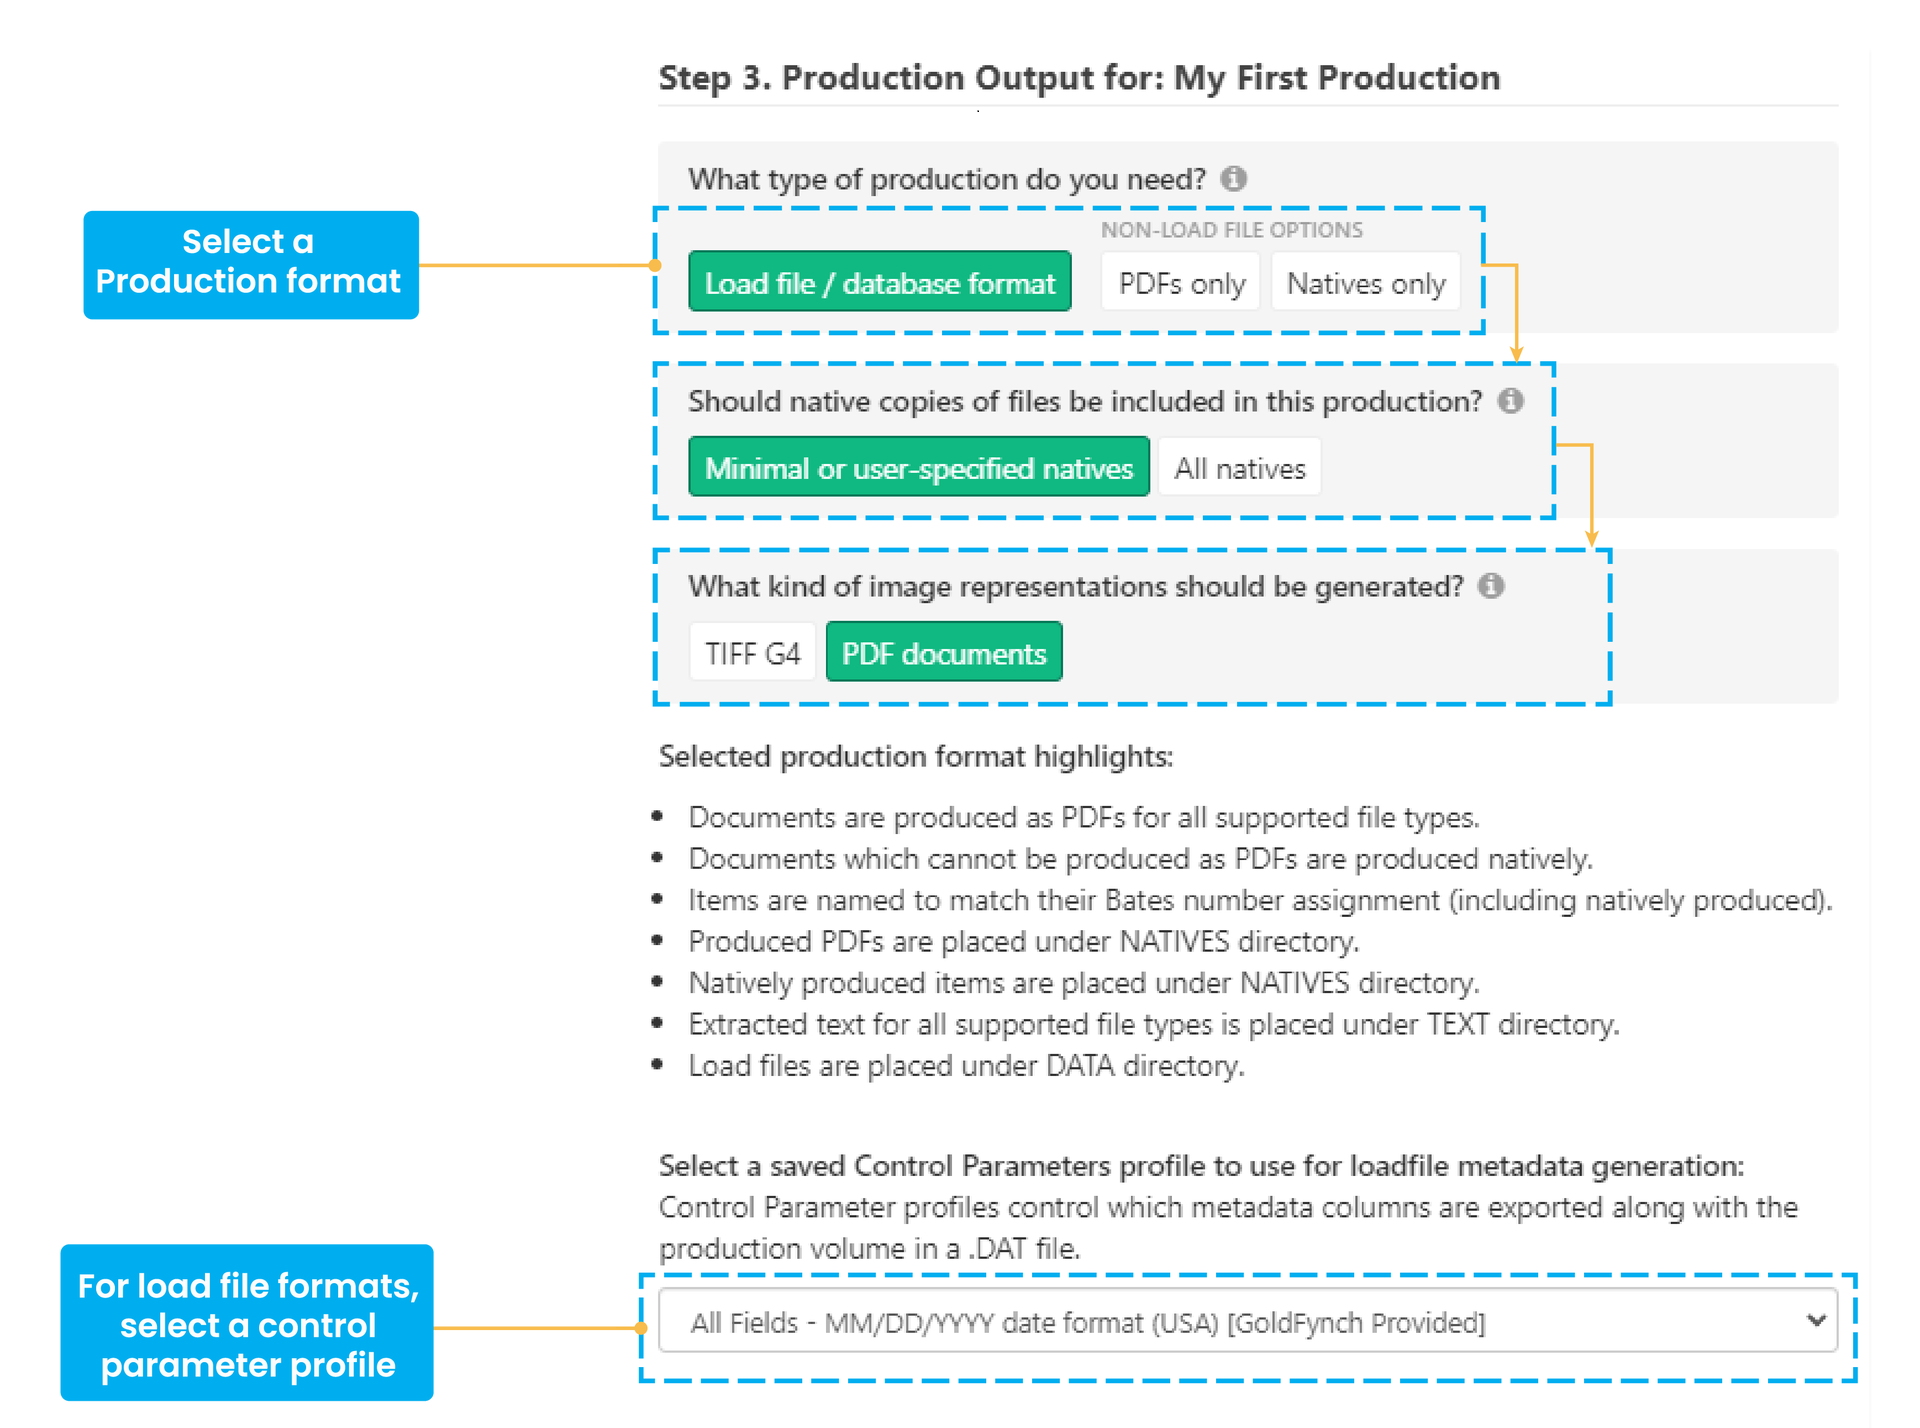
Learn more about formatting productions, and choosing between native or PDF-formatted productions.
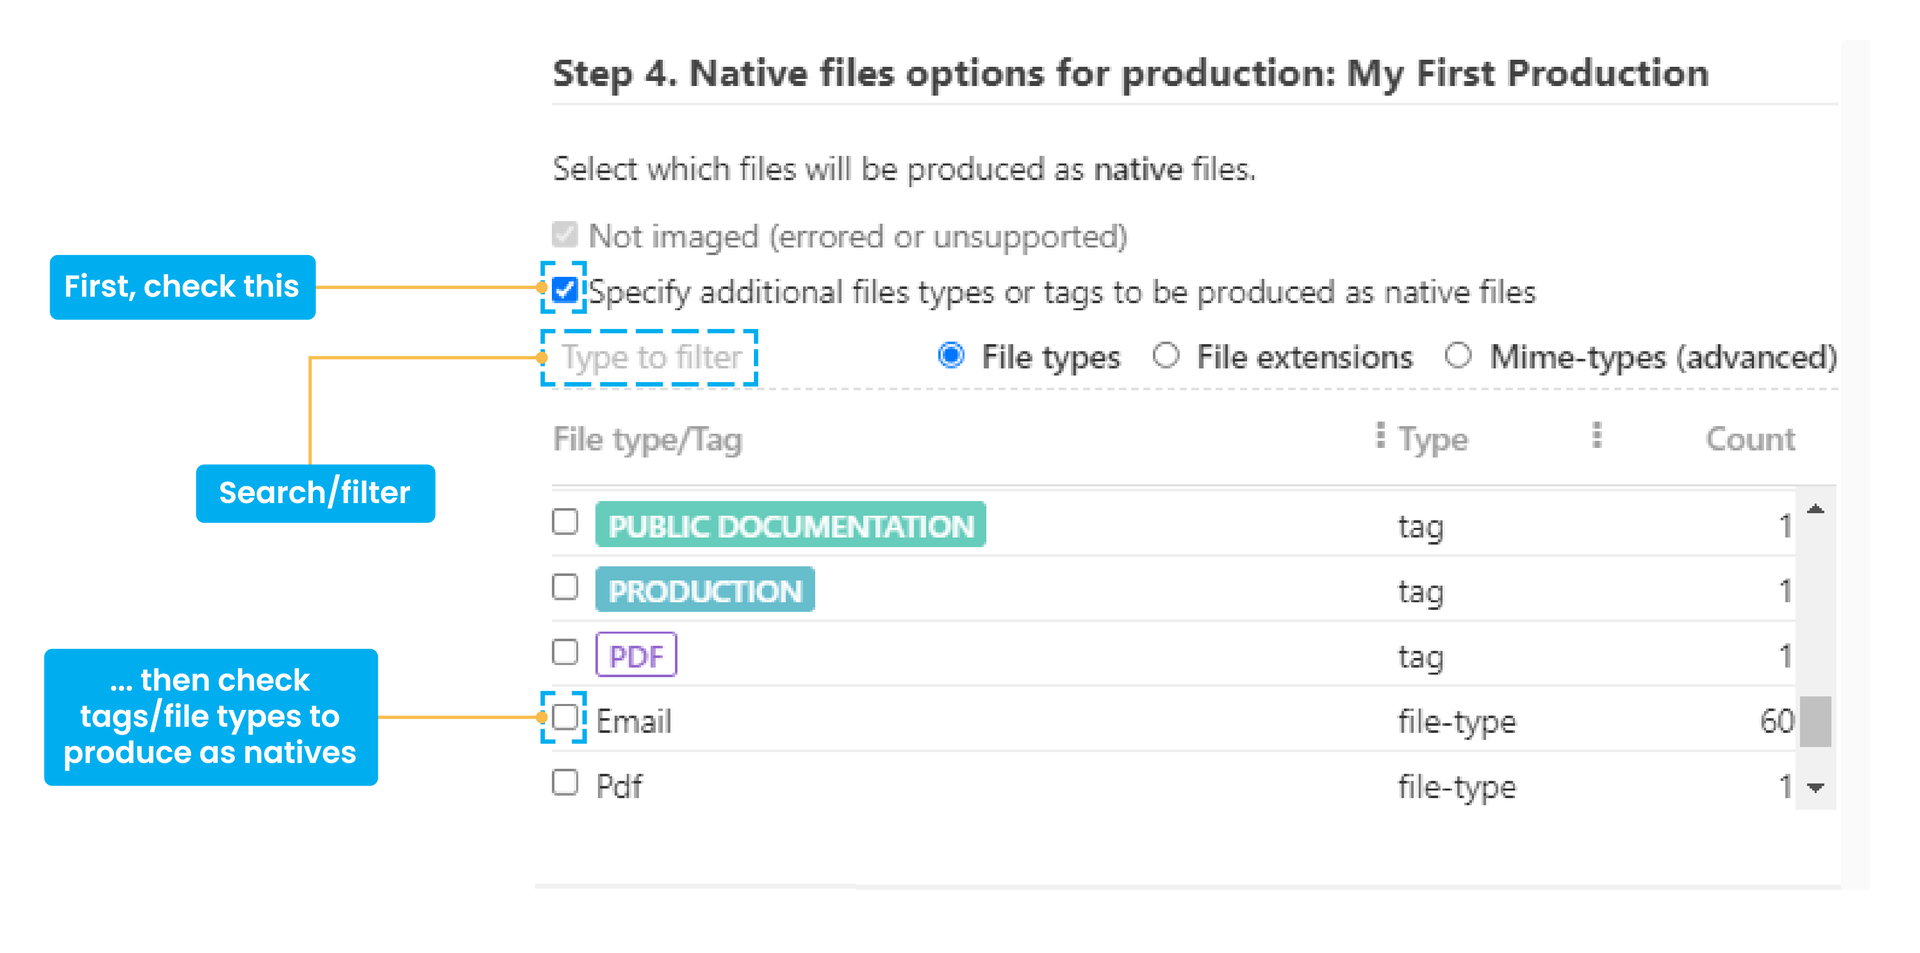
Step 4. Choose file formats to be produce entirely in their native format (Optional)
- Check the ‘Specify additional file types or tags to be produced as native files’ box
- select the file types/tags if you want specific types of files/tags to be included as natives
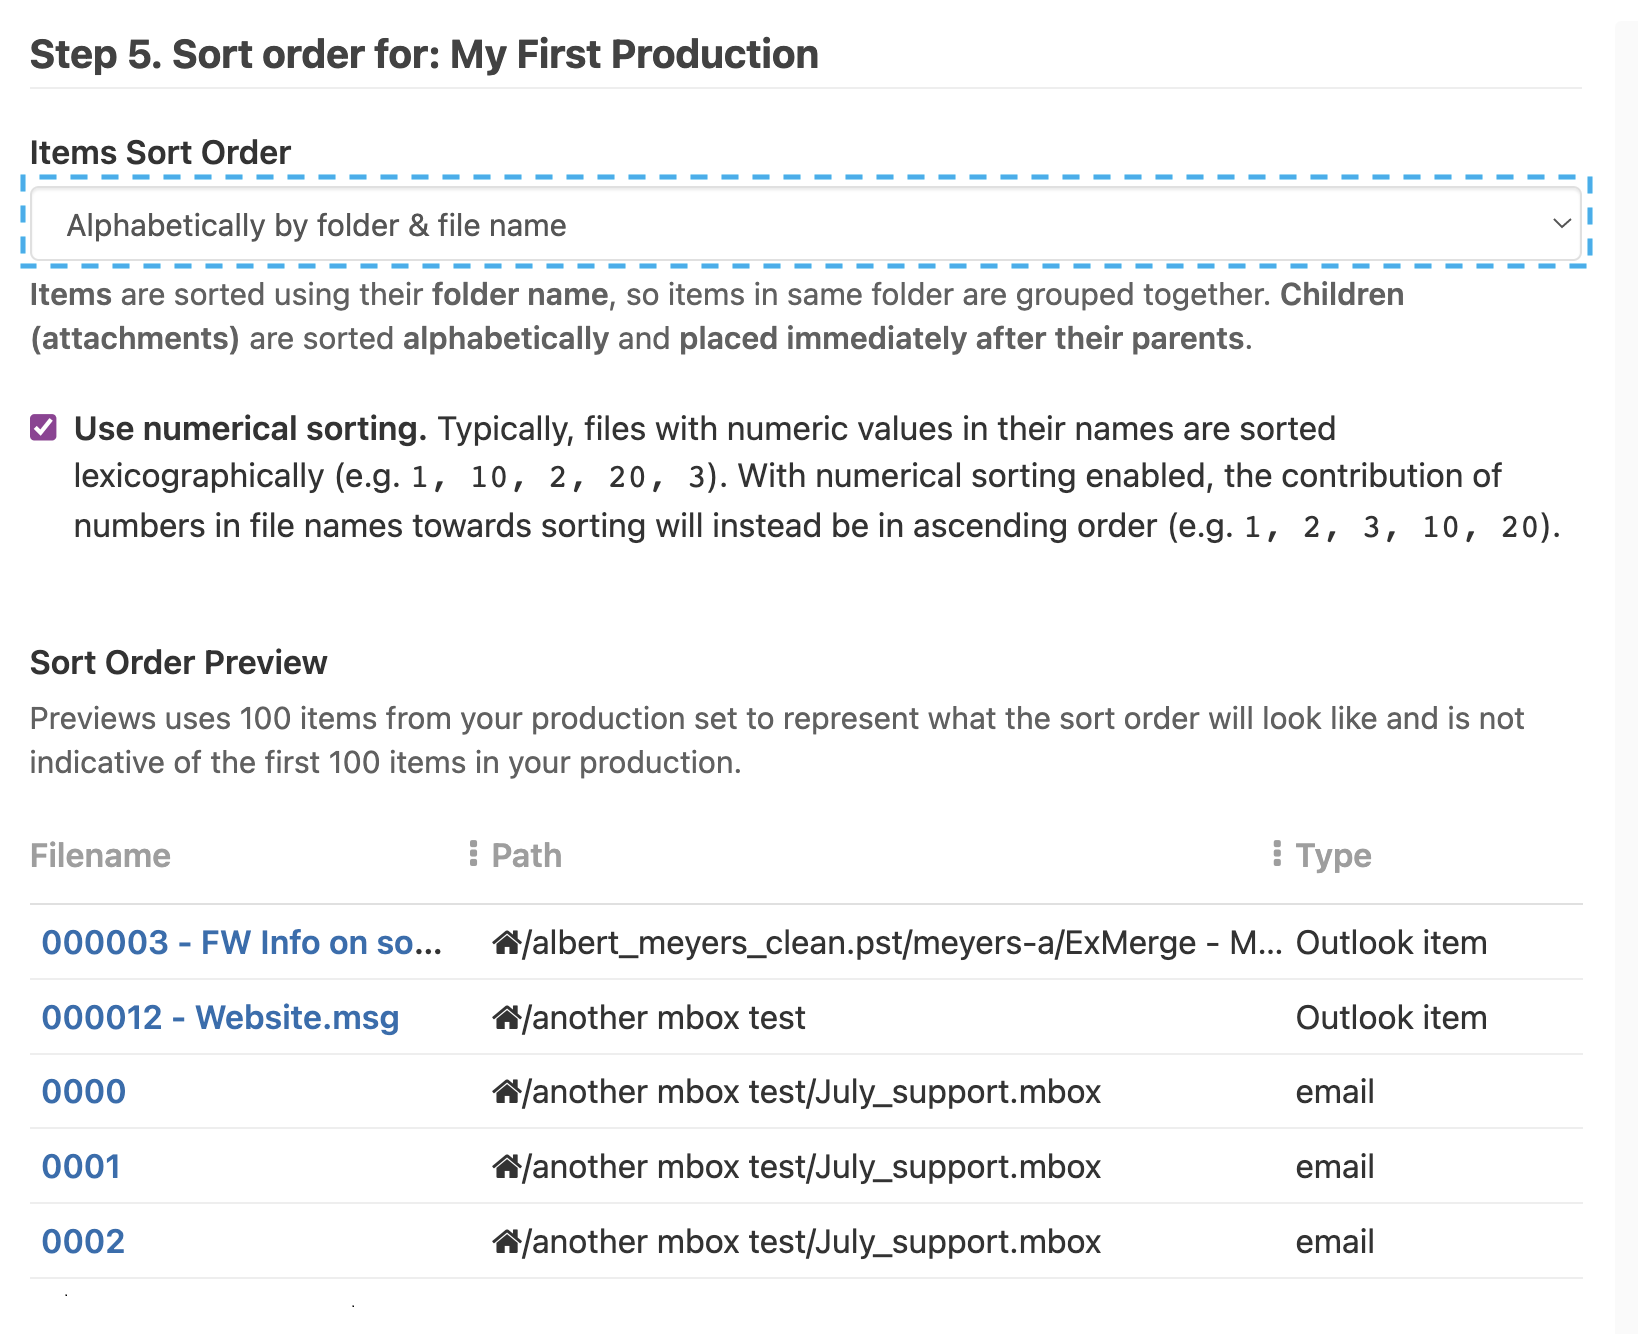
Step 5. Choose how you want files in the production to be sorted
- Choose a sort order from the drop-down menu
- Check the checkbox to set how numbers contribute to the sort order
Step 6. Select where on each page stamps should be placed
- To add Bates numbering to every page of your files, choose a region of the pages to be stamped using the drop-down against the ‘Bates-Stamp’ row
- You can stamp files that have specific tags and optionally edit the text that is stamped on them
- To stamp every page of every files with a specific text you can use the ‘+Custom Stamp’ option
- You can add margin space if your files have existing content in their margins
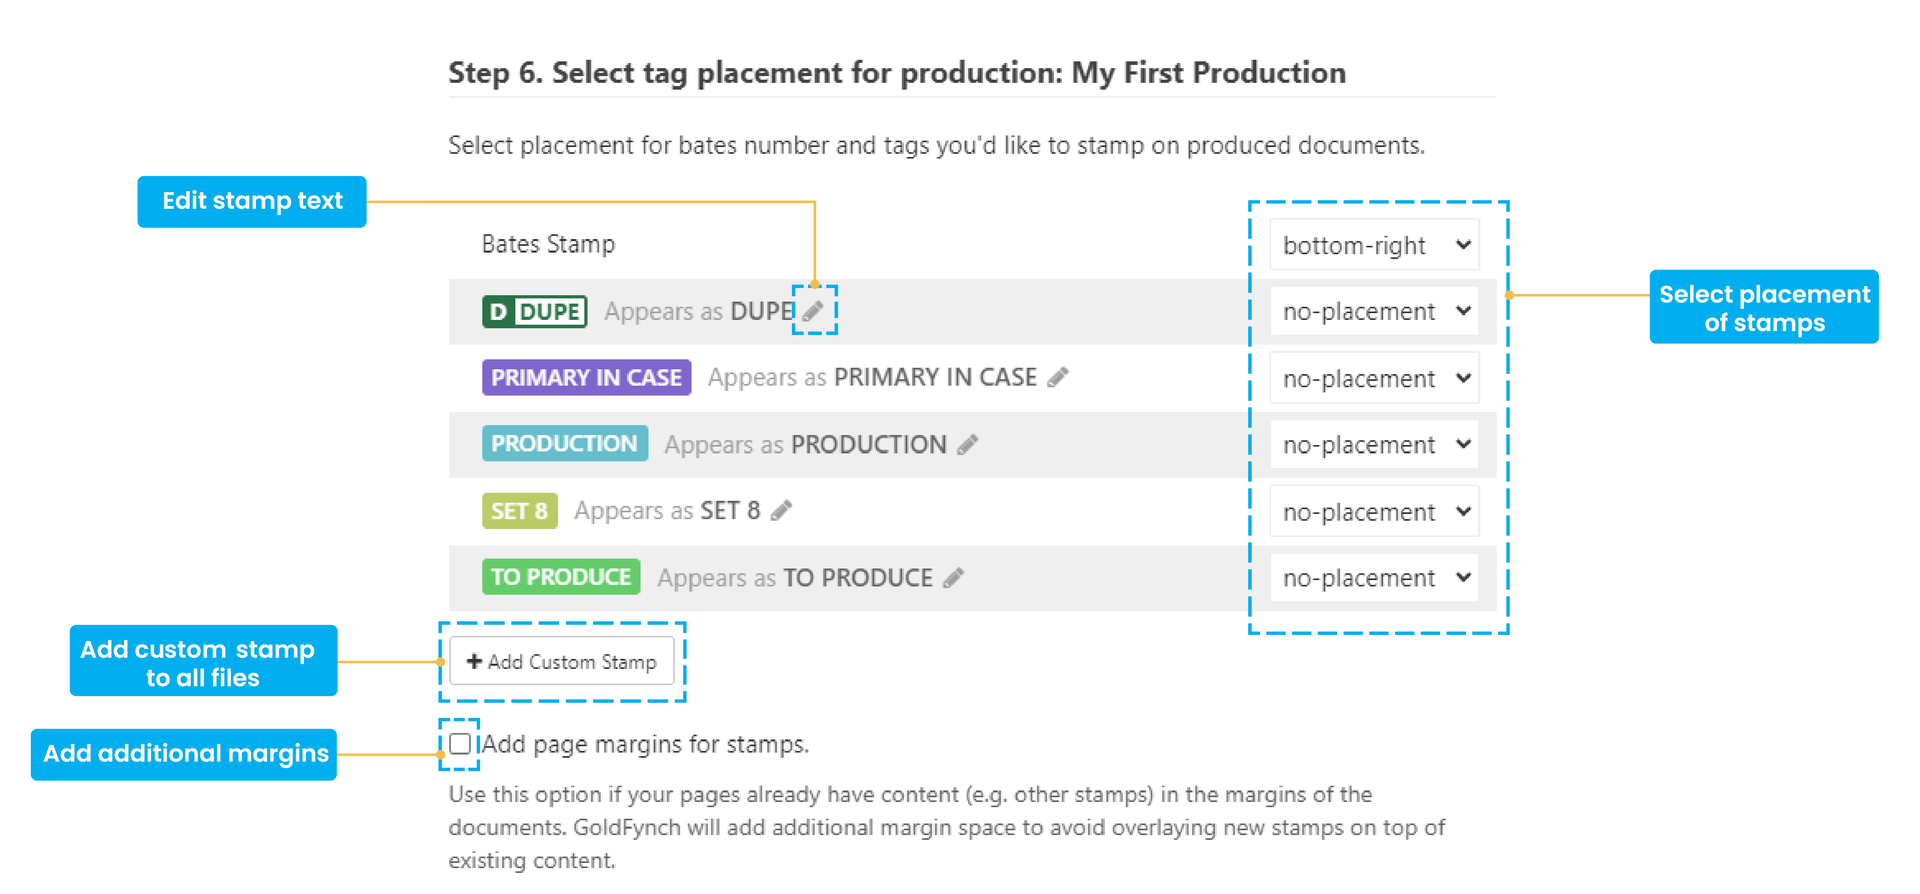
Learn more about document stamping
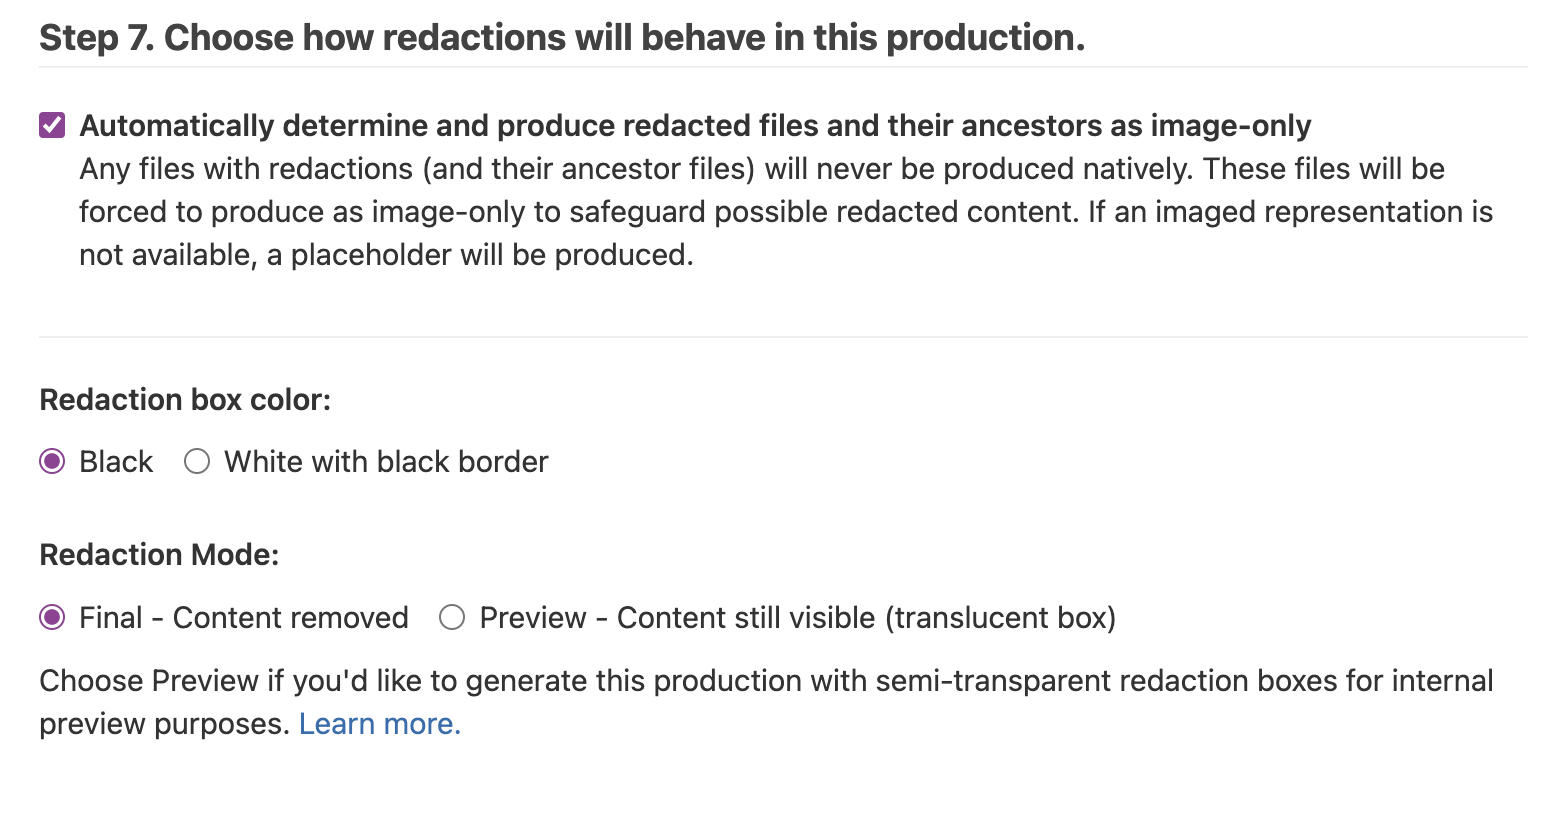
Step 7. Choose how redactions will behave in this production.
The redactions placed on files in the Document Viewer will be applied to produced files based on these settings.
- Check the checkbox to force redacted files and their ancestor/parent files that are included to be included only in their image form (and not as natives) - this ensures that redacted content cannot be extracted and viewed
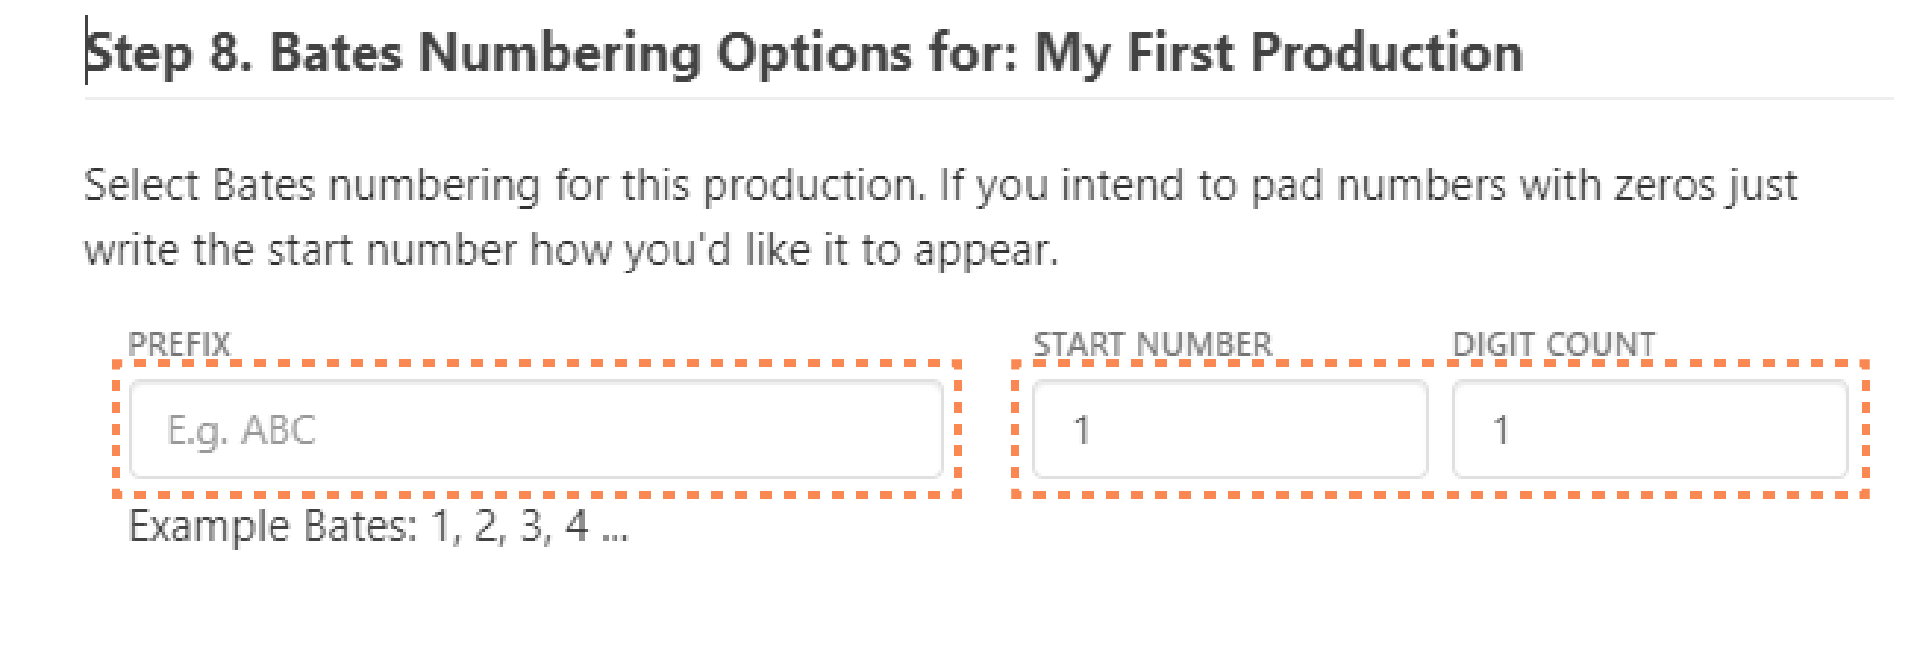
Step 8. Bates Numbering Options
- Add a prefix, starting number and number of digits if required
- If you do not enter any values the Bates numbers will start from 1 without any padded zeroes.
- If you’ve chosen to use Bates Stamping (i.e. selected a location for Bates stamps in Step 6) your produced documents will be stamped accorindingly.
- If your files are named based on Bates numbering, they will be named accordingly (see Step 9)
Step 9. File naming options
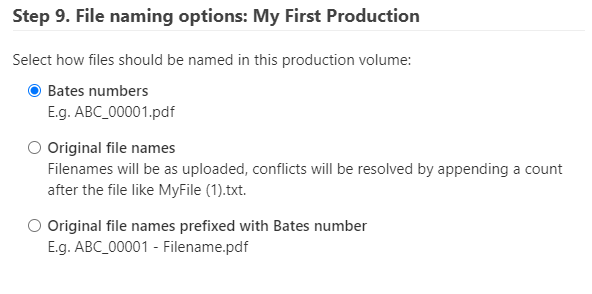
Note that only the non-load file Natives Only or Document-based PDFs Only output formats allow you to choose original file names or original file name prefixed with Bates numbers - otherwise, your files will be assigned Bates numbers and named according to them (regardless of whether you stamp them with Bates stamps)
Step 10. Review your production
A series of checks will flag files that are commonly undesireable in productions. Such files can be easily viewed and omitted from productions. Some of the checks include:
- Instances of files with redactions being included in their native form (since redacted boxes won’t be present in native versions)
- Instances of privileged files being included in the production
- Parent/ancestor files of redacted and privileged files in the production (even if the redacted/privileged files are not present in the production themselves, since they can be extracted and viewed from the parent files)
- Archives present in the production
- Duplicate files
- Files that have been requested in their native form but which don’t have a native version available to be included
- Unprocessed files
- Files detected to contain malware (placeholders are always used in the place of such files)
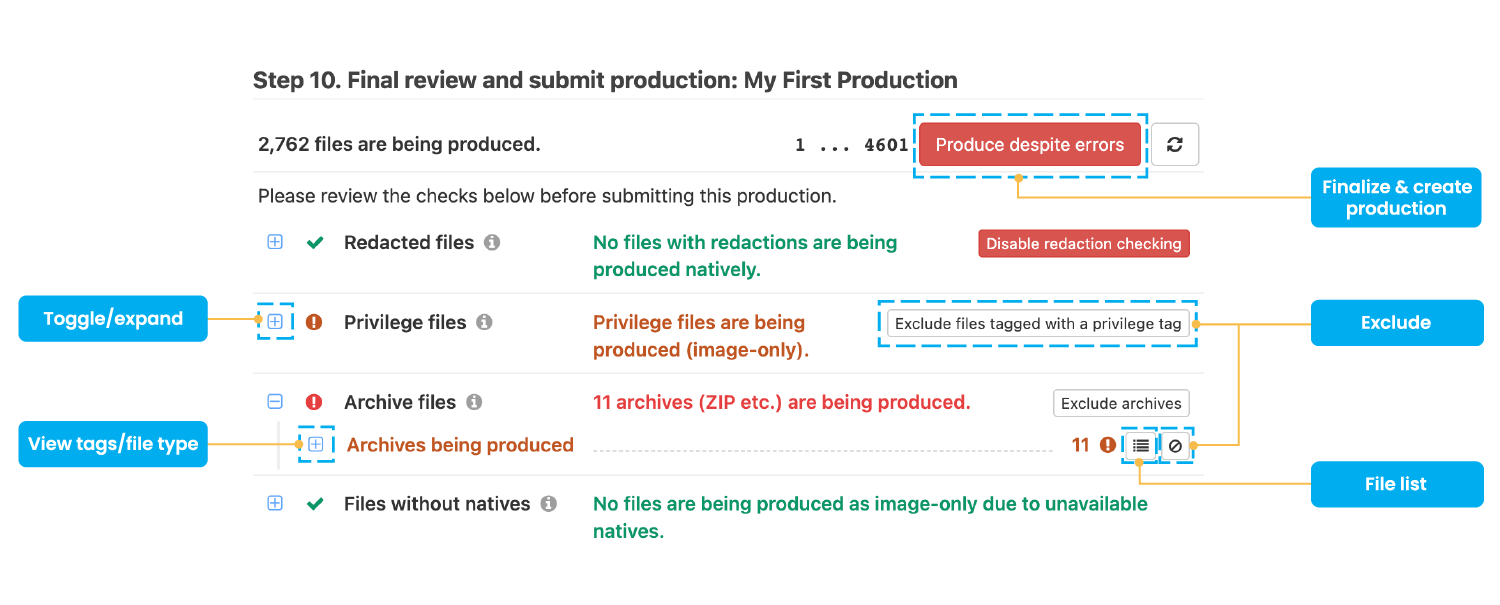
- You can expand each individual section to view a list of files that are flagged
- Click on the ‘Exclude’ button against an individual check to omit all files by that check
- When you’re done reviewing your production, submit it by clicking on the ‘Produce’ button or the ‘Produce despite errors’ button if there are warnings that you choose to ignore
- You can then track the production’s status on the ‘Requested Prodcutions’ tab.
Note: The ‘Exclude’ option can omit files in situations where up to 1000 files are flagged by a single warning. If more than 1000 files are flagged by a single warning and you wish to omit them, you will need to alter the selection of files you made in step 2 of production.
Sharing productions
Share productions easily and securely directly through GoldFynch. You can also check when shared productions were last opened and downloaded. It’s worth noting that GoldFynch does not charge extra for users with whom productions are shared.
To share a production:
- In the ‘Productions’ view, click on the ‘Requested Productions’ tab
- Click on the ‘Share’ icon against the production you want to share
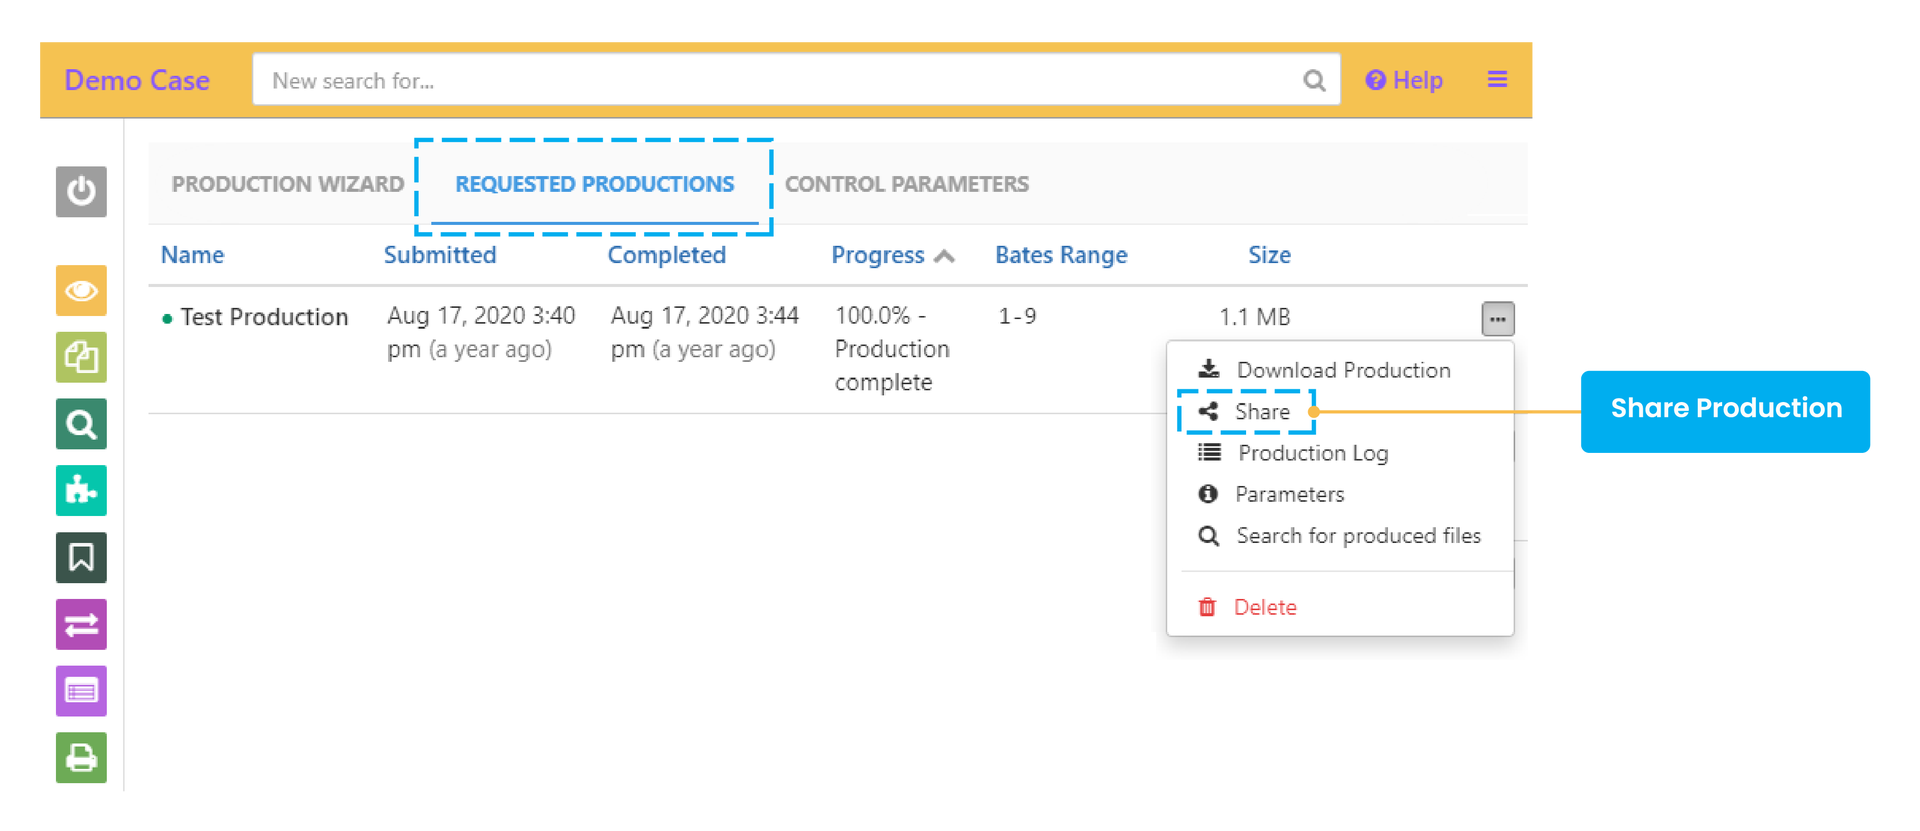
then…
Sharing via email
- Enter the recipient’s email address
- Check the ‘Automatically email invite to user’ box
- Click on the ‘Share’ button
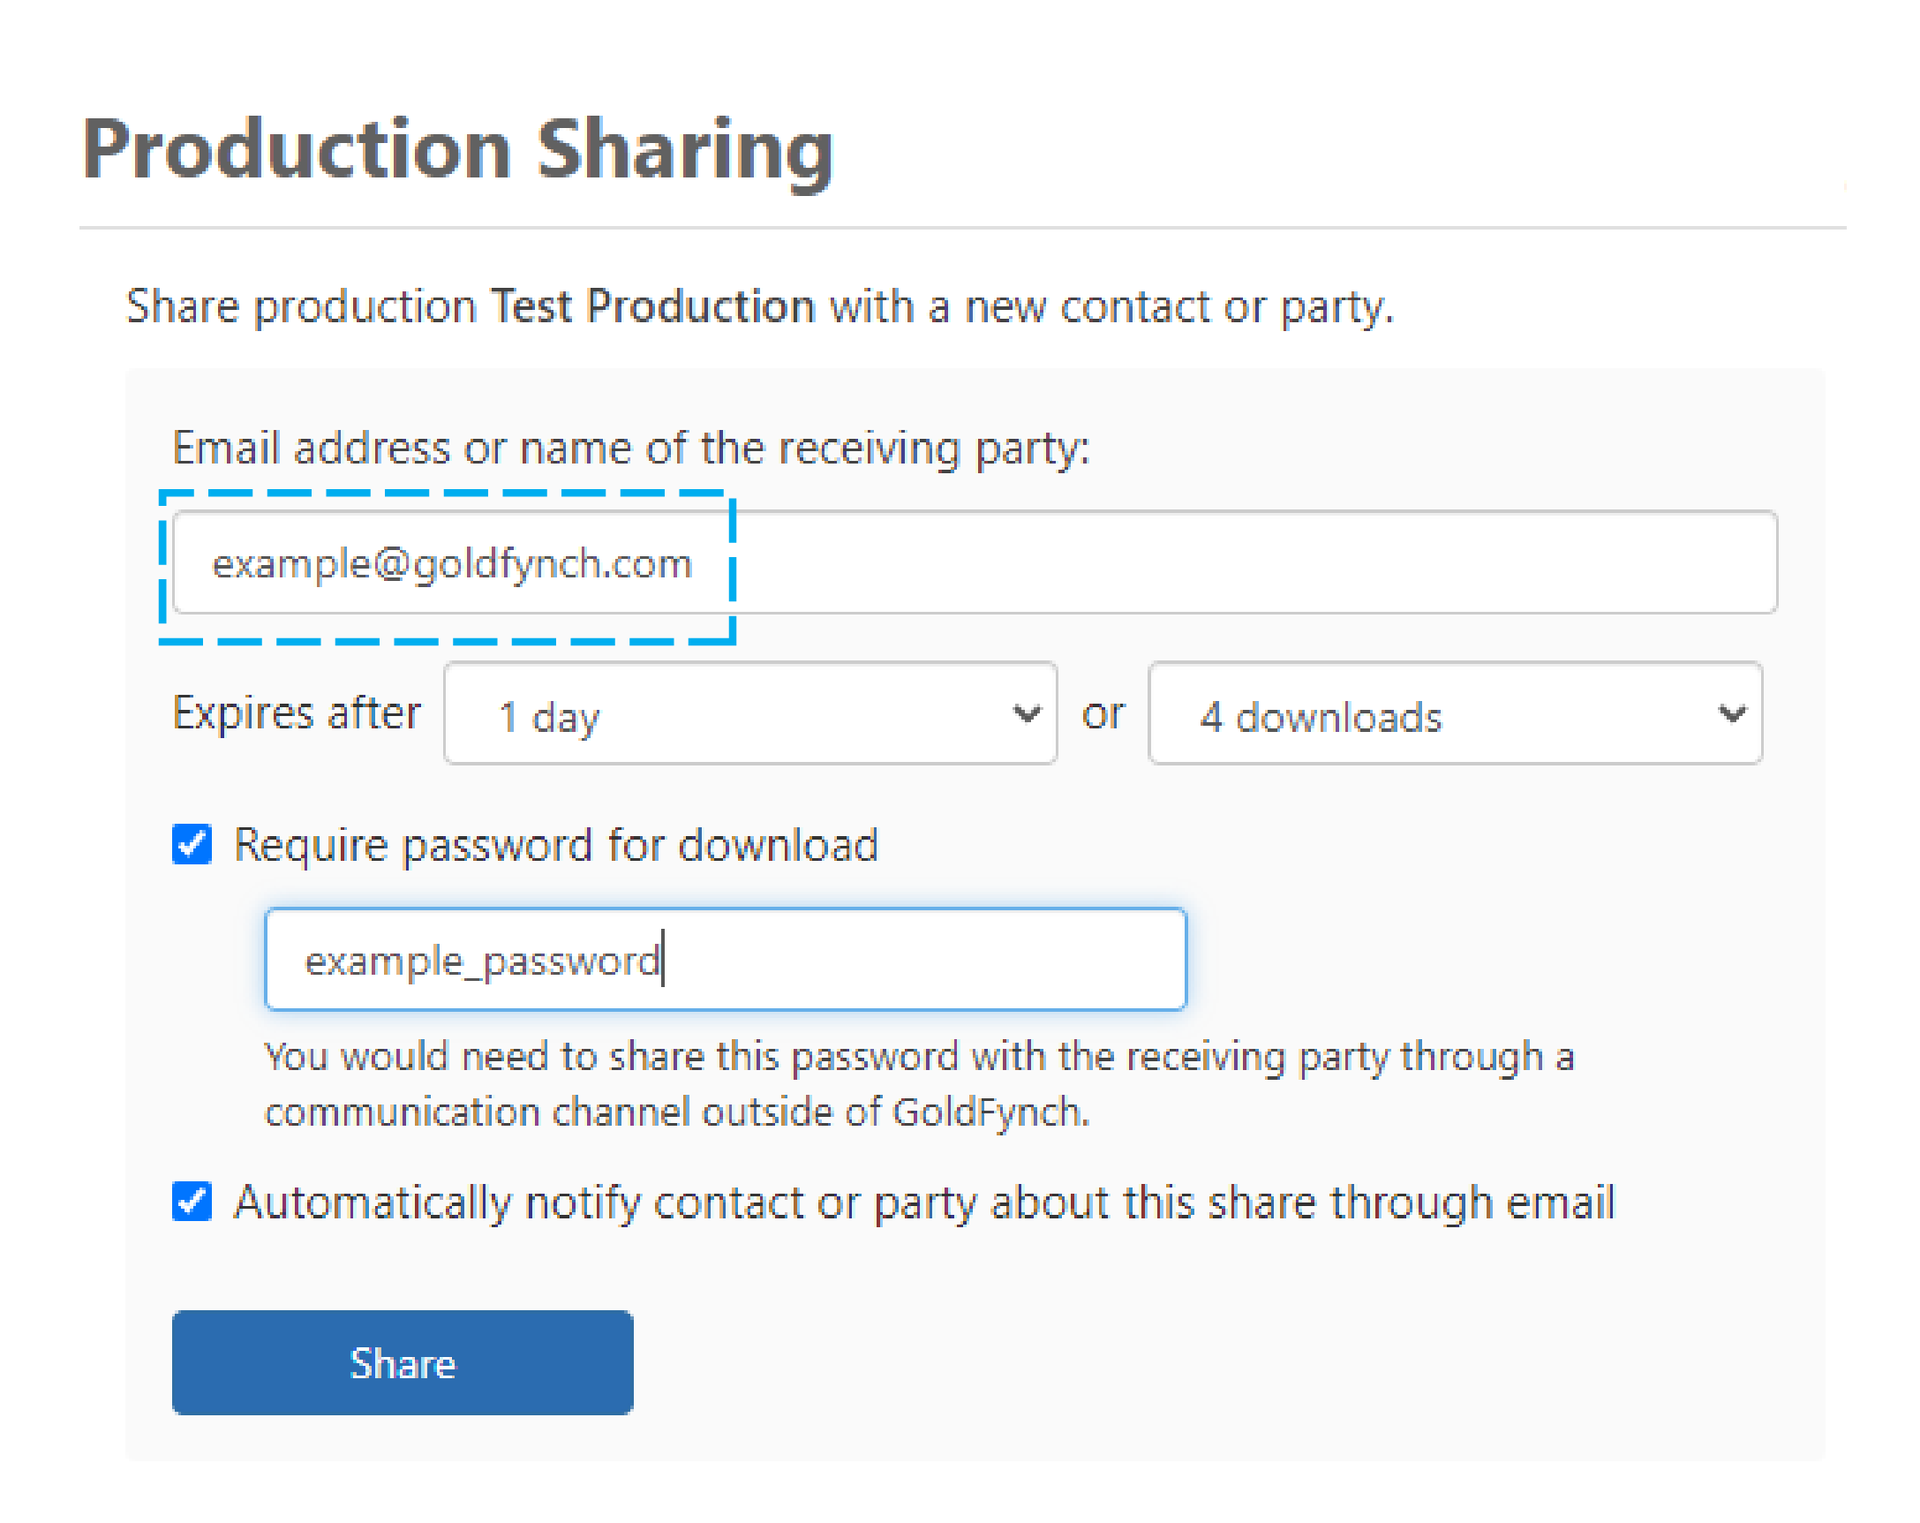
or…
Sharing via link
- Enter the recipient’s name
- Uncheck the ‘Automatically email invite to user’ checkbox
- Click on the ‘Share’ button
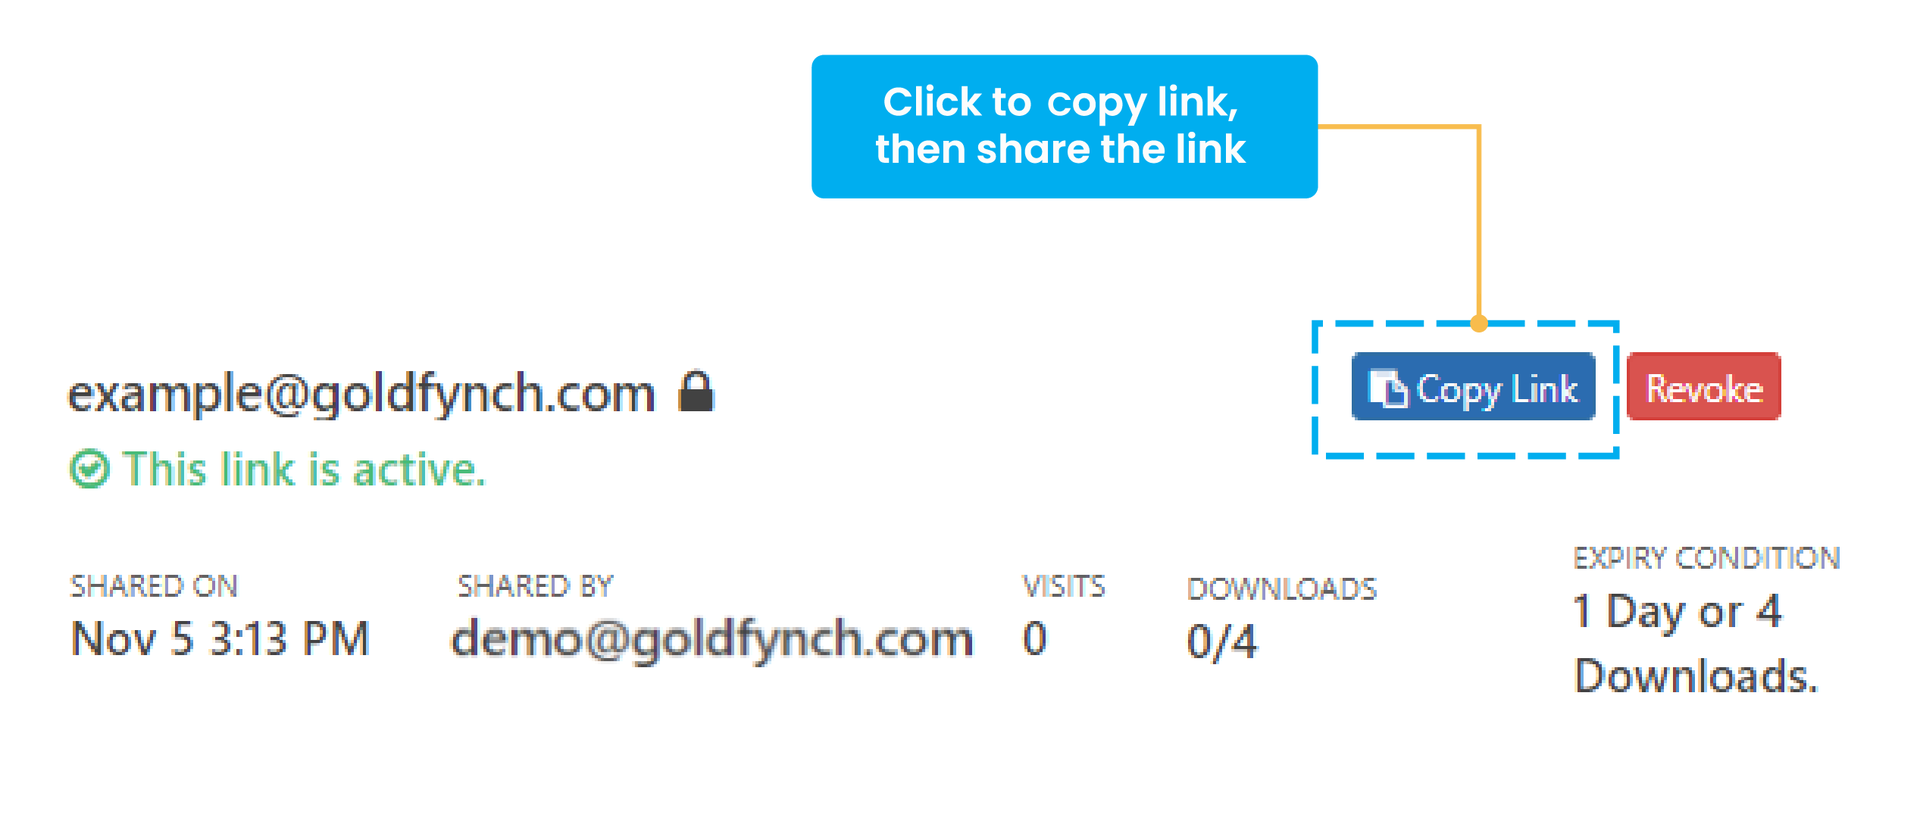
- Click on the ‘Copy Link’ button against that person’s name
- The link will be copied to your clipboard. Paste it and send it to them. They will be prompted to either download the file or import the production into a new GoldFynch case
Learn more about sharing productions here.
Downloading productions
To download your productions:
- Navigate to the ‘Productions’ view
- Click on the ‘Request Productions’ tab
- Click on the download icon against a production. The download should automatically begin
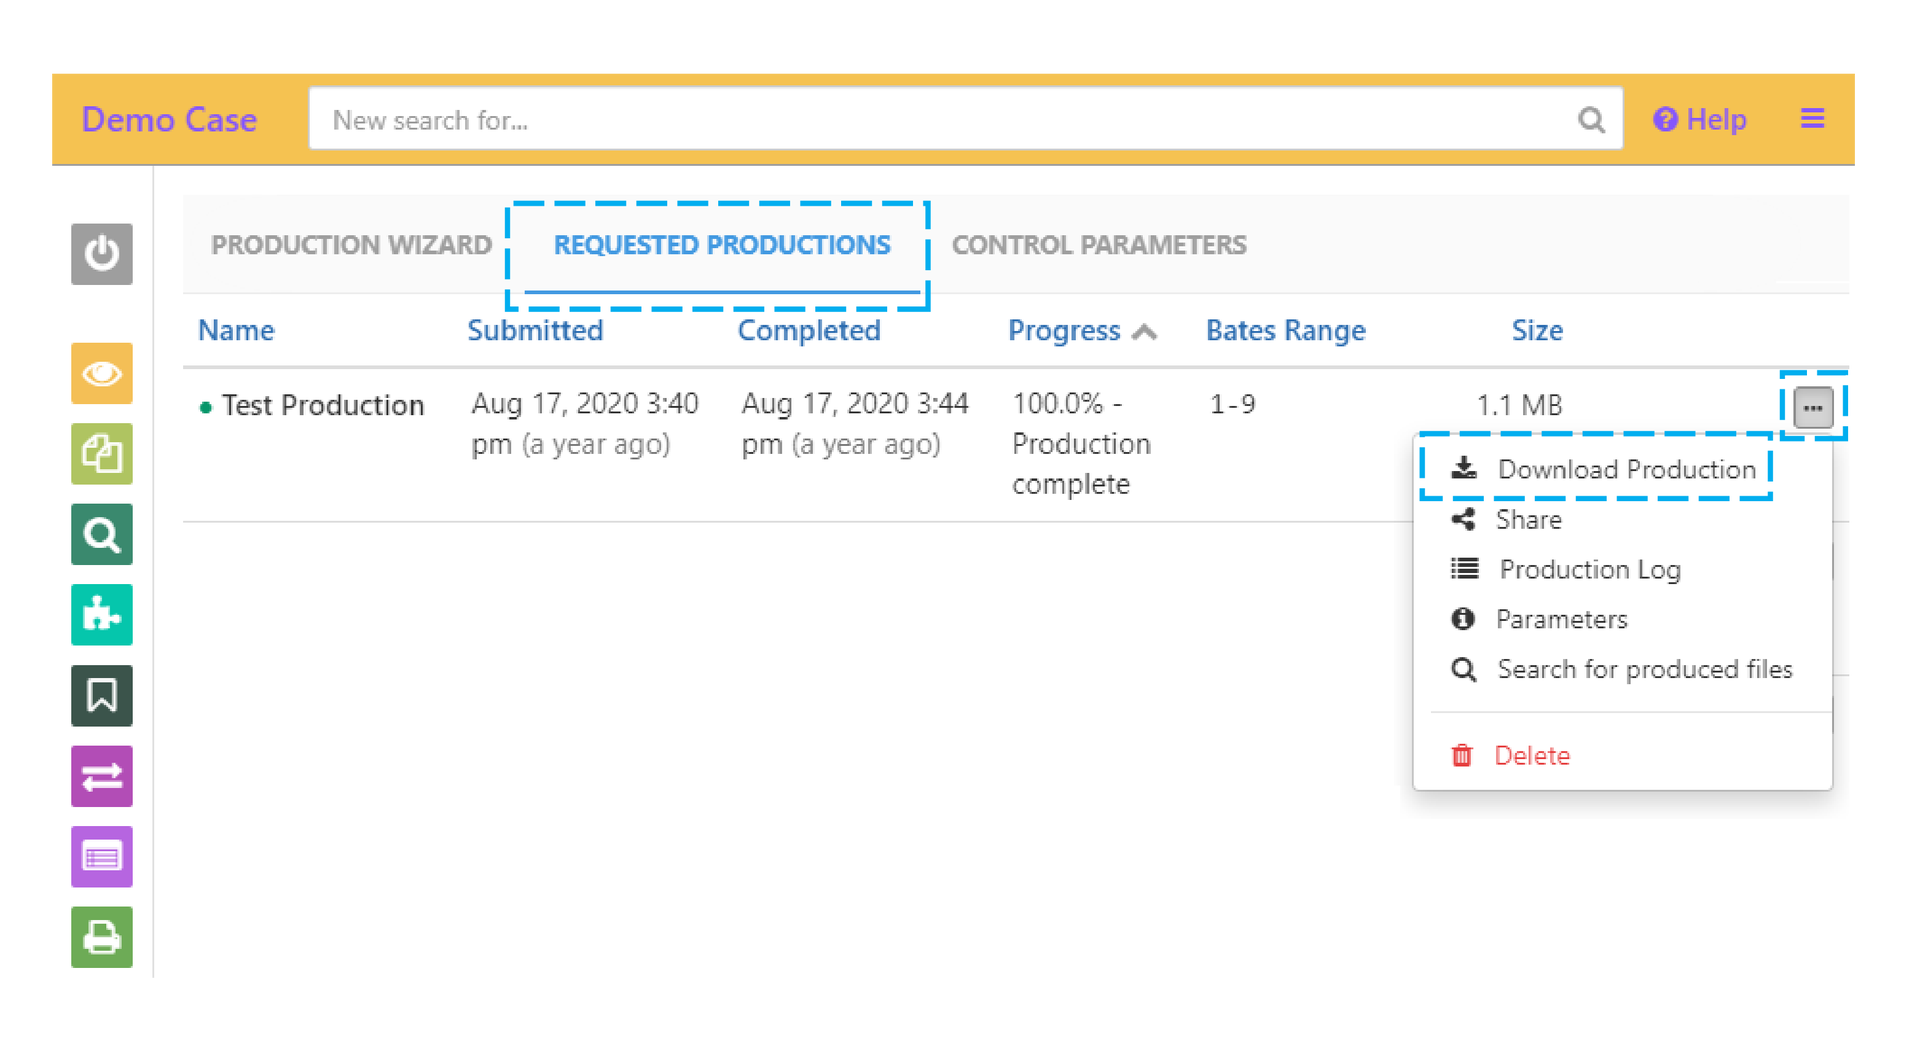
Note: You can download just the load file of a production by clicking on the ‘…’ button and the ‘Download Loadfile’ button
Production logs
Production logs are useful for quickly cross-referencing files in your productions.
- Navigate to the ‘Productions’ view
- Click on the ‘Request Productions’ tab
- Click on the production log icon
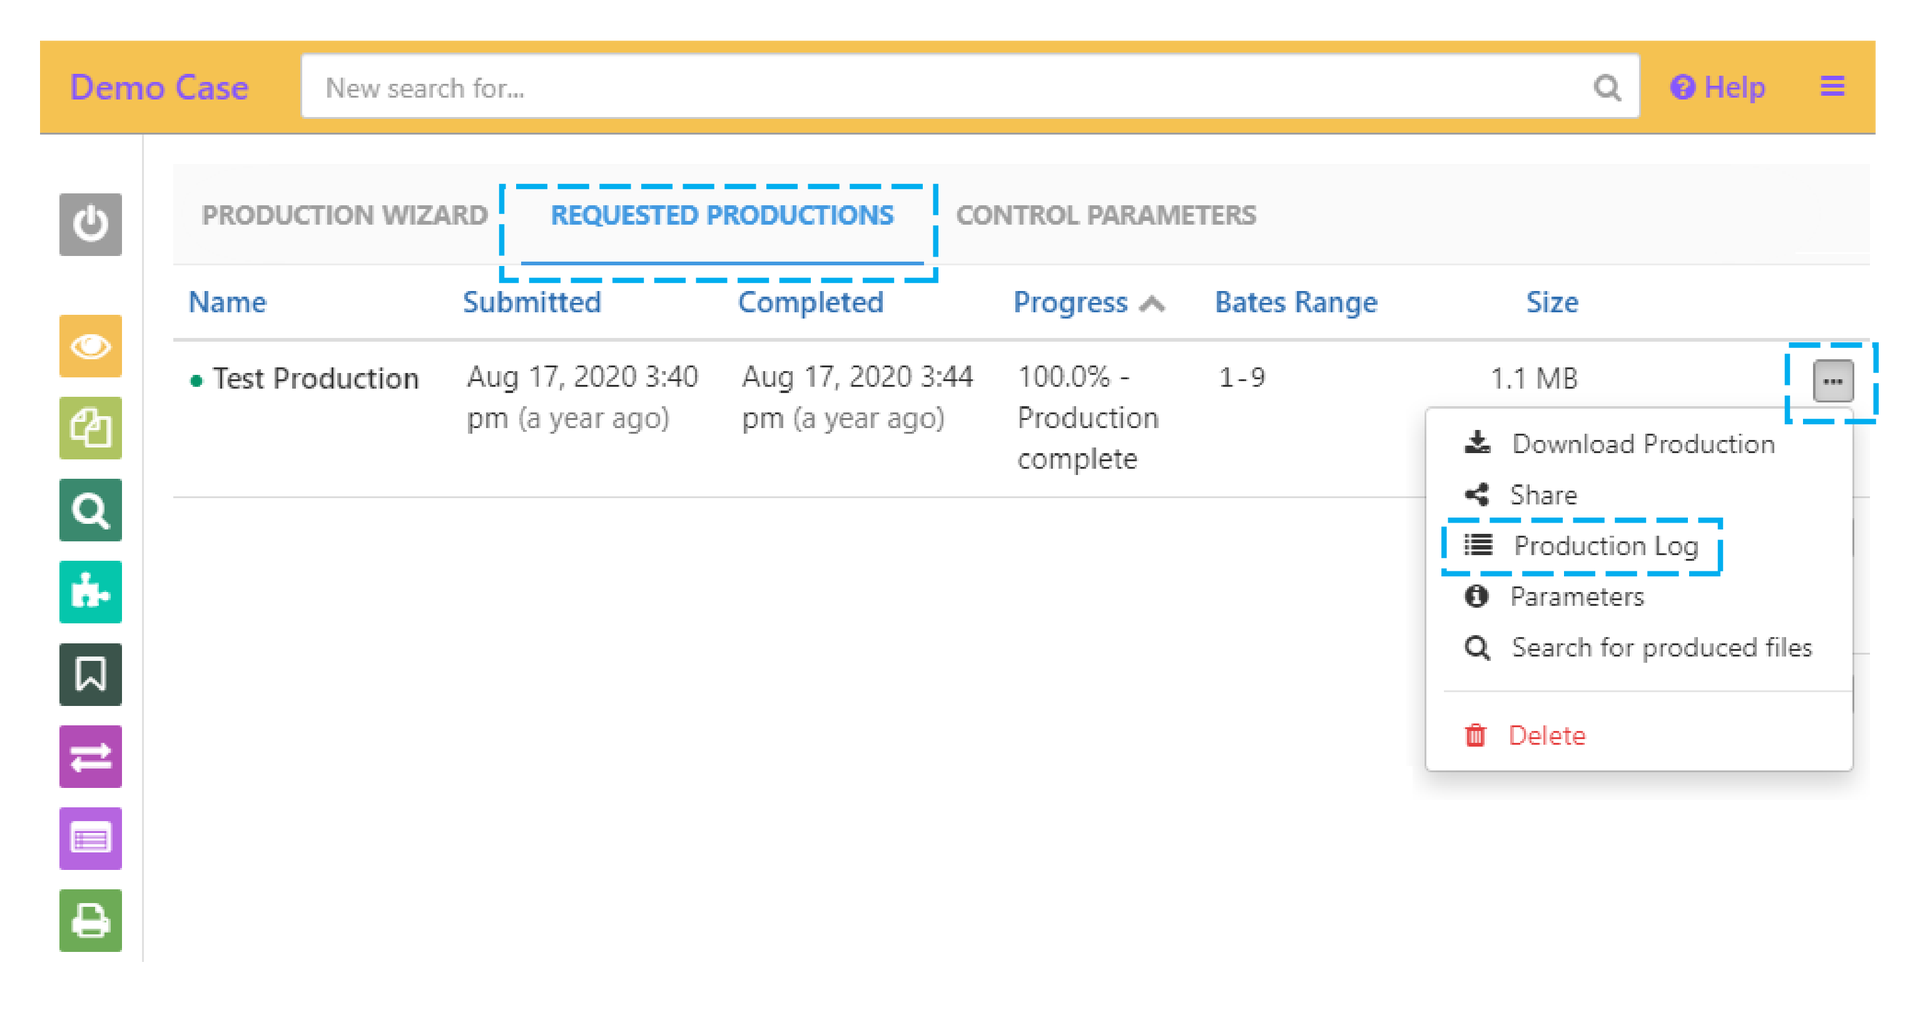
- Download the production log by clicking on the ‘Download Log’ button
- Search for files in the log by typing into the filter box
- Filter by Deleted, Native and Redaction status by checking the respective check boxes
- Open files in the Document Viewer by clicking on a file’s name
- Navigate to a file’s path in your case by clicking on the text under the ‘Path’ field
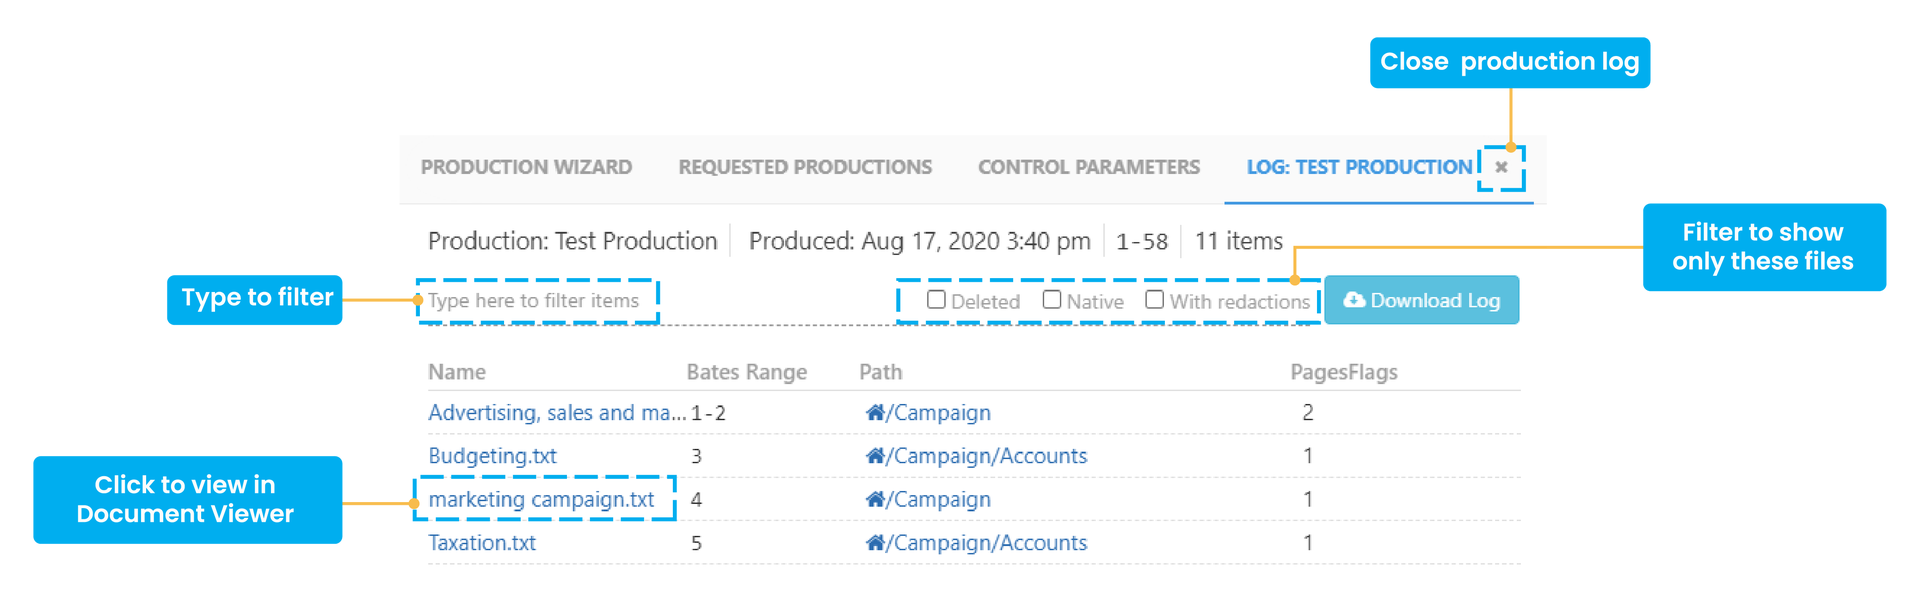
Learn more about Production logs here.
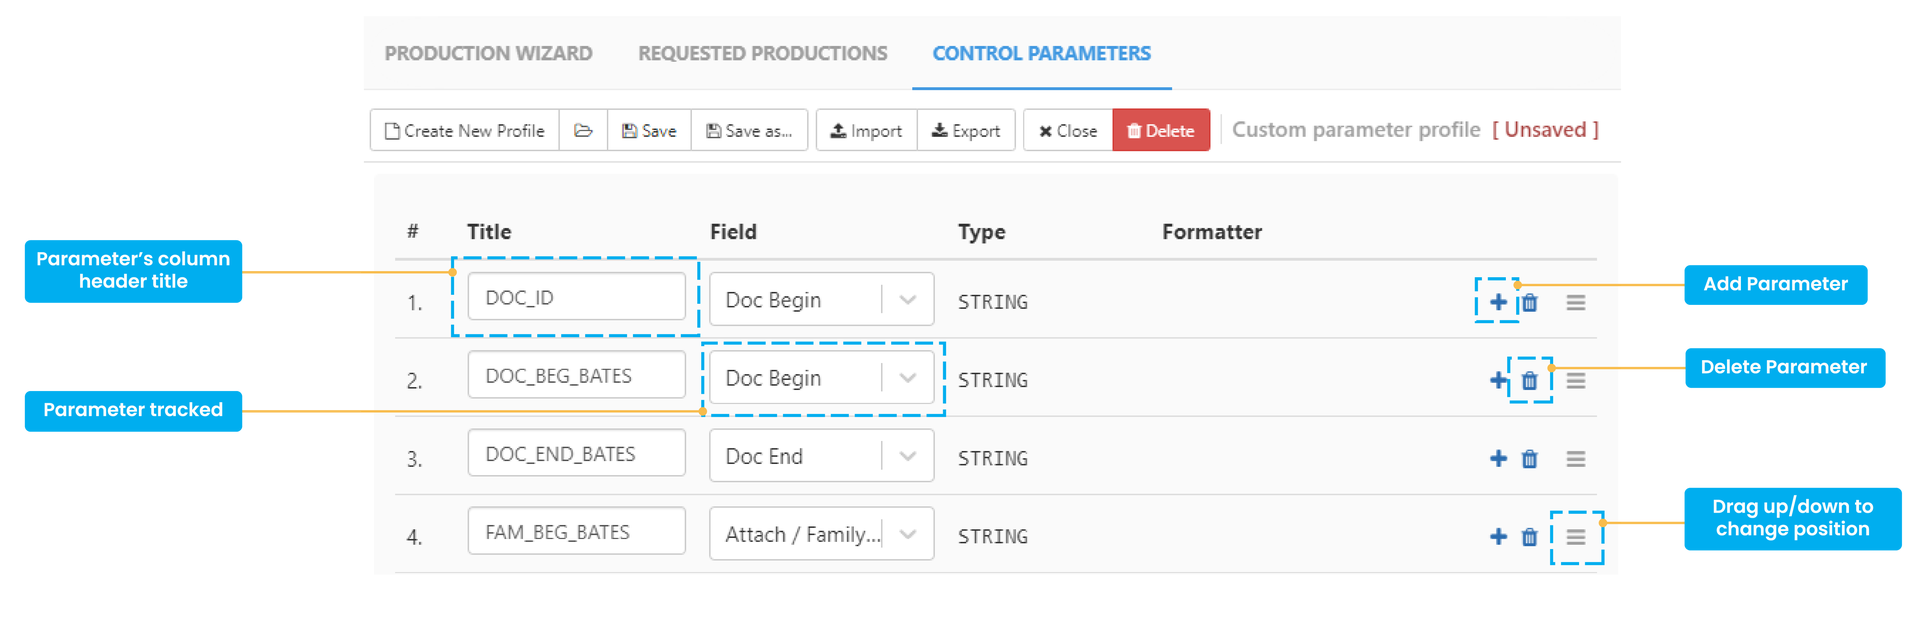
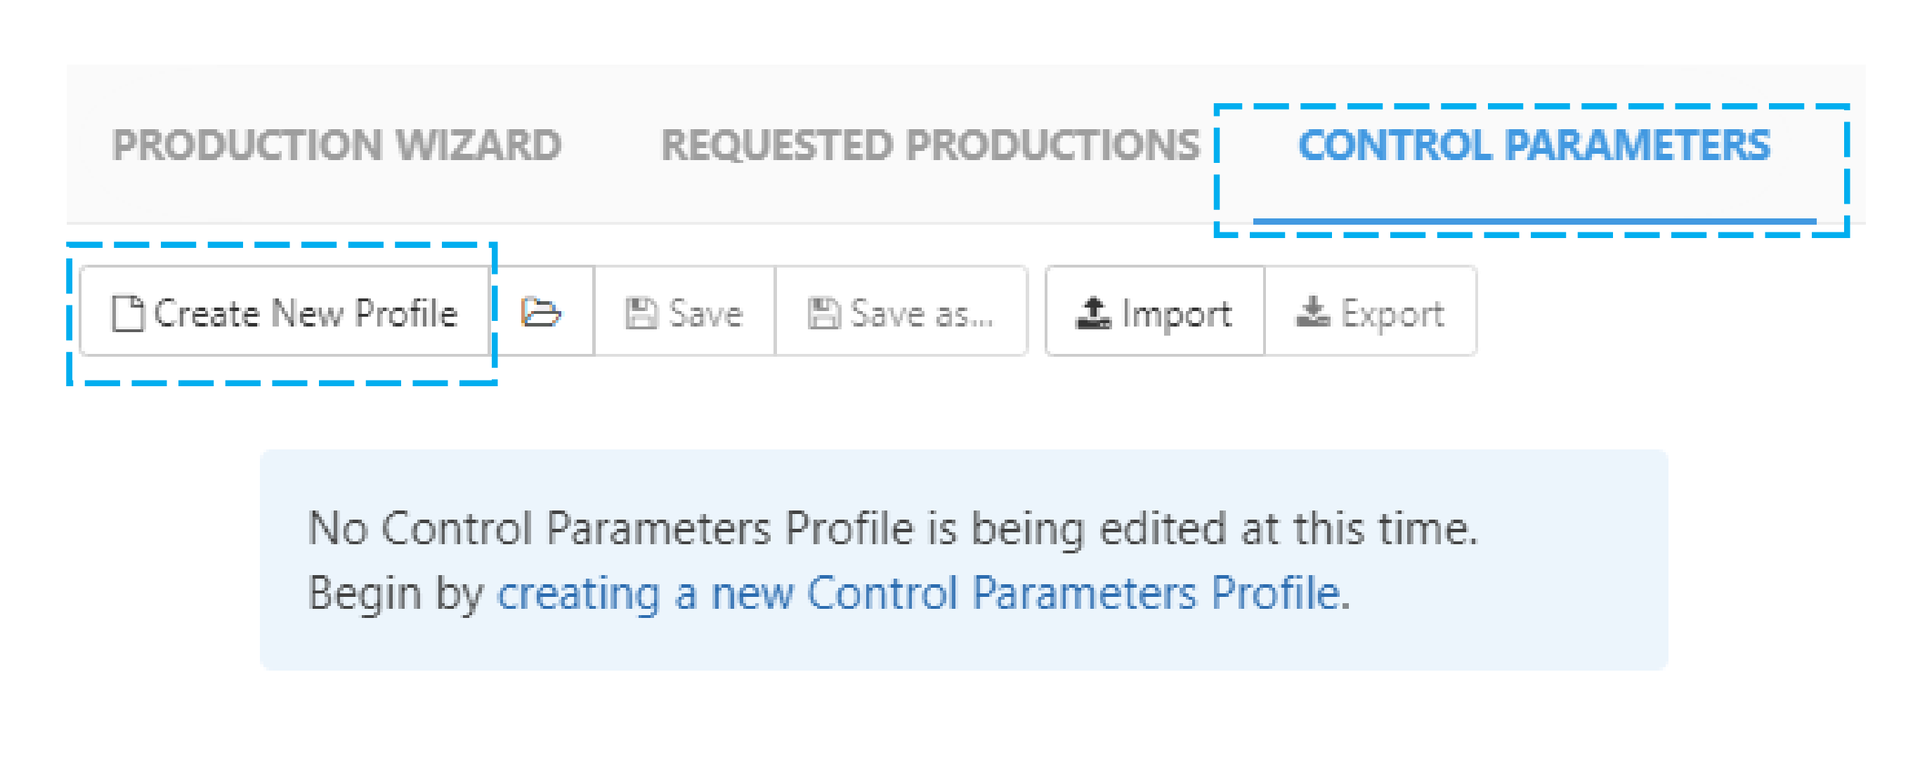
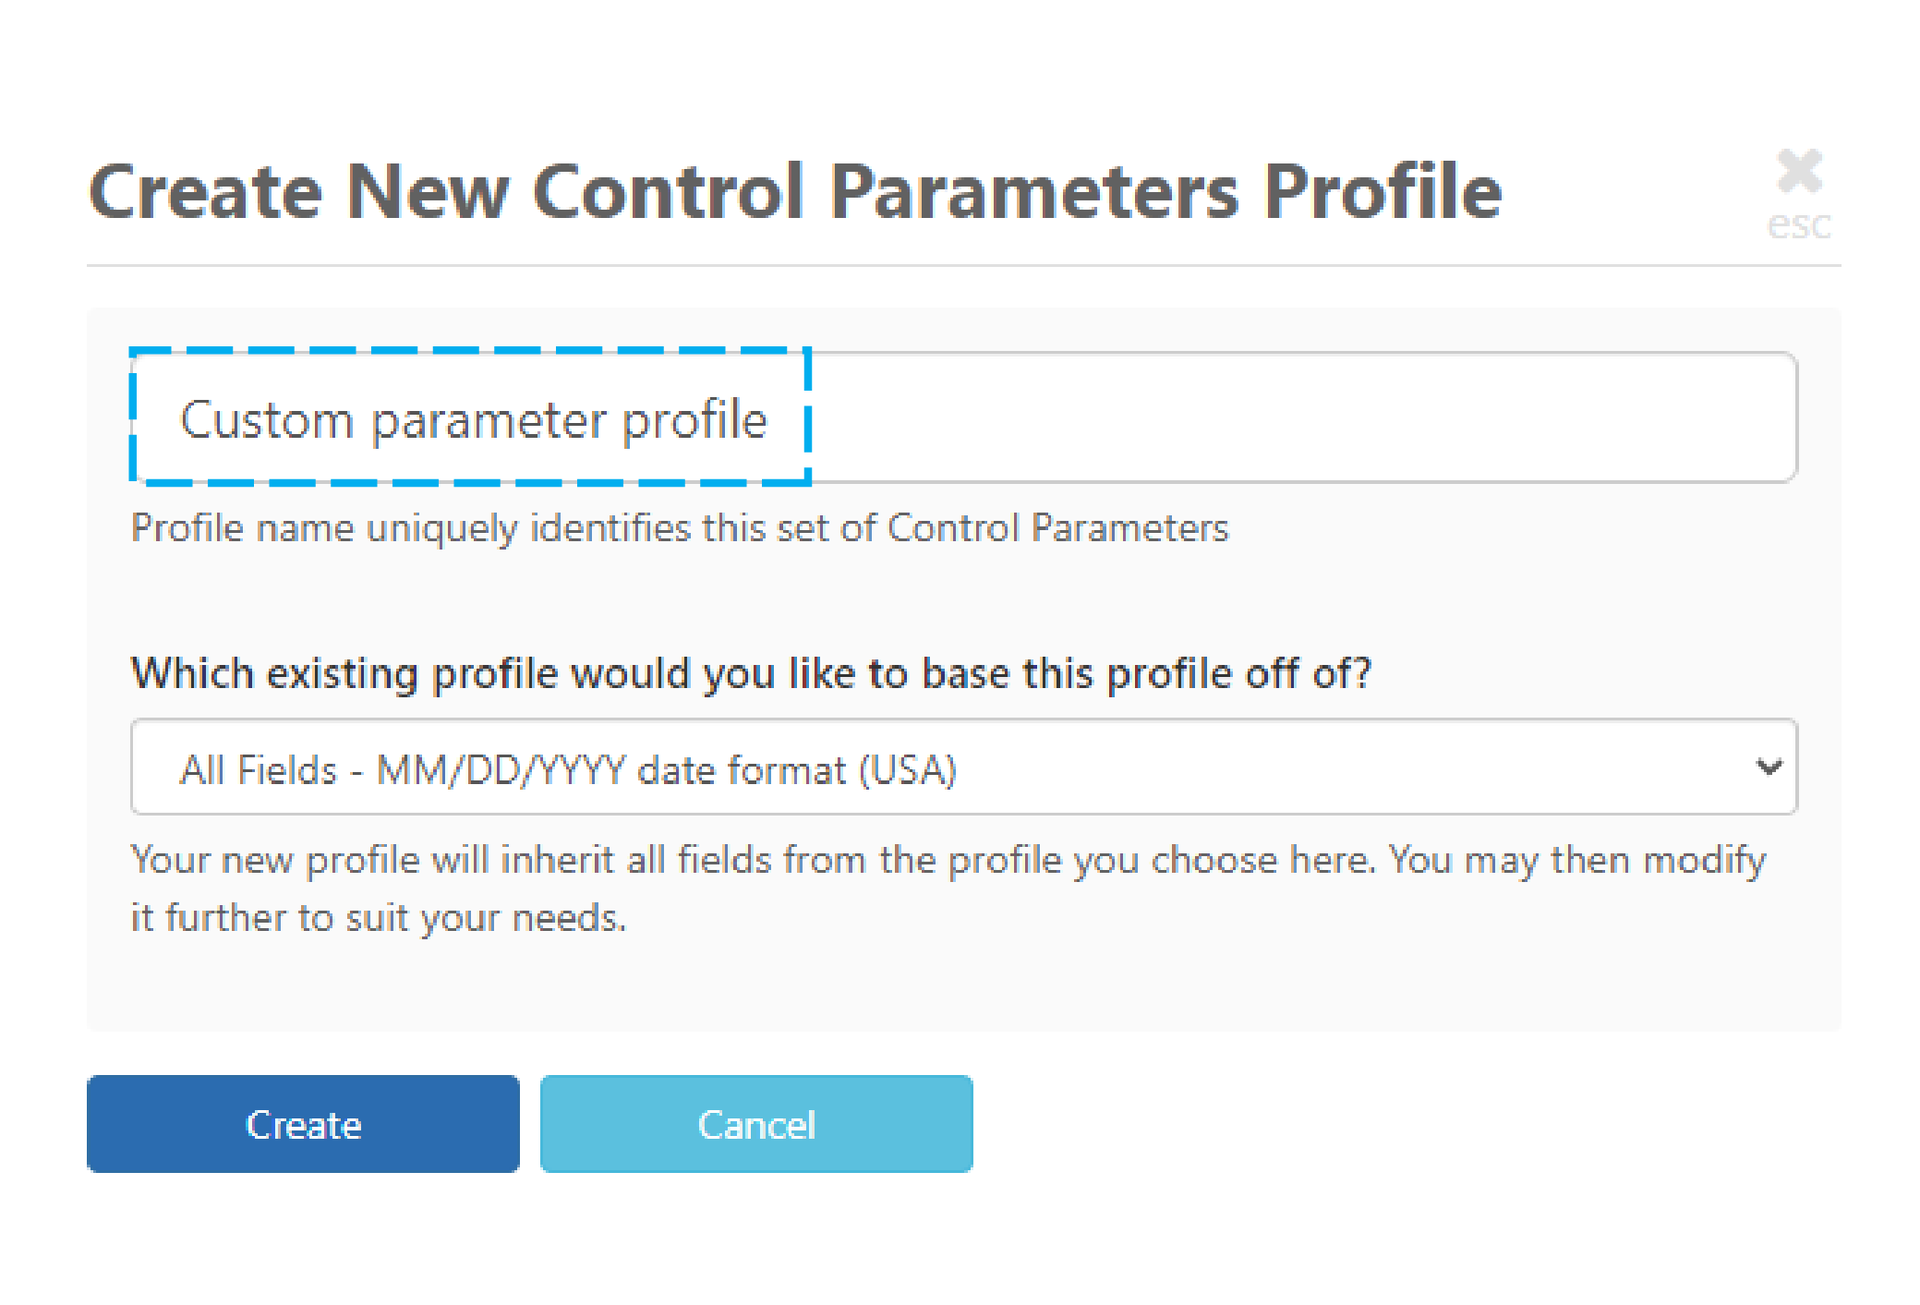
Control Parameter profiles
Control Parameter profiles are used to determine the information generated in load files created in the production process. To create a new profile:
- Navigate to the ‘Productions’ view
- Click on the ‘Control Parameters’ Tab
- Click on the ‘Create New Profile’ button
- Enter a name and select an existing profile to base yours off of from the dropdown list. Then click on ‘Create’ GoldFynch New Profile
- Add, edit and remove parameters as needed, selecting fields from the dropdown menu.
- When you are done, click on the ‘Save’ button.