Using and Placing Bates, Tag and Custom Stamps in Your Productions
While producing your files, GoldFynch gives you the option of stamping your documents with Bates Stamps, as well as to stamp them using tags or custom text.
Note that Bates stamps, tag stamps, and custom stamps can only be placed on non-native documents.
Placing Bates, tag, and custom stamps
Step 1. Follow the steps of production (click here for a detailed guide on producing files) till you reach Step 6: Select tag placement for production
Step 2. Click on the drop-down menu on the right side of the screen against the tags you wish to use as stamps, and select one of the available options:
- top-left
- top-center
- top-right
- bottom-left
- bottom-center
- bottom-right
- no-placement
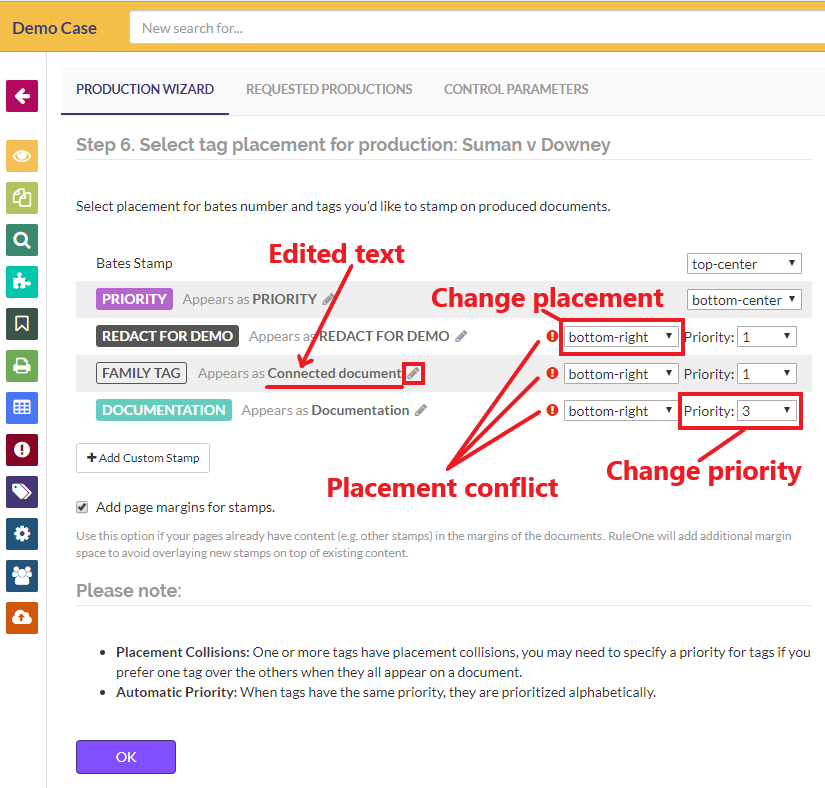
If there are any conflicts in placement, you have the following options:
- Change the priority of the tag you wish to be prioritized to a higher value. If a file has both tags assigned, only the tag of higher priority will be applied
- Change the assigned placement location of the tag
Step 3. Click on the "Next: Redaction options" button
Adding Bates stamps
This is Step 8 of the Production Wizard
Step 4. (Optional) Enter a prefix for your bates number. If not entered then there will be no prefix added to the Bates number Step 5. (Optional) Enter the starting number and digit count. By default the value for these are 1
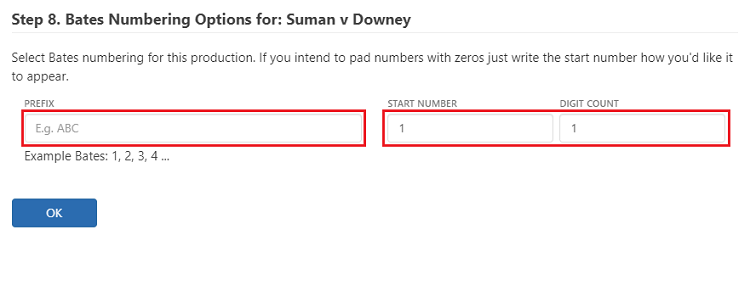
Step 6. Click on the "Next: File naming options" button
Step 7. Complete the remaining steps of the Production Wizard and submit the production by clicking on the Produce button
Editing tag stamp text
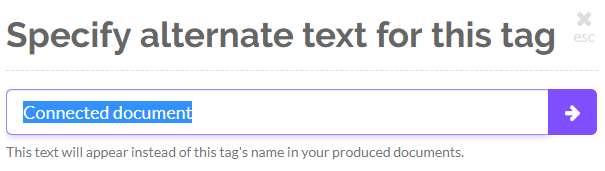
By default, when applying tag stamps, the name of the tag is applied as the stamp. However, you can change the text that is applied. To do so:
Step 1. Click on the edit icon (the pencil) against a tag where it displays "Appears as
Step 2. Type in the text you wish to apply and click on the arrow
For example, in the image of the "Select tag placement for production" step given above, documents with the “FAMILY TAG” tag will have "Connected document" stamped on them.
Adding Custom Stamps
In addition to applying stamps based on tags to documents, you can assign custom tags to non-native documents in the production.
To add a custom stamp:
- Click on the "+ Add Custom Stamp" button and enter the text you would like stamped on the documents.
To delete a custom stamp:
- Click on the 'X' button that appears next to the edit button of an already-created custom stamp
The custom stamp will be:
- Be present on all non-native documents (as opposed to tag tamps that are only placed on documents with that specific tag)
- Display the same text on each page they are applied to, similarly to tag stamps (and unlike Bates numbers which are an ascending number series)
A few things to note about stamping documents
-
You cannot apply tag stamps, custom stamps or the Bates Numbers as stamps to native documents
-
If there is a conflict between the assignment for placement of the Bates Stamp with any tag or custom stamps, the Bates Stamp will always be given the highest priority (it has a fixed priority of 100)
-
If you want to disable Bates Stamp, tag stamp, or custom stamp placement, you can do so by selecting the "no-placement" option
-
If you see tags other than the ones you selected in Step 2 (Select tags for production) appear on this screen, this is because some of the files you chose also had these tags assigned to them. If you don’t want these tags to appear as stamps, assign them the ‘no-placement’ option as described below. If you don’t want files with these tags in your production at all, make sure you select them as ‘inverted' tags in Step 2.
Adding page margins
If your documents already have content in their margins, you can add additional margin space to prevent the overlap of the new tags that are applied.
This can also be helpful when printing stamped documents - Bates numbering and stamps are placed at the edge of documents and can potentially fall in the unprintable space at the edges when using printers that do not support and have edge printing enabled.
To add extra margin space, check the "Add page margins for stamps." box