Producing files with the Production Wizard
Learn how to use GoldFynch's Production Wizard to produce your files.
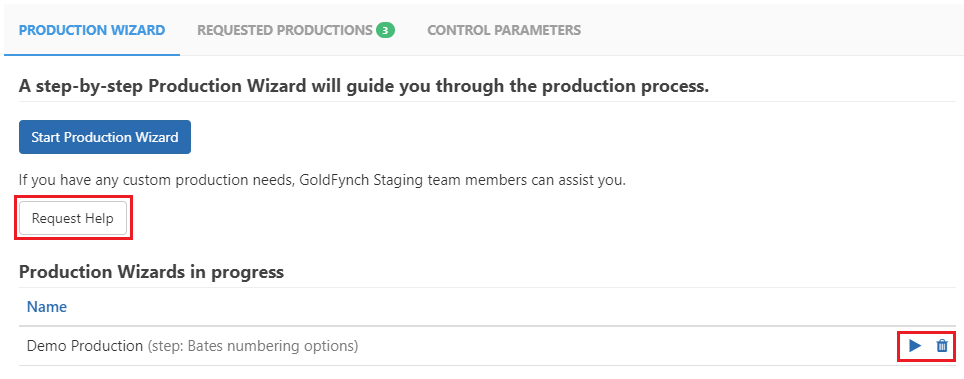
To begin the production process:
-
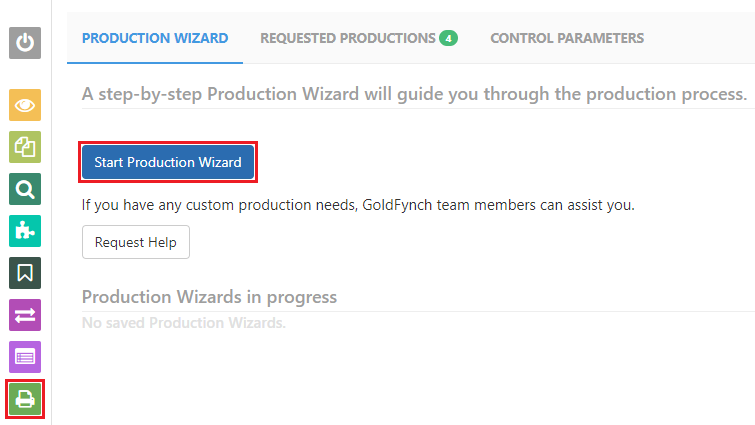
Navigate to the 'Productions' view by clicking on the
Productionsbutton in the left pane -
Open the
Production Wizardtab and click on theStart Production Wizardbutton
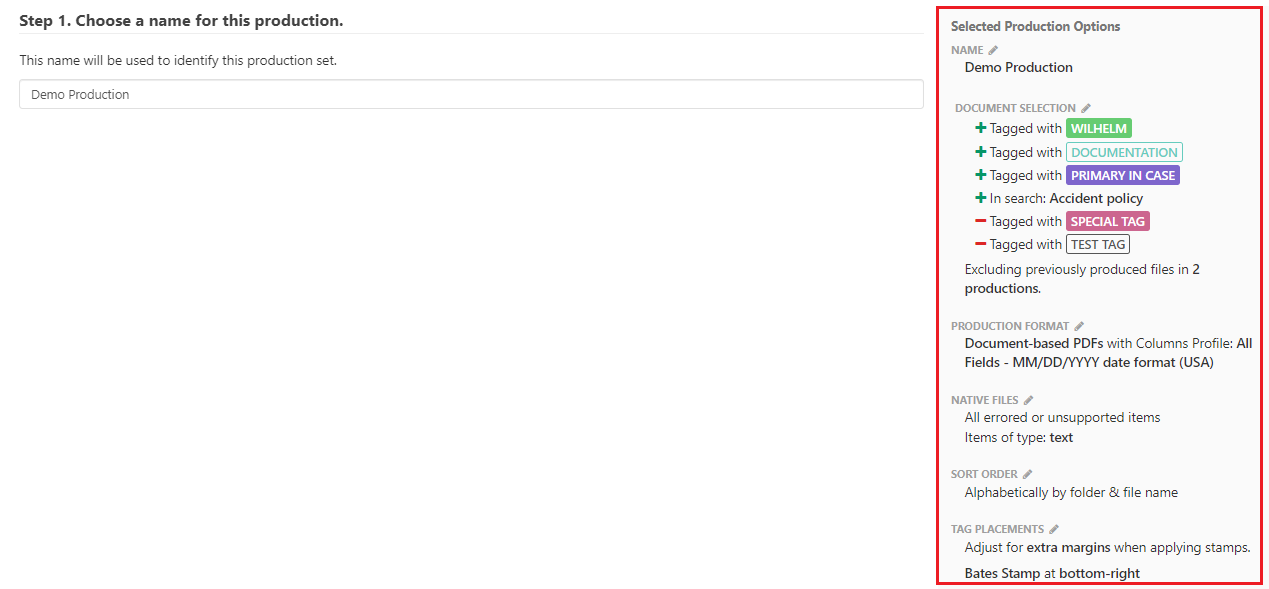
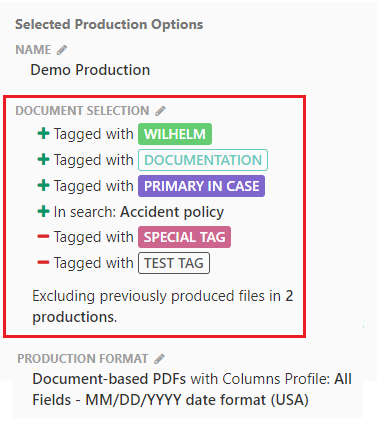
The 'Selected Production Options' image above is from the completed production we will make as an example for this help article
Steps of production
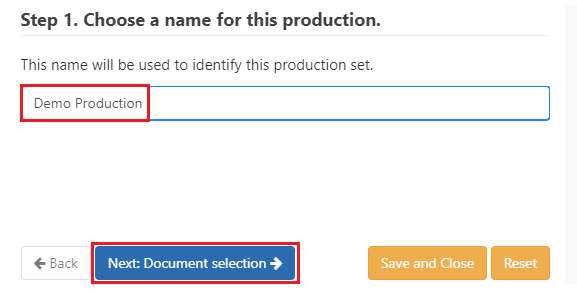
Step 1. Choose a name for the production
-
Enter a name for the production into the box
-
Click on the
Next: Document Selectbutton.
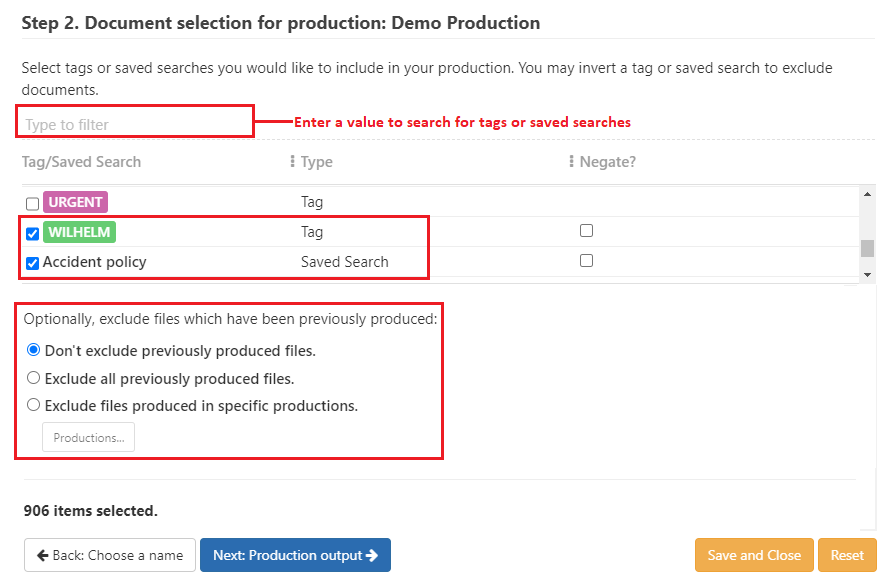
Step 2. Select documents for the production
During your review process, you would have tagged your files or used a search to retrieve a set of documents. GoldFynch lets you use both these tags and saved searches to select documents that are to be included in the production.
-
Select the tag or saved search whose documents you want to include in the production. GoldFynch lists each available tag and saved search.
-
Choose how you would like to handle previously produced files. The available options are -
- Do not exclude any of the previously produced files. Note: this option is selected by default
- Exclude all previously produced files
- Exclude previously produced files from certain productions
-
Click on the
Next: Production Outputbutton
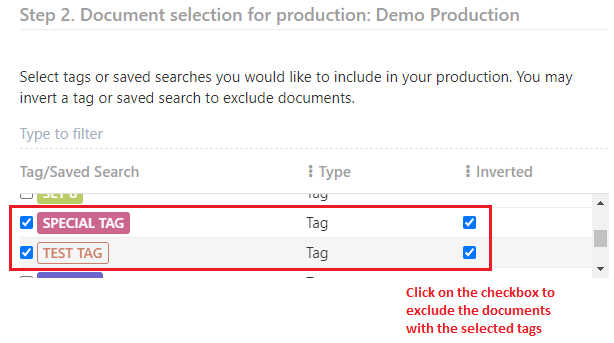
You may also want to make use of the 'Invert' function to omit files with a given tag or that are part of a saved search:
Excluding files using the Invert tag function
If your tags or saved search cover some files that you would like to omit from the production, you have two options:
- Select one of the lists in the final step of production (Step 10. Final Review and Submit production) which will open the list of files in the 'Search' view, then manually remove the tag for those files.
- Use the 'Invert' tag feature. This is helpful when you want to exclude files in bulk from your production.
To use the 'Invert' feature:
-
Tag the files in the case you wish to exclude from your production that might otherwise be included by their other tags or create a saved search to retrieve them
-
Select the tag or saved search along with the other tags you are going to include in the case
-
Check the checkbox labeled 'Invert' that appears against the tag or saved search you wish to be excluded
Excluding previously produced files from specific productions
If you would like to exclude previously produced files from specific productions -
- Select the
Exclude files produced in specific productionsoption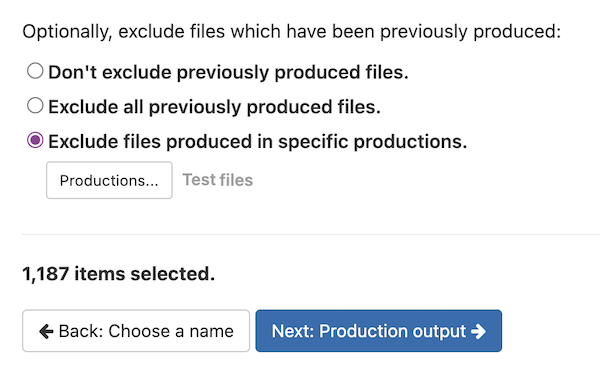
- Click on the
Productionsbutton - Check the checkboxes against the productions from which the files are to be excluded
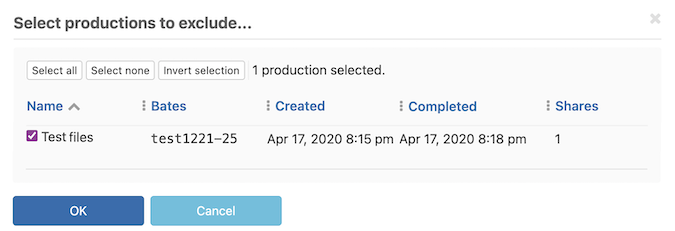
- Click on the
OKButton
The Document Selection section of the Selected Productions box will list out the tags and saved searches that are included in the production as well as those that have been excluded. In the image below, documents tagged with 'WILHELM', 'DOCUMENTATION', 'PRIMARY IN CASE', and those that are retrieved by the 'ACCIDENT POLICY' saved search will be produced, while documents having the tag 'TEST TAG' and 'SPECIAL TAG' will be omitted. Additionally, files that have been produced previously in the selected productions will also be excluded from the production
Step 3. Choose the production output
GoldFynch offers you a number of different output formats for your productions, both with and without load files.
-
Choose the type of production output
- Load file/ Database format
- PDF only
- Natives only
-
If you have selected the Load file/Database format then you can choose to include natives of all files as part of your production output. Alternatively, select the 'Minimal or user-specified natives' if you want to include only the minimal necessary natives (i.e. errored and unsupported files in the dataset) or if you want to include only specific file types and/or tags as natives.
-
Choose the type of image representation you would like
-
Click on the
Next: Native files optionbutton
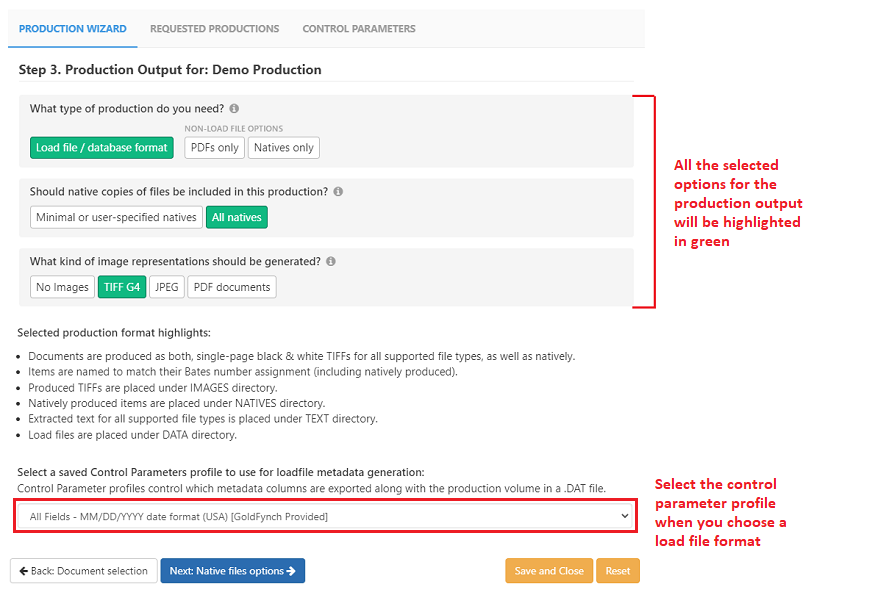
NOTE: If you choose load file/database format as your production output, select a load file parameter profile from the drop-down menu before you click the Next: Native files option button.
To learn more about productions with load files and how to customize their parameters, click here.
Note: For the PDF only option you will need to choose the PDF format and then click on the Next: Native files option button. If you choose the Natives only option then just click on the Next: Native files option button.
Under the formats that generate load files, there are:
-
Load file formats with minimal or user-specified natives:
- TIFF G4
- JPEG
- PDF Documents
-
Load file formats with natives versions of all files included:
- No Images
- TIFF G4
- JPEG
- PDF documents
Among the PDF only formats:
- One PDF per page
- One PDF per document
- One PDF per family
- Single, bulk PDF
Step 4. Choose file types to be produced natively
If you want to create a non-native production, but wish that specific files are produced in their native state, it is possible to do so. In Step 4 you will be provided with a list of all tags and quick tags in the case (that have been attached to at least 1 file), as well as the different file types. Typing a tag name or file type or extension at the top of the grid will filter the list based on the criteria entered.
- Check the checkboxes against tags, quick tags, or file types that you want to produce in their native formats.
Once you're done selecting file types to produce in their native formats, click on the Next: Production sort order button.
Note: If a partial value is entered in the filter field then the list is filtered to retrieve all the entries that have the value entered.
Step 5. Select sort order
You can sort files included in the production to reorder them, along with any sub-files they contain (like attachments and zipped files)
-
Click on the drop-down list and select from one of the following sorting options:
- Alphabetically by folder & file name
- Alphabetically by file name
- Date - Oldest first
- Date - Newest first
-
(Optional) Check the numerical sorting checkbox. This will sort files that have numerical values in their names in ascending order rather than lexicographically
For example, if there are a set of files with the names (Training_doc_1, Training_doc_2, Training_doc_3,,, Training_doc_10.... Training_doc_20, etc). When the numerical sorting is checked then they will be sorted as Training_doc_1, Training_doc_2, Training_doc_3.... Training_doc_10, etc. In case the numerical sorting checkbox is not selected then they will be sorted as Training_doc_1, Training_doc_10, Training_doc_2, Training_doc_20, Training_doc_3...., etc.
-
Click on the
Next: Tags and custom stamp placementbutton
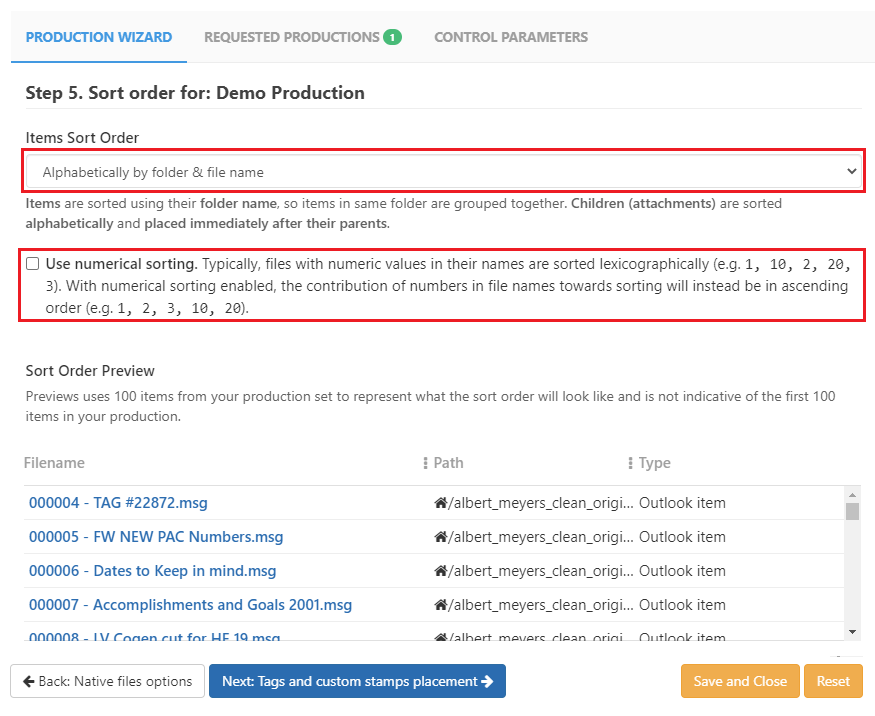
The page will immediately update the order of the files, and when you generate your production, the files will be arranged in this order.
You will also be provided with a list of the files that are about to be added to your production, along with relevant details from their:
- Primary date
- File path within the case
- File size
- Number of pages (for relevant documents)
Step 6. Select stamp placement for the production
GoldFynch lets you stamp non-native documents with Bates Numbers, stamps from tags, and custom stamps.
- You can select where each tag's stamp is positioned (one location across all documents per stamp)
- When two different stamps are assigned to the same position on a document there is a hierarchy that decides which stamp gets priority to be placed in that position - the stamp with the highest priority (100 being the highest, 1 the lowest) will be placed at the location if there is a placement conflict between multiple stamps. Only one stamp will ever be placed at a single location on a particular document
- Additional margins can be added to documents in case there was existing content in their margins when they were uploaded
- You can choose not to assign any stamps at all
NOTE: After you are done editing and placing stamps as described below, click on the Next: Redaction options button
Choosing the position of stamps
Click on the drop-down menu on the right side of the screen against Bates Stamp, or against the tags you wish to use as stamps, and select one of the available options:
- top-left
- top-center
- top-right
- bottom-left
- bottom-center
- bottom-right
- no-placement
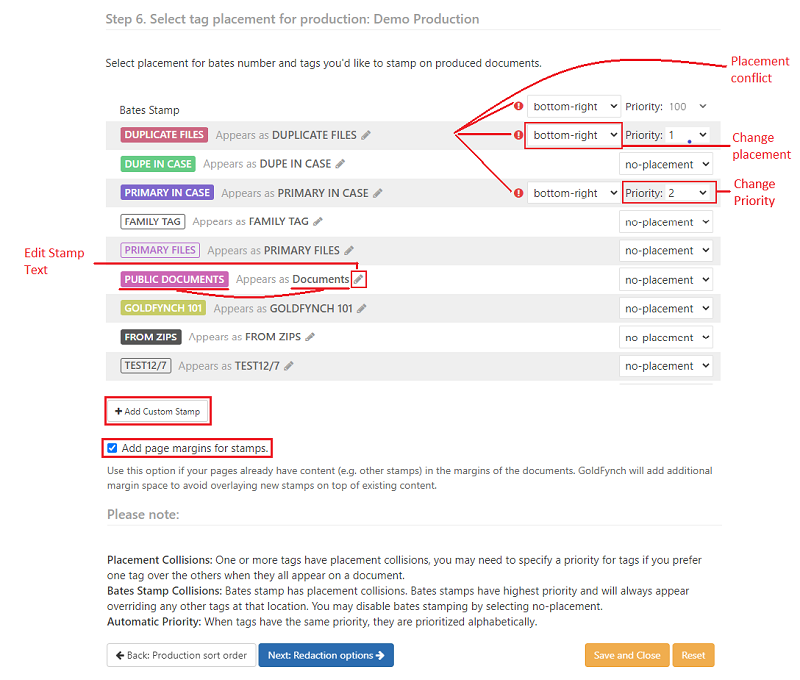
Resolve conflicts, if any
If there are two or more tags assigned to the same position, you will get a chance to resolve the placement conflicts by doing one or both of the following:
- Change the priority of the tag you wish to be prioritized to a higher value by selecting a Priority in the drop-down menu that appears. If a file has multiple tags assigned, the tag with the highest priority will be applied
- Change the assigned position of the tag
Editing Stamp Text
By default, when applying tag stamps, the name of the tag is applied as the stamp. However, you can edit the text that is stamped on the documents.
To edit the text that is stamped on tagged documents, click on the edit button against a tag where it displays "Appears as (tag name)"
E.g., In the image of the "Select tag placement for production" step given above, documents with the GOLDFYNCH tag will have "GoldFynch Documents" stamped on them.
Adding Custom Stamps
You can assign custom tags to all non-native documents in the production (mimicking the behavior of Bates Stamps)
-
To add a custom stamp, click on the
+ Add Custom Stampbutton and enter the text you would like stamped on the documents. -
To delete a custom stamp, click on the
Xbutton that appears next to the edit button of an already-created custom stamp
Adding page margins
If your documents already have content in their margins, you can add additional margin space to prevent the overlap of the new tags that are applied.
To add extra margin space, check the Add page margins for stamps box
REMEMBER: Click on the Next: Redaction options button once you are done assigning stamps.
Click here to learn more about custom stamping your documents
Step 7. Choose how redactions will behave in this production.
-
(Optional) Click the
Automatically determine and produce redacted files and their ancestors as image-onlycheckbox to enable redaction checking in Step 10 of the Production Wizard. This is checked by default -
Select a redaction mode for redactions in your production
-
Select a color for the redaction boxes
-
Click on the
Next: Bates numbering optionsbutton
Redaction modes
The redaction mode you choose will affect how redaction areas you mark in your documents will appear in the final, produced files of the production.
- 'Final' mode: Regular redaction boxes will be placed on your non-native files. All information covered by the boxes will be completely removed from your files, making it unreadable and unsearchable.
- 'Preview' mode: Areas marked for redaction will have translucent, 'preview' redaction boxes placed on them. The information covered by the boxes will be viewable and searchable for, in the final produced files.

Redaction box color
Select the color you want your redaction boxes to be when placed on your documents. This color choice will also affect the color of 'preview' redaction boxes.
NOTE:
-
The term 'Preview' is used to denote that usually such 'preview' productions are created for internal review before 'final' productions (with regular redactions) are made to send to external counsel.
-
When redaction checking, is enabled any files that have redactions will be produced as image-only. This also includes files whose ancestors have redactions
-
GoldFynch treats redaction boxes and full-page redactions the same way, and all options selected will apply to both.
Find more about redaction modes and redaction box colors here.
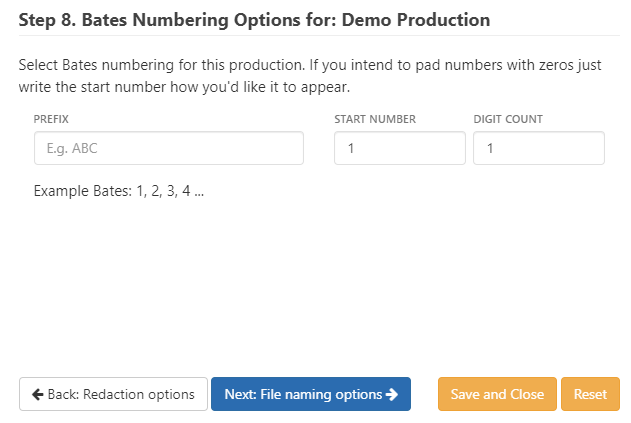
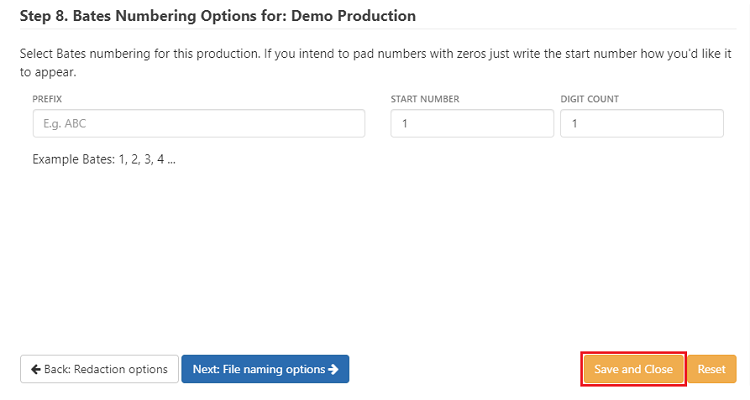
Step 8. Bates numbering options
- (Optional) Enter a prefix for your Bates number if required. By default this is blank
-
(Optional) Enter the starting number of your Bates Number and the digit count. The default value for the starting number and digit count is 1
-
Click on the
Next: File naming optionsbutton.
Note:
-
The Bates number prefix cannot end with numbers or consecutive spaces
- Examples of some valid prefixes - DP, D1P, AS#, TXT_ (the last example contains a single space at the end)
- Examples of some invalid prefixes - DP1, TXT_ (the last example contains 2 consecutive spaces at the end)
-
The digit count indicates the number of digits that the Bates number will contain. For e.g., if the digit count is 4 and the starting number is 1 then the Bates number will be 0001, 0002, 0003 etc.
Step 9. File naming options
If you selected the Native or Document-based PDF output formats without load files, you will be able to select the naming of files in your production:
- Bates numbers (e.g. "ABC_001.pdf")
- Original file names (conflicts will be resolved by appending a count after the file like "file (1).pdf")
- Original file names prefixed with their bates numbers (e.g. "ABC_001 - file (1).pdf")
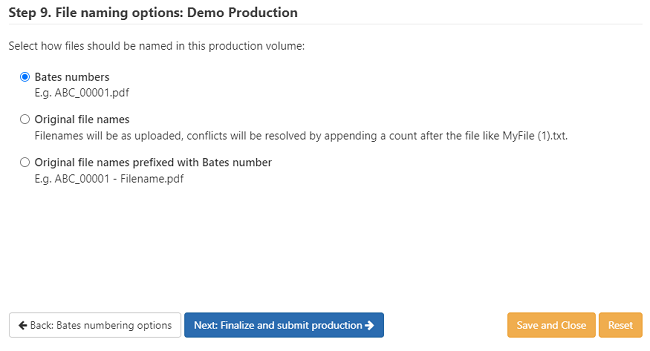
After selecting a file naming option (or if you are not given a choice depending on the output format you selected) click on the Next: Finalize and submit production button.
Selecting the right file naming option helps you to download files with their original names. Click here to see how
Step 10. Final review and submission of your production
GoldFynch gives you a summary of your production for you to review. The system performs several checks and issues a warning if any of the selected files do not pass them. If all checks are passed then a green Produce button will be displayed at the top along with the number of files in the production and the Bates number range.
When you are done setting up your production, click on the Produce button
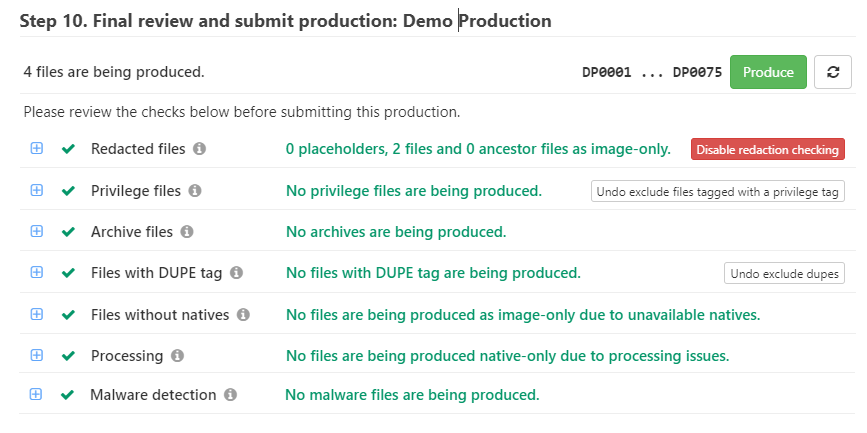
You will receive a notification that the production request has successfully been placed.

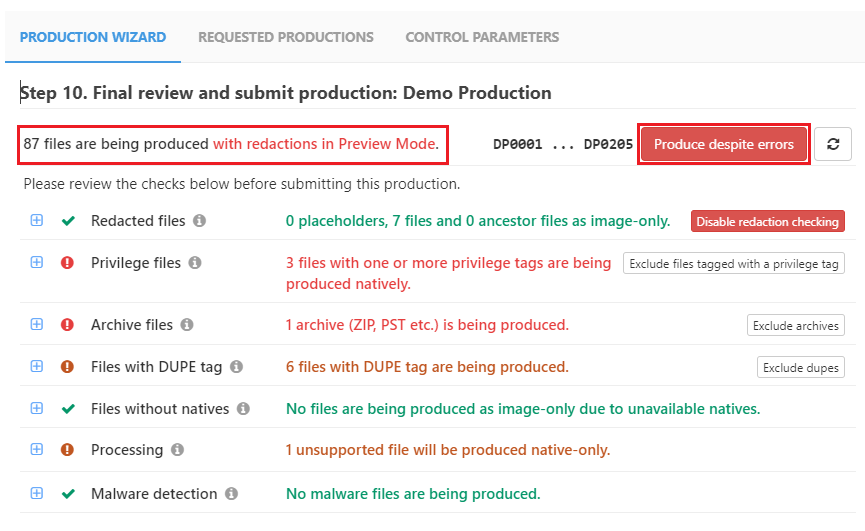
In case some of the files fail the checks, you will still be able to produce the documents but a warning will be displayed. Additionally, if the preview mode for redactions was selected then a warning will be displayed in the production summary
Viewing and resolving the checks and warnings issued in Step 10
The GoldFynch system issues warnings in case any of the files in the production fail the checks that are present in Step 10. The files that fail the check will be listed against the corresponding check. You can exclude the files either by individual checks or by the check category
Viewing files with issues
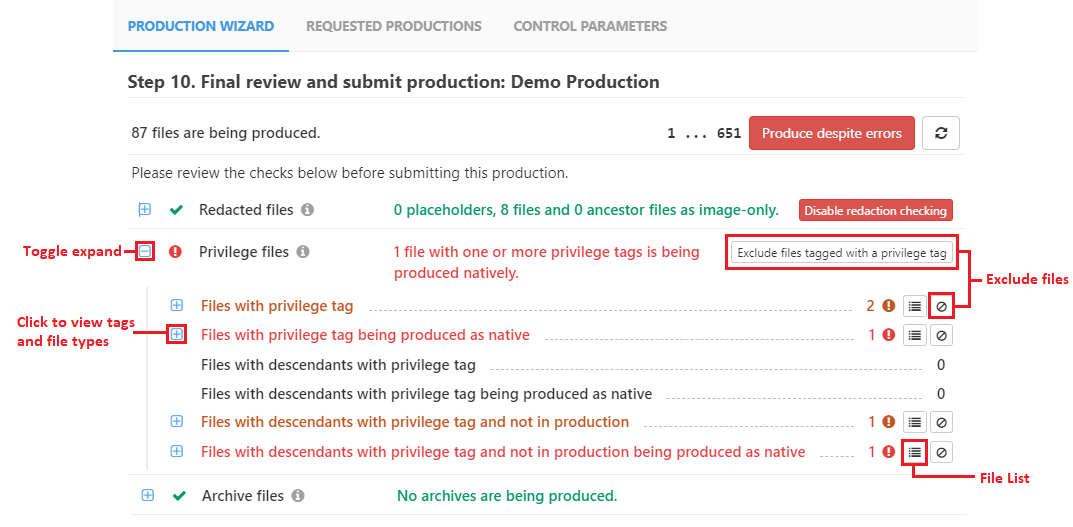
-
Click on the
+symbol against a category to expand it -
Click on the list icon to view and quickly navigate to files flagged by that individual check
Resolving issues
-
Click on the
exclude filesbutton to omit all files listed by that individual check from the production (this is only possible if less than 1000 files are flagged. If more than 1000 files are flagged, you will need to change the criteria for selecting the documents in Step 2 - document selection) -
Checks in red involve redacted/privileged/archive files being included in the production in their native state
-
Checks in brown involve files being included but not in their native states
-
Using a category's
Excludeoption (e.g.,Exclude files tagged with privilege tag) will exclude files found in both red and brown checks
Checks run by category
Redacted files check
This check ensures that:
-
Files with redactions in your production are never produced natively to avoid the accidental production of a redacted document
-
No ancestors of such files are produced natively
-
Image-only versions of such files are produced where possible and a placeholder is created if an image version of the file is not available
You can disable redaction checking. When enabled, it will automatically adjust for the following and omit files as needed. If the check is disabled, you can manually omit files that are caught by each category of redaction checks
The list of redaction checks are:
-
Files being produced erroneously - This flags files where redacted information is included in the native form of the file
-
Files being produced as a placeholder - In case GoldFynch does not have an imaged representation of a file, then the file should not be produced natively since it could have redacted content (e.g., a ZIP file that contains other files that have redactions, as ZIP files do not have imaged versions they will need a placeholder)
-
Files being produced image-only due to redactions - If a document that is being produced in native form has redactions then it will only be produced in image format with the redactions
-
Files being produced image-only due to descendants with redactions - In case a document that is being produced natively has a child that has redactions then it will be produced in image form only (e.g., An email where the attachment has redactions and the email does not. The email will be produced in image-only format)
Privilege files check
All files in the production that have privileged tags assigned to them are flagged by this check as it is common practice to omit privilege files from productions. Additionally, files that are ancestors of privileged files are flagged. This is done even if the descendant is not part of the production. This helps prevent the privileged files from being extracted and accessed through the included ancestor files
For example, a ZIP file without a privileged tag that contains a privileged Word document will be flagged in the checks. For if the ZIP was included in the production, someone could unzip it and view the privileged Word document even if it was not included in the production.
The Exclude files tagged with a privilege tag button will exclude files under the following checks:
-
Files with privilege tags - This check will flag a file that has a privilege tag assigned to it
-
Files with privilege tags being produced as natives - Files with privilege tags that are being produced in the native form will be flagged
The Exclude files tagged with a privilege tag button will not exclude files found under the following checks if the triggering files themselves do not have privilege tags:
-
Files with descendants with privilege tags - This check will flag ancestor files (e.g., email) with a descendant (e.g., an attachment) that has a privileged tag attached to it
-
Files with descendants with privilege tags being produced as native - This check is similar to the one above where ancestor files being produced as natives are flagged. This is so that privileged descendants cannot be inadvertently extracted from the parent file.
-
Files with descendants with privilege tags and not in the production - This check is also similar to the ones above but it is specific for ancestors that are part of the production and the descendants with the privilege tags are not in the production
-
Files with descendants with privilege tags and not in the production being produced as native - This is similar to the one above where the ancestor is being produced in native form
Archives files check
This check will flag any archives that have been included in the production. You can choose to exclude the archives from the production
Files with DUPE tag check
This check flags any files that have been tagged as duplicates with the DUPE system tag so that you can avoid including duplicates in your production. You can then exclude these files from your production by clicking on the Exclude Dupes button
Files without natives check
If any of the files in the production do not have corresponding native files, they will have to be produced only as image-only in case a native file is required. This scenario can happen in case the files were part of a load file production that was imported into GoldFynch without including the natives
Processing state check
The processing state check identifies files in the production that have currently not been processed. These files will be produced as native-only files (i.e., exactly as you have uploaded them). You can exclude the unprocessed files from the production in case you want to
Malware detection check
The malware detection check identifies files in the production that could potentially be harmful (i.e., malware). In such an event, a placeholder will be generated and inserted in place of the corresponding files. Instead of inserting a placeholder, you can choose to completely exclude the files from the production using the Exclude option
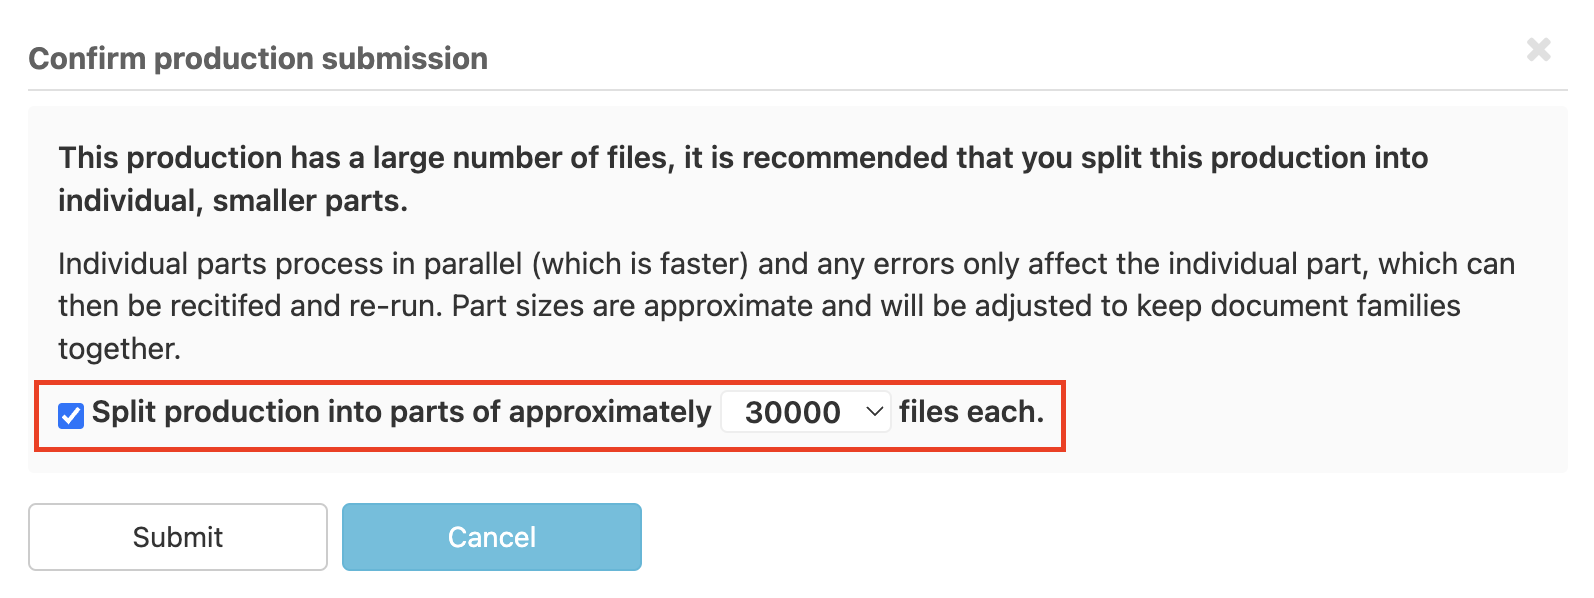
Running large productions exceeding 100K files
If the created production contains more than 100k files, the Production Wizard will prompt you to split the production into smaller sets (roughly 20k - 50k files). This prompt will appear once you click on the Produce button, then you will need to:
- Check the
Split production into parts of approximately <n> filescheckbox - Select the number of files you would like to have in each set
- Click on the
Submitbutton to begin running the production
Note:
- The parts of the production will have the original production's name with the suffix "- Part 1", "- Part 2" (e.g., "Demo Production - Part 1")
- All the parts of the production will be processed in parallel, thereby reducing the processing time of the production
- Any error that occurs will affect only the production set in which it occurs. Once the error is resolved, only the production set that was affected needs to be re-run
Tracking production status
GoldFynch queues the production and gets to work on it. To track the process, or to view any completed productions, click on the Requested Productions tab of the 'Productions' view.
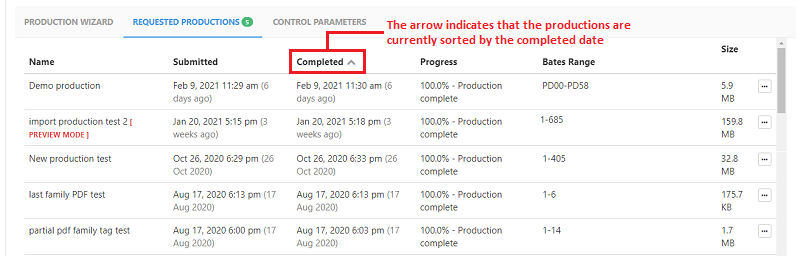
Click on the 'Completed' header text to sort by completion date. The completed status for your production will change from "in-progress" to the completion date once the production is completed.

A warning icon will be present next to the production name if the production was submitted despite having errors or warnings. If you mouse over the warning icon you will be able to view all the warnings or errors associated with the production.
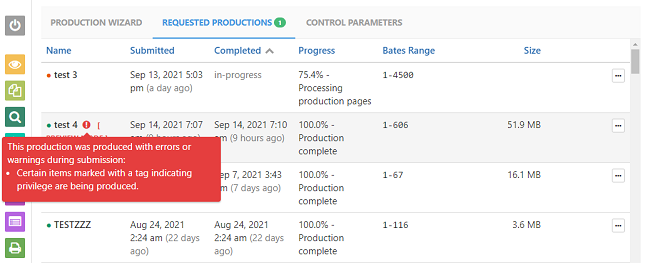
You can also sort these productions by their names, dates submitted, Bates number ranges, and sizes. To sort productions by a category, click on the text of a header category that you want to sort by.
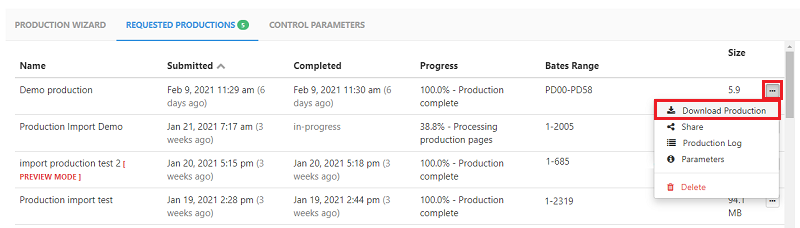
Downloading completed productions
Once the production has finished processing and becomes available, click on the ... button against the production's name and then click on the Download Production option in the popup menu to download the final production as a zip file.
Renaming completed productions
You can rename a completed production at anytime. To do so:
1. Click on the ... button against the production
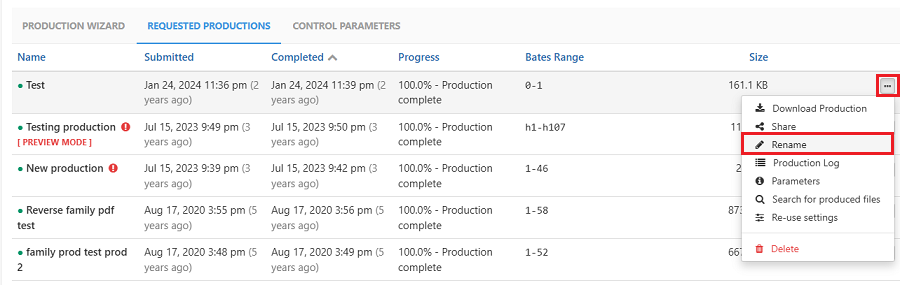
- Click on the
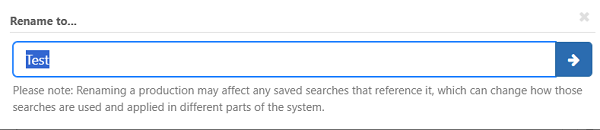
Renameoption in the popup menu - Enter the new name for the production and click on the arrow button
Note:
- The application does not enforce unique production names, so please choose the production name carefully for easy identification.
- Renaming a production may affect any saved searches that reference it, which can change how those searches are used and applied in other functions of the system.
Other production features
Production Wizards in progress (saving and loading while producing)
While entering details for a production, you can save the current state by clicking on the Save and Close button at the bottom of the screen. This will allow you to pick up where you left off at any point in the future.
The Production Wizard tab of the 'Productions' view lists these productions that require additional inputs from you. The current step of production is also listed.
- To continue working on a production click on the
playicon against it. - To delete an in-progress production click on the
trashcanicon against it.
Note: From Jan 2026 onwards in-progress production wizards will be available even if you log into your account from a different computer or browser
Downloading Production Load Files
GoldFynch lets you download just the production load file without having to download the entire production. Click here to learn how.
Downloading Files and Productions with their Original File Names
GoldFynch gives you the ability to download files from your case in bulk along with their original file names. You can also prefix Bates numbers to the original file names before downloading them
Click here to learn how to download files and productions with their original file names
Sharing productions
GoldFynch allows you to share productions directly through its interface, making it extremely simple to hand them over to opposing counsel. Only the final ZIP file of the production is made available to the receiving parties.
Click here to learn how to share your productions
Re-use production settings
GoldFynch lets you create a new production based on a similar older production with its re-use production settings feature.
Click here to learn more about re-using production settings
Delete production
You can easily delete productions when they are no longer needed from the Production view. Click here to learn how.
Production Parameter Summaries
GoldFynch lets you view the parameters used in the creation of your productions once you have submitted them.
Custom productions
If you need help to set up a custom production, make use of GoldFynch's Custom Production Help add-on service by clicking on the Request Help button
Production logs
With every production, GoldFynch generates a log of information about its files to help cross-reference them. The logs also contain information on which files are in their native state, whether they have any redactions, etc.
Click here for information about production logs
Production Exceptions
Any exceptions that are encountered while processing a production can be viewed using the Production exceptions screen. Click to learn more about viewing them
Setting up custom Control Parameter profiles for load files
It is possible to generate Concordance/Relativity-style load file formats with GoldFynch using preset or even custom parameters.