Reports
GoldFynch lets you generate reports of the files in your case.
Reporting Options
The GoldFynch Reporting system simplifies the process of creating a case report by giving you a few options to customize your report. You get to choose how files are selected for the report. There are some descriptive fields that you can choose to include. Finally, you also get to choose the output format of the report.
The details of these different reporting options are described below:
Report Type
The Reporting system lets you choose how files are to be added to the report. There are three ways in which you select the files:
-
File listing - All files: This report type includes all the files in the case (including zipped files and attachments).
-
File listing - Tag: In this report type you are allowed to pick tags from your case, and the report will contain files in the case which have the selected tags assigned to them.
-
File listing - Saved Advanced Search: You are allowed to select a saved advanced search query for this report type. The report will consist of the files that are the results of the selected search query.
Note: To view a report of a production you can either view or download the production log. Click here to learn more about production logs
Descriptive Fields
The descriptive fields that you can choose to include in your report are tag names, tag application notes, document notes and annotations. All the other components of the report are described in detail later on in this article.
-
Tag Names: You can choose to include either all tags or only privileged tags in your report.
- The tag field will have the format
[Tag 1 Name];[Tag 2 Name];[Tag 3 Name].
- The tag field will have the format
-
Tag application notes: Similar to tag names either all tag application notes or only those that are marked as privileged can be displayed.
- The tag notes field will have the format
[Tag 1 Name]:[Tag note 1];[Tag 2 Name]:[Tag note 2].
- The tag notes field will have the format
-
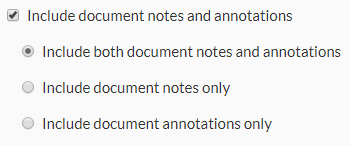
Document Notes and Annotations: You can choose to include both document notes and annotations or any one of, document notes or document annotations. Please take note that only the initial comment assigned to an annotation will be displayed in the report.
-
The Document Notes field will contain the information present in the 'Document Notes' section of the Document viewer as is.
-
The Document Annotations field will be formatted as:
[Selected text]-[Initial comment].
-
Learn more about document notes and annotations here, tag application notes here, and privileged tags here.

Report Output Format
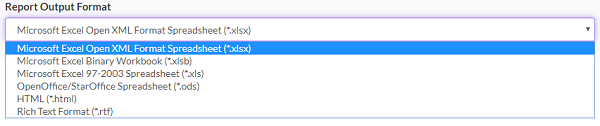
You can choose to have the report created in any one of the following output formats:
- Microsoft Excel Open XML Format Spreadsheet (.xlsx)
- Microsoft Excel Binary Workbook (.xlsb)
- Microsoft Excel 97-2003 Spreadsheet (.xls)
- OpenOffice/StarOffice Spreadsheet (.ods)
- HTML (.html)
- Rich Text Format (.rtf)
Generating a Report
Generate a Report using - 'File Listing - All Files'
Step 1. Navigate to the 'Reports' view by clicking the Reports button in the left pane.
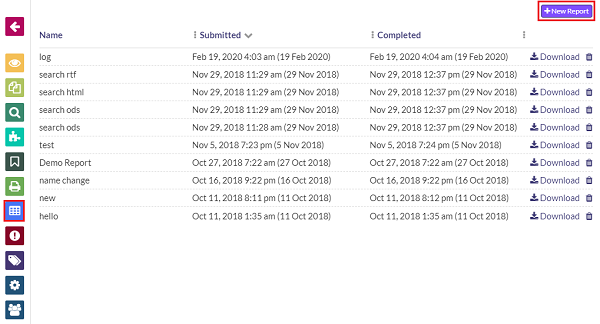
Step 2. Click on the + New Report button.
Step 3. Select the report type 'File Listing - All files'.
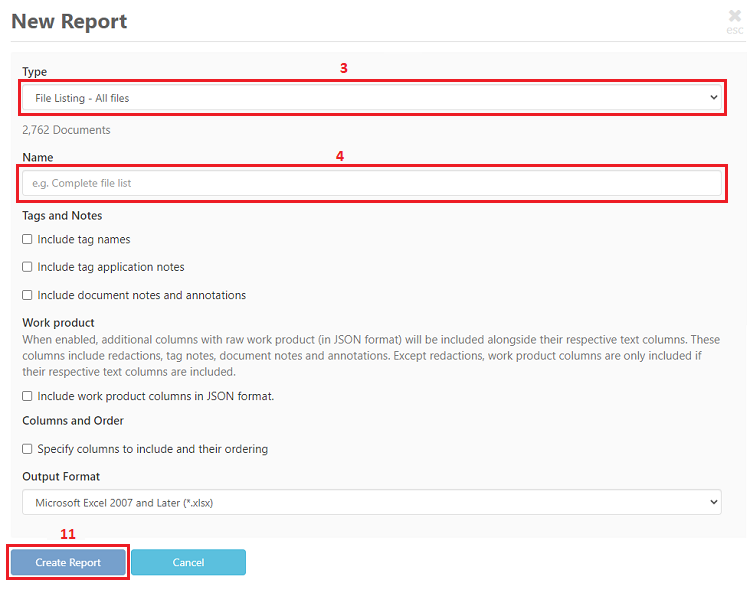
Step 4. Enter a Report name
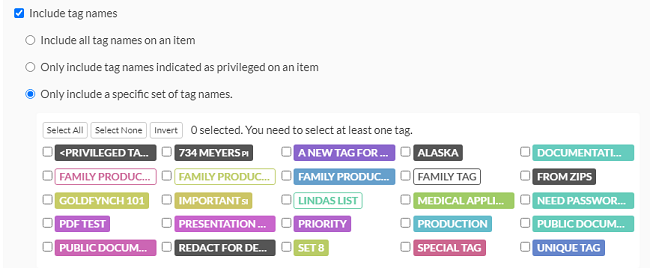
Step 5. (Optional) Check the Include Tag Names checkbox if you wish to include tag names in your report. Once you select this option you get to further choose the tag names you wish to include in the report by selecting any one of the following options:
- All tag names associated with a file
- Only tag names of privileged tags
- Tag names of a specific set of tags that you have chosen
- You can even choose to omit some tag names by clicking on the invert button once you have made your selection
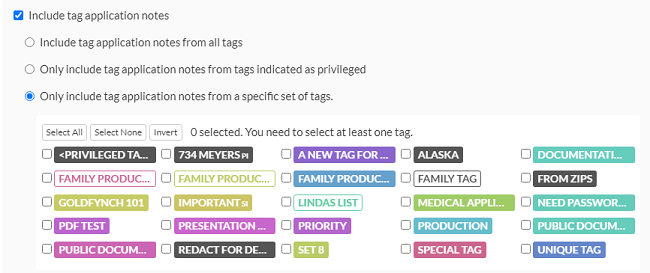
Step 6. (Optional) Check the Include Tag Application Notes checkbox if you wish to include tag application notes in your report. When you select this option you can also choose what tag application notes you want to include in your report. The options are:
- All tag application notes associated with a file
- Only tag notes for tags that are set as privileged
- Tag notes for a specific set of tags that you have selected from the list displayed
- You also have the option of omitting tag notes for a specific set of tags by clicking on the invert button after you have made your selection.
Step 7. (Optional) Check the Include Document Notes and Annotations checkbox if you wish to include document notes and annotations in your report. Then choose the appropriate option to include either Document Notes or Annotations or both in the report
Step 8. (Optional) Check the Include work product columns in JSON format checkbox if you wish to include raw work product data in JSON format alongside their respective text columns. These columns include redactions, tag notes, document notes, and annotations. Except for redactions, work product columns are included only if their respective text columns are included in the report

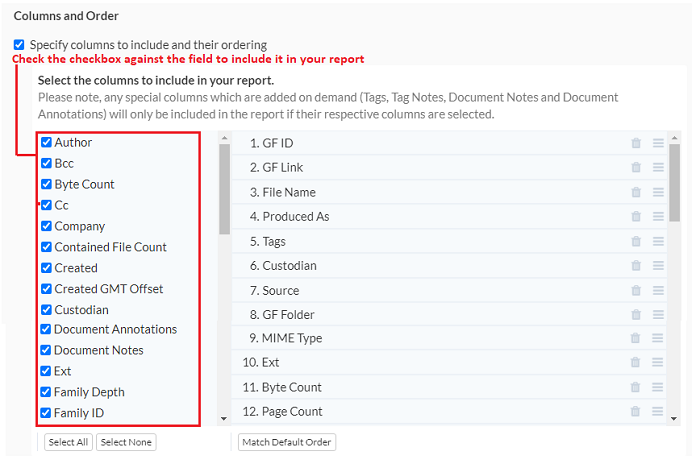
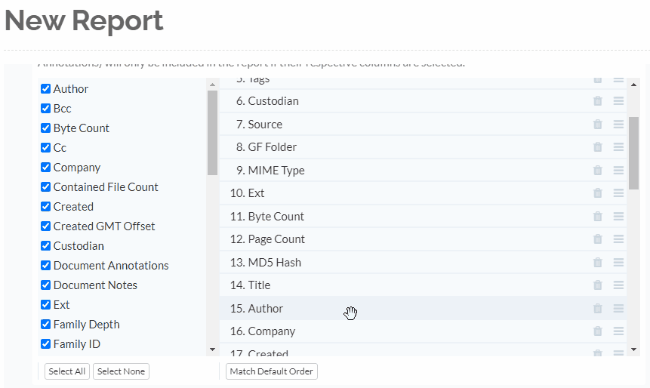
Step 9. (Optional) Check the Specify columns to include and their ordering checkbox if you wish to customize your report by choosing the columns to be included in your report. You can even set the order of the columns in your report as per your requirement.
In the image below there are two columns that have the list of all fields that are in the report. The column on the left is used to choose the fields to be included in your report and the one on the right is used to set the order of the columns.
Follow the steps given below to customize your report.
-
Click on the checkbox against the fields on the left and select it to include them in your report. By default, all fields are selected.
-
To change the order of the columns just drag the fields from the right column and drop it to the position you want. For example, if you want to have the "Author" field in the 9th position, then just drag it and drop it to the 9th position.
Note: In case you have chosen to include Tags, Tag notes, Document notes and annotations in your report then please ensure that these columns have been selected when you customize the report.
Step 10. Select a Report Output format
Step 11. Click on the Create Report button at the bottom of the New Report screen overlay
Generate a Report using 'File Listing - Tag'
The steps to generate a report using 'File Listing - Tag' are similar to those for a report using 'File Listing - All files', the main difference is that there is a step where you can choose the tags that you wish to include in your report.
Step 1. Navigate to the 'Reports' view by clicking the Reports button in the left pane.
Step 2. Click on the + New Report button.
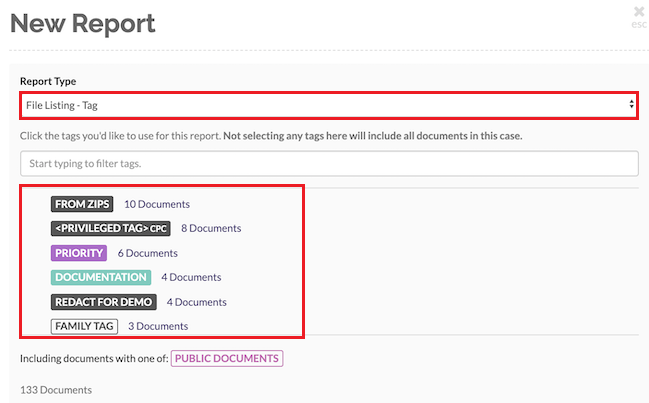
Step 3. Select the report type 'File Listing - Tags'.
Step 4. Click on the tags whose files you wish to be included in the report. If no tags are selected then all documents will be included in the report. You can also choose to include hidden tags. Find out more about tagging files here.
Then enter the report name, select the descriptive fields you wish to include in the report, select an output format and create the report by executing Steps 4 - 9 of the Generate a Report using File Listing - All Files section.
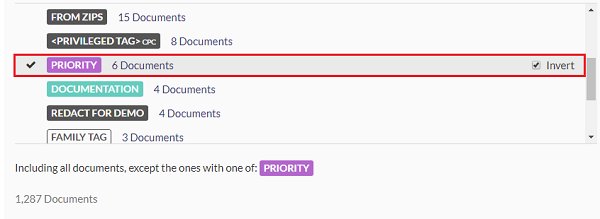
Note: While selecting the tags to be included in the report you can begin typing in the text box to quickly search for specific tags. Additionally, the 'Invert' function is available for reports also and this will exclude files with the corresponding tag. To invert a tag, check the 'Invert' checkbox against that tag.
Generate a Report using 'File Listing - Saved Advanced Search'
The steps to generate a report using 'File Listing - Saved Advanced Search' are similar to those for a report using 'File Listing - All files', the main difference is that there is a step where you need to select the Saved advanced search query. The report will consist of files that would have been displayed as results of the saved search query.
Step 1. Navigate to the 'Reports' view by clicking the Reports button in the left pane.
Step 2. Click on the + New Report button.
Step 3. Select the report type 'File Listing - Saved Advanced Search'.
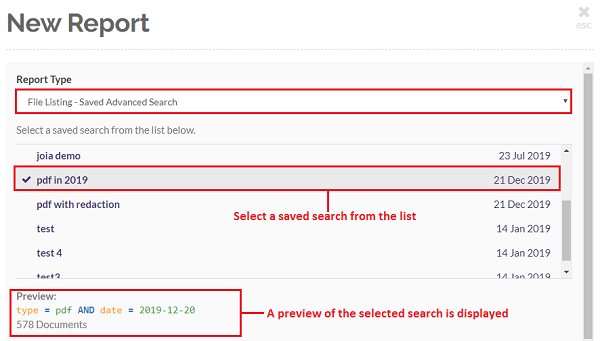
Step 4. Select a saved search from the list of saved searches in the case. Once the search is selected a preview of the query will be displayed on the screen.
Then enter the report name, select the descriptive fields you wish to include in the report, select an output format and create the report by executing Steps 4 - 9 of the Generate a Report using File Listing - All Files section.
Click here to learn more about saving and loading saved advanced search queries.
Note: You can also generate a privilege log using any of the above methods. Click here to learn more about generating privilege logs.
Generating a report by re-using the settings of an existing report
1. Navigate to the report whose settings you want to reuse
2. Click on the Re-use settings icon

3. Review the settings that are displayed
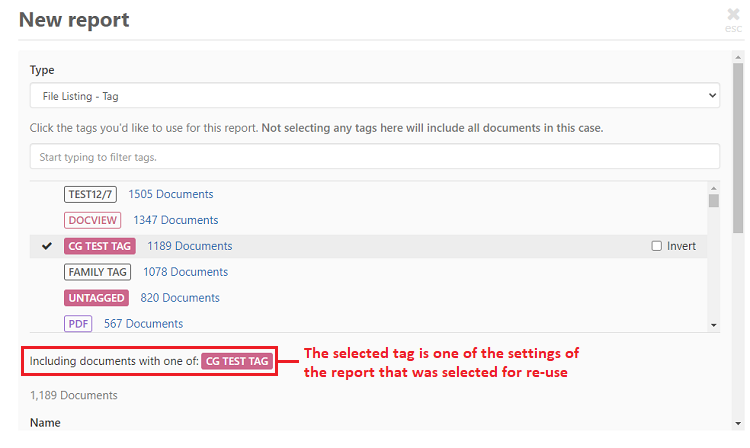
4. (Optional) Change any of the existing settings
5. Enter a name for the report
6. Click on the Create button
The new report will be submitted and you can view it once the processing is complete
Note:
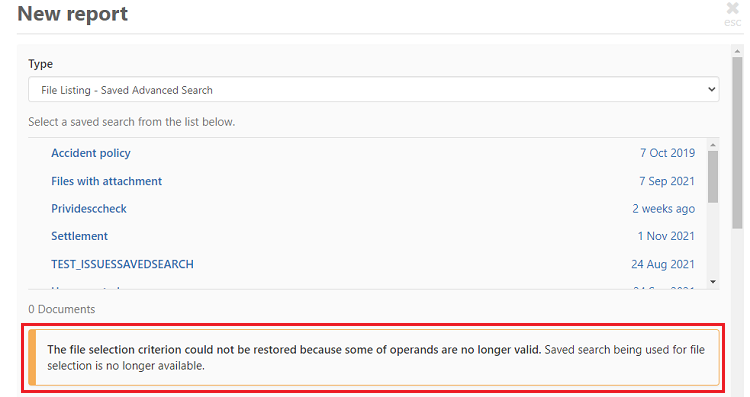
- In case a tag or saved search has been deleted, then you will need to reselect the file selection criteria for the report
- This feature is not available retrospectively (i.e. it is only available for reports created after the feature was added)
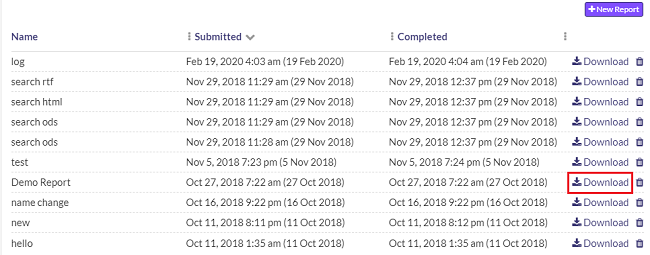
Accessing your report
Click on the Download Report button to download your report
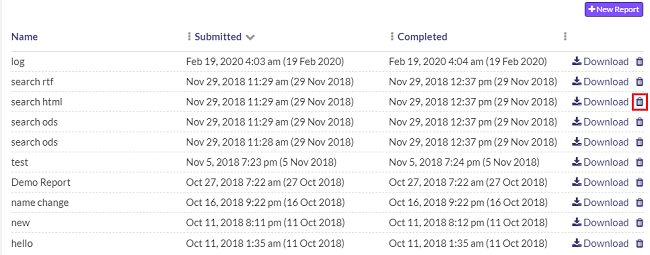
Deleting a case report
1. Click on the trashcan button against the case report you wish to delete
2. Click on the Yes button on the confirmation screen that follows
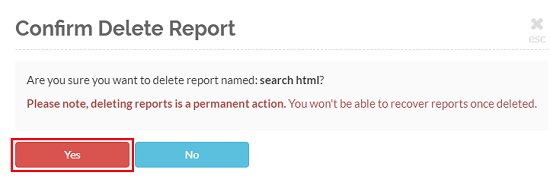
Note: Once a case report is deleted it cannot be restored
Components of a report
Generated reports have a large amount of useful metadata on the files in the case, but not every file will use each metadata field. In cases of unused fields, they are usually left blank. In some cases (like for binary fields) they will be marked as "False." GoldFynch case reports contain the following items:
- GF ID - GoldFynch's internal ID is used to track each individual file uploaded
- GF Link - The direct link to the document in your GoldFynch case (only accessible if you are logged into an account that has access to the case)
- File Name - The name of the file
- Produced As - If the file was assigned Bates stamps in any productions, the starting Bates numbers of the file in those productions are listed here (multiple Bates numbers are separated by semicolons ";" and the complete Bates stamp, including number padding, is added)
- Custodian - The custodian of the file, as assigned by the user during upload
- Source - The source of the file, as assigned by the user during upload
- Tags - All the tags that are assigned to the file. Hidden tags will also be included.
- GF Folder - The file path of the file
- MIME Type - Identifies the nature and format of the document (learn more here)
- Ext - The extension of the file (e.g. PNG, PDF, MBOX)
- Byte Count - The file size
- Page Count - The number of pages in the file if applicable
- MD5 Hash - The file 'fingerprint' which GoldFynch uses to detect exact duplicates, even when the names of the otherwise-identical files are different
- Title - The title of the document
- Author - The author field linked to word processing software (e.g. Microsoft Word) used to create the document
- Company - The company field linked to word processing software (e.g. Microsoft Word) used to create the document
- Created - The time and date (in local time) at which the document was created
- Created GMT Offset - The time difference between the local time in which the created date is displayed, and Greenwich Mean Time
- Modified - The time and date (in local time) at which the document was modified
- Modified GMT Offset - The time difference between the local time in which the modified date is displayed, and Greenwich Mean Time
- Primary Date - The assigned primary time and date (in local time)
- Primary Date GMT Offset - The time difference between the local time in which the primary date is displayed, and Greenwich Mean Time
- Redacted? - A true/false field for whether the document contains redactions
- Protected? - A true/false field for whether the document contains redactions
- Top Level Container? - A true/false field for whether the document is a top-level container
- Contained File Count - The number of files that this file contains
- Family ID - The tracking ID GoldFynch represents the family of files to which this file belongs
- Family Depth - The number of folders deep this file is in from the container file
- Parent ID - The GF ID of the parent file of this file
- PST/MSG Class - This identifies the specific class of the message (not necessarily a normal email (learn more here)
- Message ID - The unique email identifier set by the sending email client
- Review sets - This lists out all the review sets that the file is contained in
- Reviewed in Review sets - This shows all the review sets where the file has been reviewed
- Reviewed By - This lists out all the users who have reviewed the file
If the file is an email (email files have the MIME type "message/rfc822") it will also have information in the following fields:
- Subject - The subject line if this file is an email
- From - The "From" address if this file is an email
- To - The "To" addresses if this file is an email
- Cc - The "Cc" addresses if this file is an email
- Bcc - The "Bcc" addresses if this file is an email
- Sent - The time and date (in local time) at which the document was sent
- Sent GMT Offset - The time difference between the local time in which the sent date is displayed, and Greenwich Mean Time
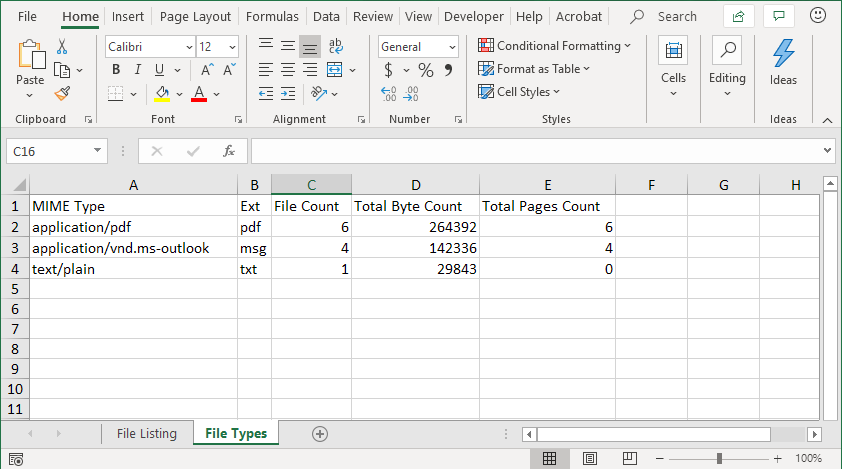
Aggregate data
Microsoft Excel and CSV-formatted reports contain aggregate data on the types of files they contain, in addition to the regular report data.
Just open such a file and click on the "File types" sheet that will be present (it will appear as a tab at the bottom of the page.)
Note: If you need a report on specific file types exclusively, you can run an advanced search query using the "Type" parameter, and select the file types you need. Save the query, and then run a report against the query by selecting "Advanced Search Query" as the Report type.