Feature: Multi-Factor Authentication (MFA) for GoldFynch
GoldFynch has added an additional (optional, but recommended) layer of security to your accounts: you can now enable multi-factor authentication, requiring a secure code to be entered whenever you sign in to your account. You can receive the code either as an SMS, or from a trusted “authenticator” application on your mobile device.
The “factor” in “multi-factor authentication” indicates that you need more than one piece of information to verify your identity at login. Multi-factor authentication, (or two-factor authentication, when it uses specifically two pieces of information for validation), are commonly used for everyday services that still require relatively high amounts of security like ATM withdrawals (where you need both your physical debit card and knowledge of your PIN number,) email validations while signing up to many websites, and often for logging into email accounts themselves.
How to enable multi-factor authentication (MFA)
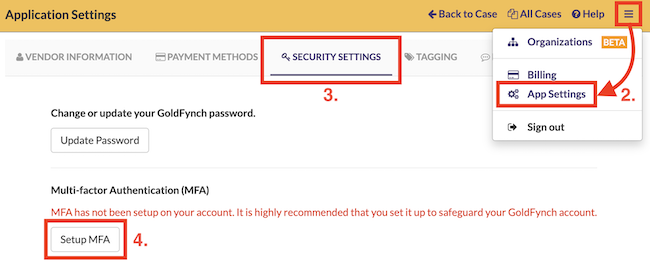
Step 1: Begin setting up MFA
- Sign in to your GoldFynch account
- Click in the menu button in the top-right corner of your screen, then on the “App Settings” button
- Click on the “Security Settings” tab
- Click on the “Setup MFA” button
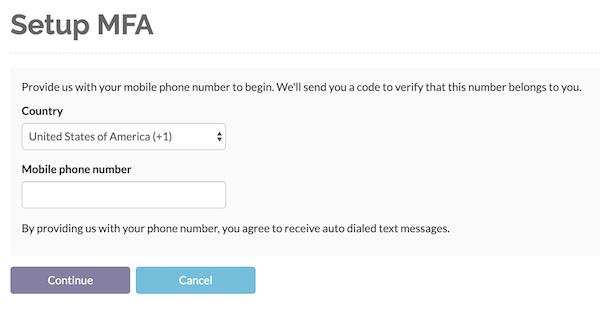
Step 2: Verify your phone number
- Enter your country and mobile phone number
- Click on “Continue”
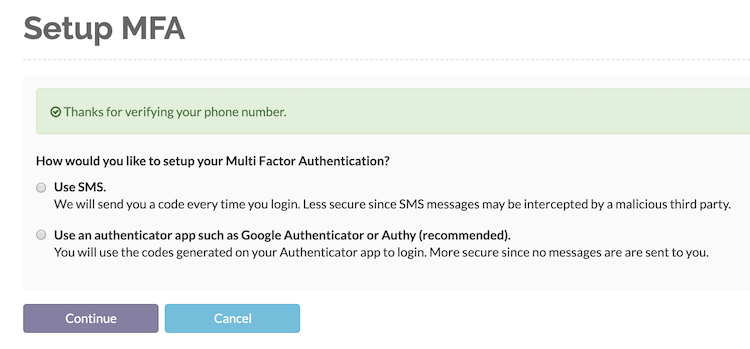
Step 3: Choose and set up your validation method
Once you have successfully verified your phone number, you will be asked to choose a method of authentication. Pick one, and click on “Continue.”
Setting up validation via SMS
The verification phone number you used will be stored, and each time you log in (i.e. successfully enter your login details on the GoldFynch website,) you will need to enter a code that is sent to you via SMS. (IMPORTANT: Don’t miss out on Step 4: Saving your Recovery Code)
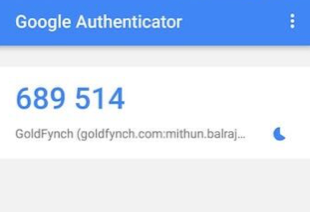
Setting up validation via an authenticator
Each time you log in (i.e. successfully enter your login details on the GoldFynch website), you will need to open a linked, secure authentication application and enter the code it generates.
NOTE: If you don’t have an authenticator like Google Authenticator or Authy installed on your mobile device, you will need to during the setup process. Learn more about setting up the Google Authenticator here, and about setting up Authy here.
Once you have installed the authenticator, you will need to scan the generated QR code (partially covered in the image below.)

After this, the connection will be made between your GoldFynch account and your authenticator. You will be able to generate an authenticator code whenever you wish.
Step 4. Saving your recovery code
Once you have set up your verification method, you will be shown a screen similar to the one below (part of the code is masked in this image), which will contain a recovery code. Take note of this code in a secure location–you will need it to recover access to your account if you are unable to log in for any reason in the future (e.g. you have chosen SMS validation and lose access to that phone number.)
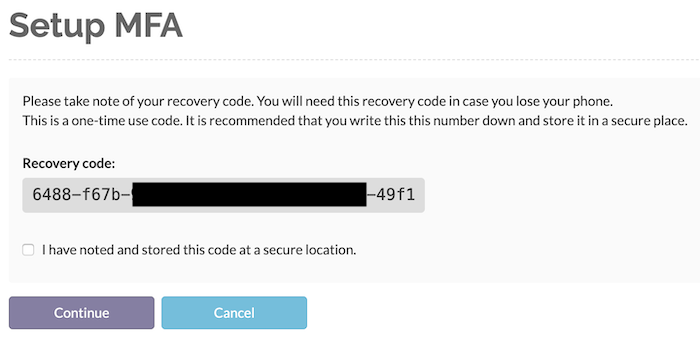
Once you have taken note of the recovery code, check the checkbox and click on “Continue” to complete the setup of your multi-factor authentication.
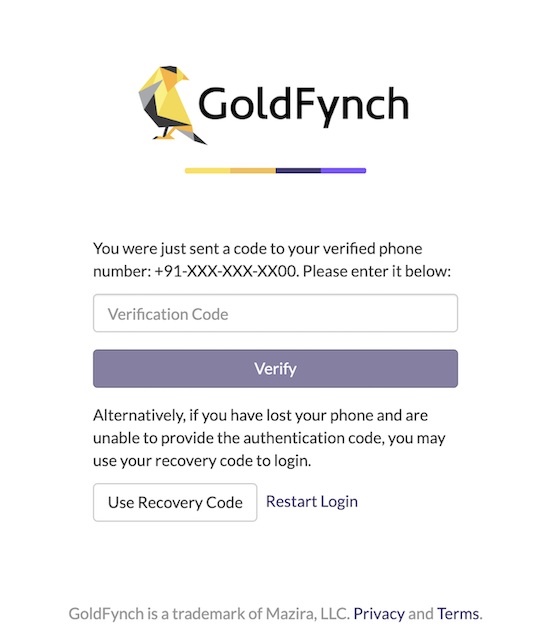
Logging into your account
Enter your login details (as usual) on the GoldFynch login screen and click on the “Log in” button. On the following screen, enter your verification code based on whether you have enabled SMS or Authenticator validation. If you use your authenticator for multiple services, generate a code for GoldFynch and enter it.
Recovering your account
If you lose access to your GoldFynch case and are unable to log in using either of the authentication methods, you can recover it using a recovery code (see Step 4. Saving your recovery code above.)
Using a recovery code
- Click on the “Use Recovery Code” button (as seen in the image above, in the “Logging into your account” section)
- Enter your secure recovery code, and click on the “Verify” button
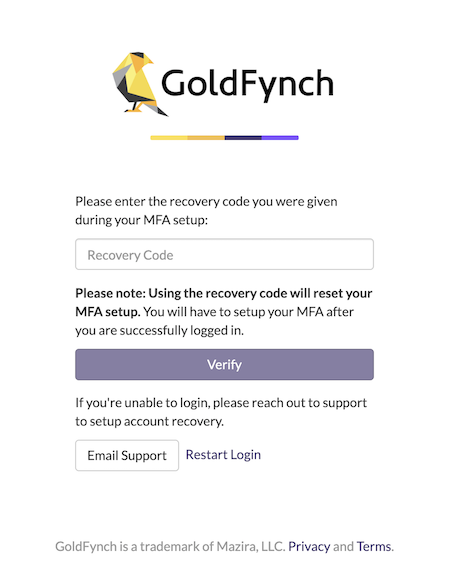
Note that once you have used your recovery code, your multi-factor authentication will be disabled and you will need to set it up again if you wish to use it.