Organizations
GoldFynch's Organizations service is a powerful tool designed to help manage multiple cases under a single umbrella "organization."
Some of the features it offers include:
- A unified dashboard with information and controls for managing all cases under the organization
- Custom branding - choose colors for your portal and upload your own logo
- Customizable subdomain, formatted as yourcompany.goldfynch.com
- Generate invoices for clients based on case usage for bill back, or add on a flat fee
- Manage members and permissions
The service is currently a work in progress, and many more features are in the works! You can expect to see these features soon:
- Monitor user activity
- Admin functions
- Fully-independent domain (e.g. ediscovery.yourcompany.com)
- ACH billing (for US customers)
- Choice of geolocation of cloud storage
- Removal of GoldFynch branding (email us at support@goldfynch.com for early access)
Creating an organization
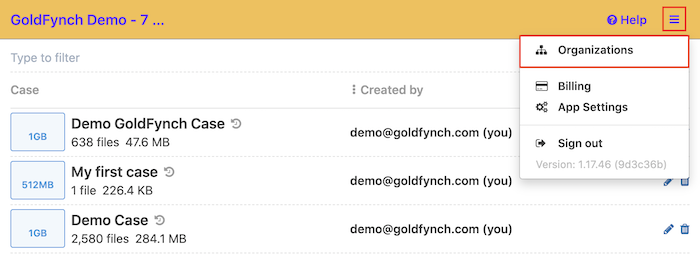
Step 1. Click on the menu icon in the top-right corner of the GoldFynch app.
Step 2. Click on the Organizations button.
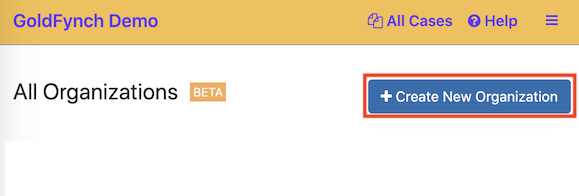
Step 3. Click on the +Create New Organization button
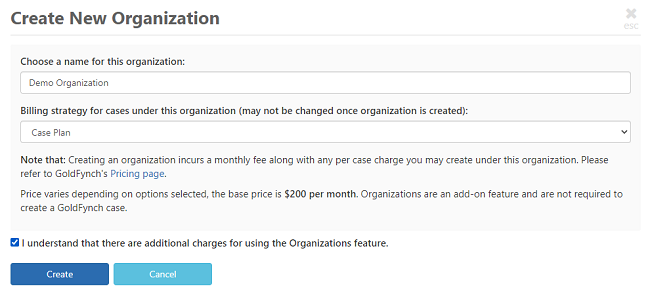
Step 4. Enter a name for the organization
Step 5. Check the checkbox against the message about additional charges for the organization feature
Step 6. Click on the Create button
Note: If you have not entered a payment method you will be prompted to. Learn more about managing payment methods here.

Billing for organizations is monthly based on case plans under the organizations. In addition to this, there is an additional charge for using the Organizations service which is otherwise not charged for GoldFynch accounts or cases.
Deleting an organization
Step 1. On the Organizations Dashboard click on the Delete button against the organization you wish to delete.
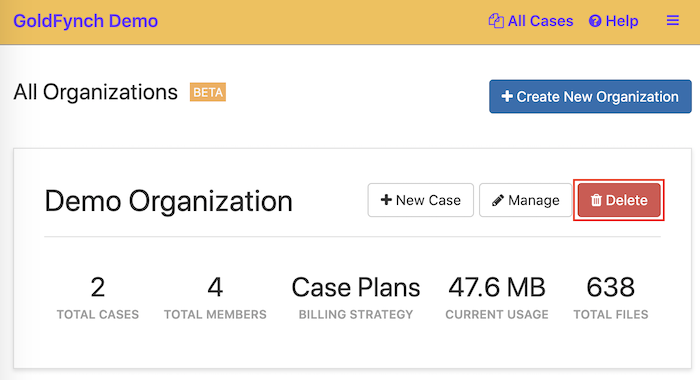
Step 2. Click on the Delete button.
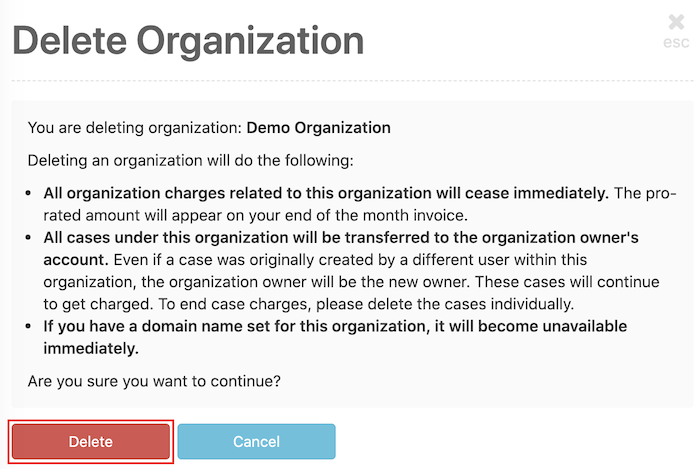
A notification will be displayed confirming that the organization has been deleted.

Managing Organizations
All organizations controlled by an account (i.e. that the account is the Owner or Admin of) are displayed on the All Organizations page - the same screen that you access from the top-right corner menu. From here you can:
- Create organizations
- Create new cases under an organization
- Manage the individual organization's settings
- View information about your organizations
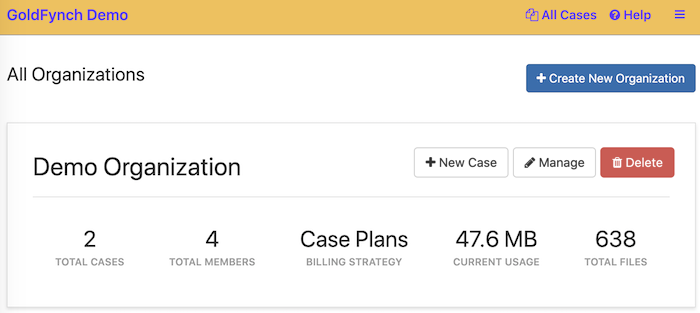
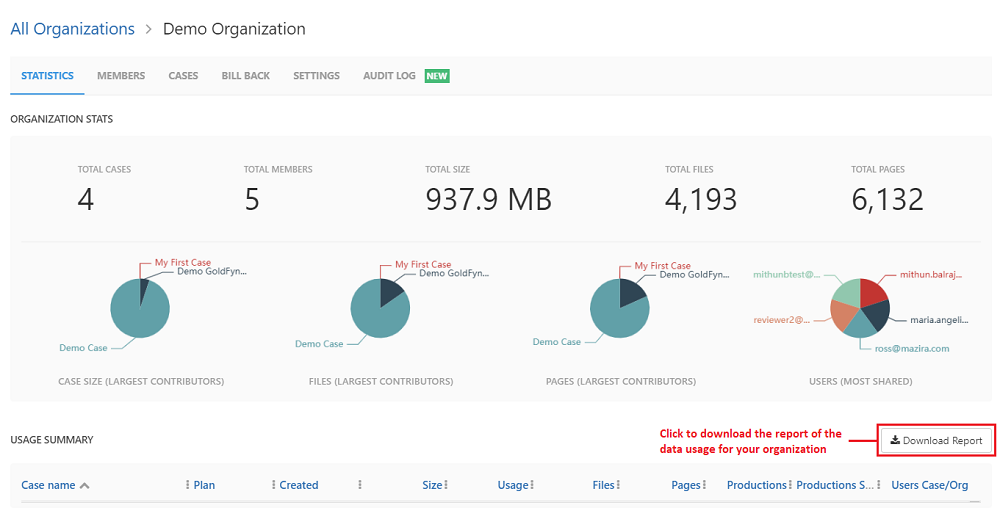
To manage an individual organization, click on the Manage button against that organization. The Statistics tab displays information about the organization, including a log of data usage for the month. You can download the report of the data usage by clicking on the Download Report button found at the bottom of the page.
Transferring ownership of an organization
To transfer ownership of an organization to another user's account, you will need the new user's account to:
- Be assigned an Owner member role in the organization (learn how to do so further down in this document.)
- Have a credit card linked to their GoldFynch account (learn how to add a one here.)
Once this is done, follow these steps:
Step 1. Log into your account which currently holds ownership of the organization.
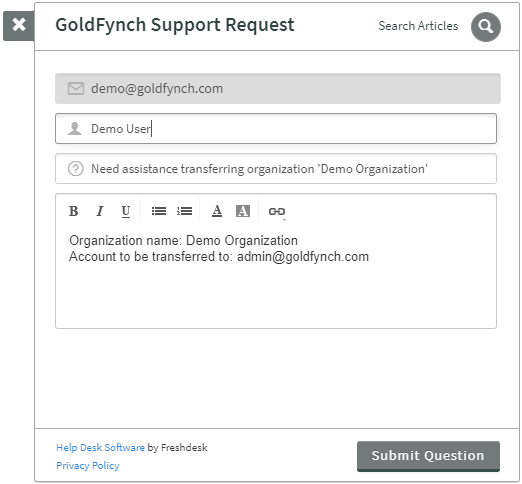
Step 2. Click on the Help button in the top right corner of the screen.

Step 3. Add the following into the Subject field: 'Need assistance transferring organization: <organization name>'
Step 4. Enter the organization's name and the email account for ownership to be transferred to.
Step 5. Click on the Submit Question button.
Once you have submitted the request, GoldFynch staff will get in touch with you, as well as send a notification to the new account about transferring the organization.
Managing cases
GoldFynch lets you both create new cases directly through organizations, and transfer existing cases into your organization.
Creating cases through organizations
Step 1. On the Organizations Dashboard, either:
- Click on the
+ New Casebutton against the organization on the Organizations Dashboard - Click on the
Managebutton, and under theCasestab, click on the+ Create New Casebutton
Step 2. Enter a case name.
Step 3. Select an appropriate time zone.
Step 4. Click on the Create Case button.
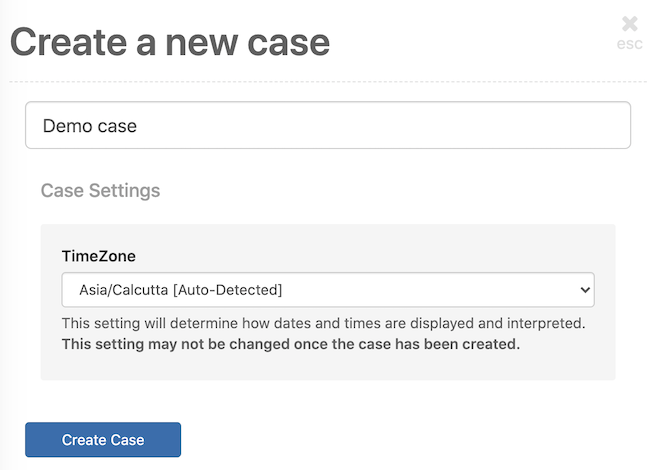
The case will automatically be added to the organization and its billing will be the default payment method that the organization uses.
Transferring cases to your organization
Step 1. Click on the Manage button against the appropriate case on the Organizations Dashboard
Step 2. On the Cases tab, click on the Transfer button. A list of cases available to be transferred to the organization will be displayed. These are cases that you are either the Owner or Admin of, and which are not currently under any other organization.

Step 3. Check the checkboxes against cases you wish to transfer under this organization.
Step 4. Click on the Next button.
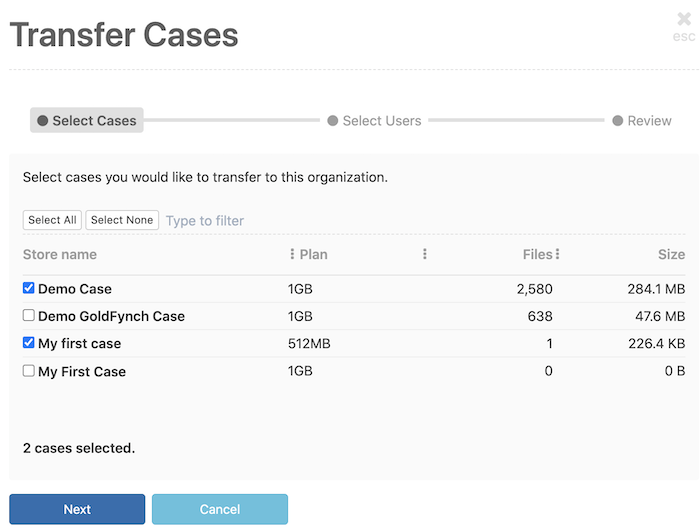
Step 5. (optional) Check the checkbox against any existing members of the cases that you would like to transfer to the organization and select the permission levels you wish to assign them from the drop-down box against each member. As mentioned in the note:
- All transferred members will be given access to all cases in the organization
- The permission levels they receive will be as assigned
- If a member has a higher permission level in a case than the one assigned, that will be maintained instead
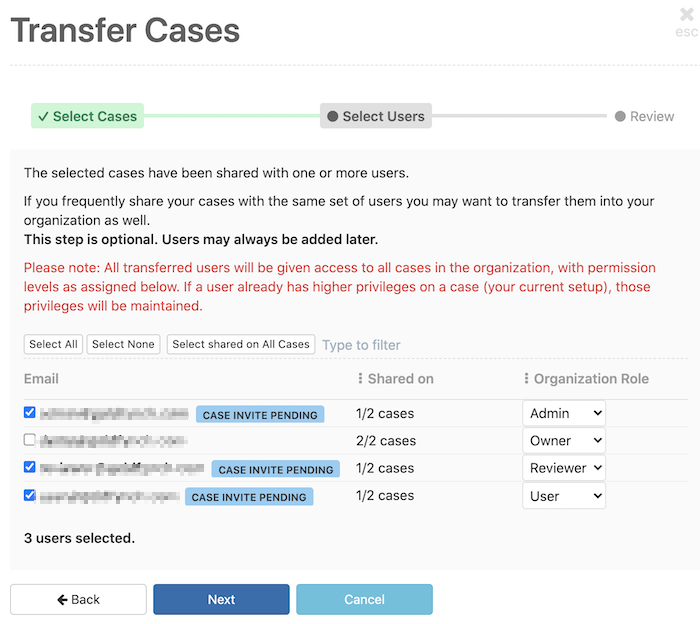
Step 6. Click on the Next button.
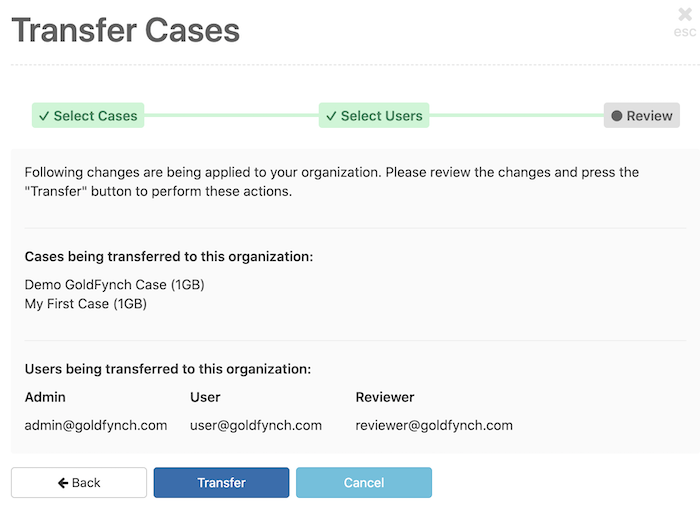
Step 7. Review the configuration for the case transfer that is about to be made then click on the Transfer button.
Managing member and roles
Adding a new member to the Organization
Step 1. On the Members tab of an organization Click on the + Add New Member button

Step 2. Enter the person's email address
Step 3. Select a role to assign to them from the drop-down menu
Step 4. Click on the Invite button
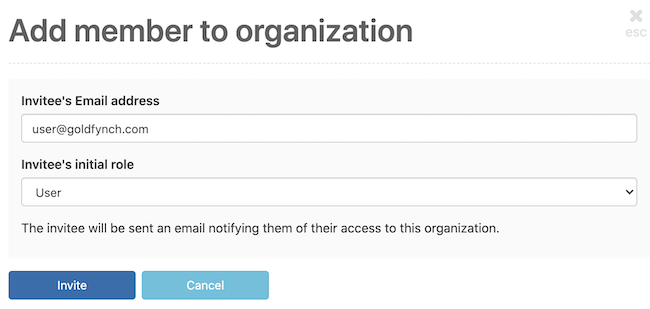
Note:
- In case there is an error with the new member's email then the owner of the case will receive a notification regarding the failed delivery. In addition to this, the member whose email had an issue will be highlighted in the member listing with an email error icon next to it. Just hover over the email icon to view the details related to the error that was encountered. You can rectify the error and try to add the member again

Changing a member's role
On the Members tab of your organization, click on the drop-down box against a member's name and select a new role.
Removing a member
On the Members tab of the Click on the trashcan icon against a member's name.
Client invoicing
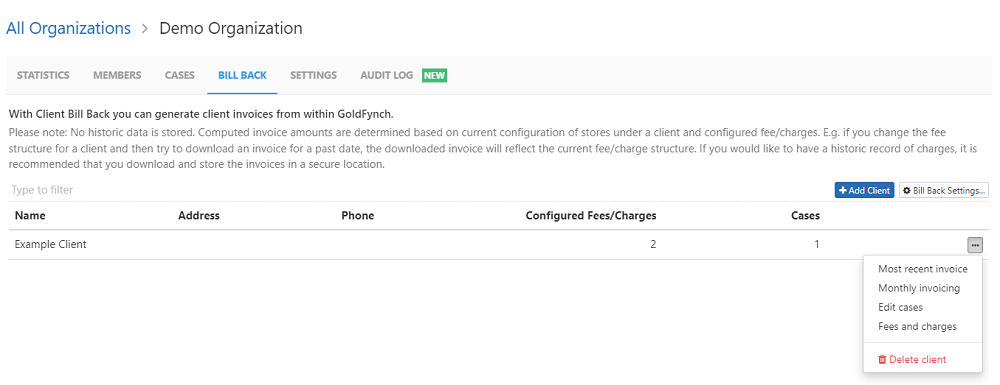
Using GoldFynch's Bill Back feature you can create entries for your clients, and assign cases in the organizations to them. You can then directly generate invoices using the case's billing amount, optionally adding custom fees/charges to them as either a fixed amount or a percentage of the invoiced amount.
Adding a client
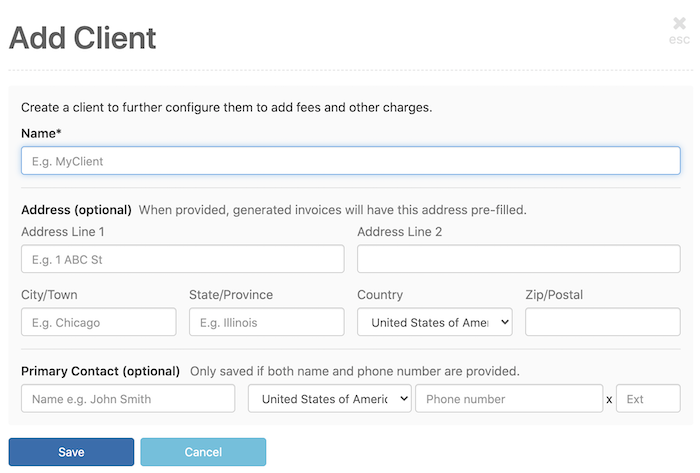
Step 1. On the Bill Back tab, Click on the + Add Client button.

Step 2. Enter details about your client then click on the Save button.
Managing client invoicing
Editing a client's details
Click on the Edit client settings button to edit any of the details you entered while creating the client's entry.
Assigning cases to a client
Step 1. On the Bill Back tab click ... button against the client
Step 2. Click on the Edit cases option in the popup menu
Step 3. Check the checkbox next to one or more cases
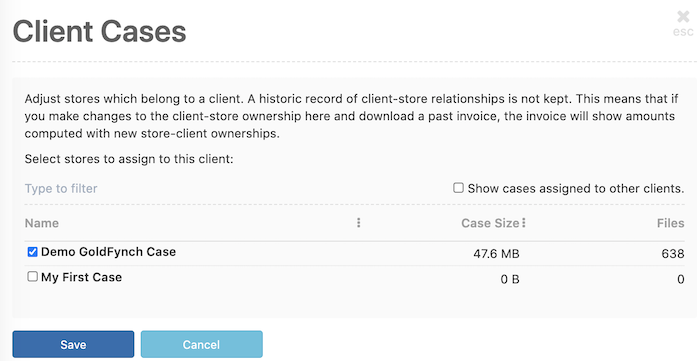
Step 3. Click on the Save button
Note: If you don't see any entries on this page, it means you have not added any cases to your organization yet.
Viewing and downloading invoices
On the Bill Back tab, click on the ... button and then click on the Monthly invoicing option
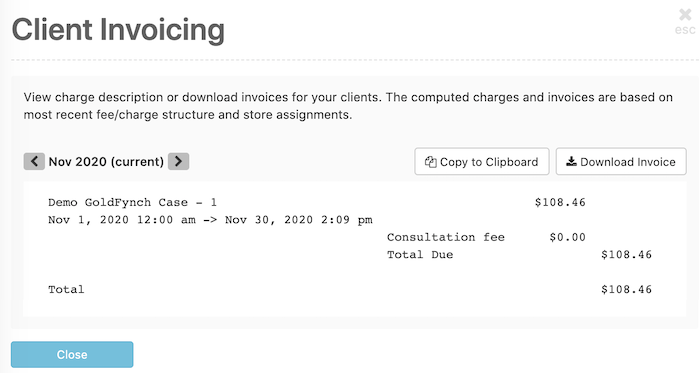
From here you can:
- Click on the
<and>arrows to scroll through monthly invoices - Click on the
Copy to Clipboardicon to copy a plain-text version of the invoice - Click on the
Download Invoicebutton to download a copy of the currently-display month's invoice
Alternatively, you can download the latest month's invoice by clicking on the Most recent invoice option on the popup menu dislpayed in the billback tab
Adding and managing custom fees/charges
Step 1. Click on the Fees and charges option in the popup menu
Step 2. Click on the Add Fee/Charge button
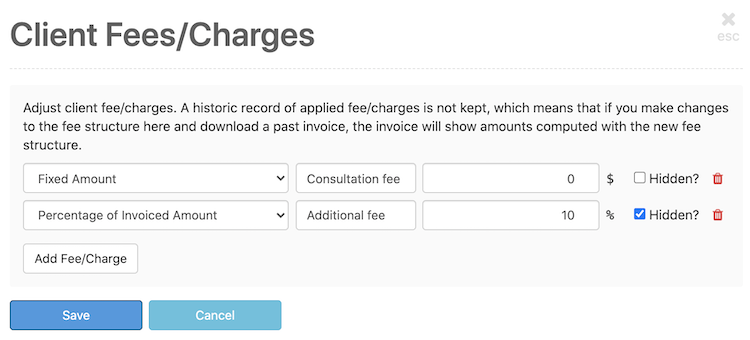
Step 3. From the drop-down menu, select from either “Fixed Amount" or “Percentage of Invoiced Amount" - the “invoiced amount" here is the total billed amount of all the cases assigned to the client.
Step 4. (optional) In the text box against the entry, enter what the fee/charge is for, Enter a fee amount or percentage.
Step 5. (optional) If you want the fee/charge to be hidden, check the checkbox.
Step 6. Click on the Save button once you are done with your changes.
To delete a fee/charge entry, click on the trashcan icon.
Note: Editing or deleting a fee/charge will affect past invoices will make the same changes to any invoices of previous months that you view/download through the system
Bill back settings - adding organization details
To add organization details for your bill back invoices:
Step 1. On the Bill Back tab, Click on the Bill Back Settings... button.
Step 2. Enter your details
Step 3. Click on the Save button
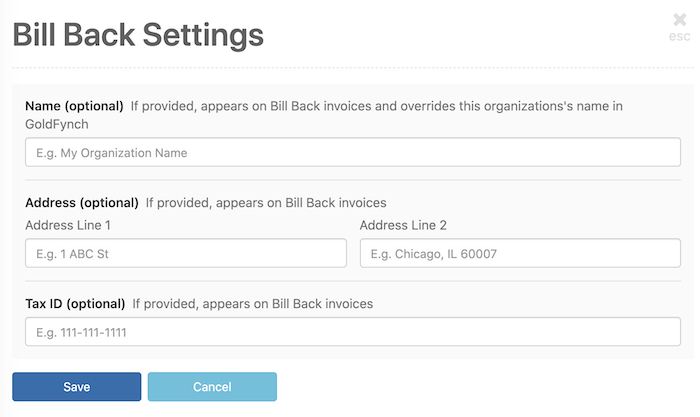
Note: Adding an organization name in this manner will override the organization's displayed name in GoldFynch
Managing billing
On the Settings tab, click on the Billing sub-tab. Your currently-configured payment method is listed here.
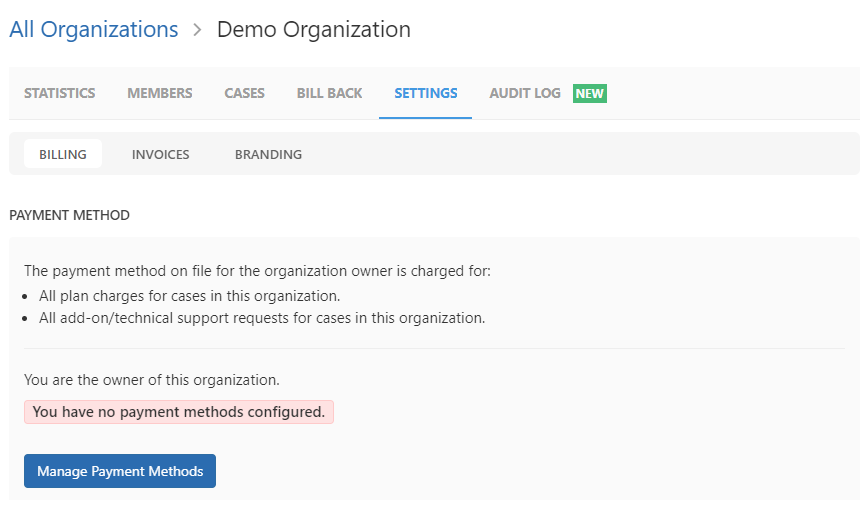
- Click on the
Manage Payment Methodsbutton to add a different payment method as described from Step 5. on this page - You can also assign a different default payment option as explained in the above link
Organization branding
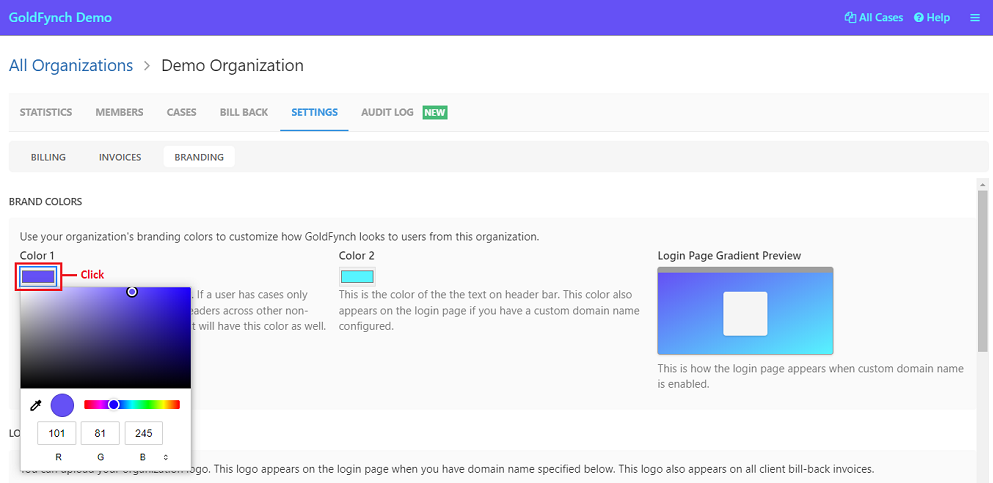
The Branding tab found under the Settings tab for organizations lets you update how GoldFynch looks to users from your organization. From this tab you can -
- Add a custom organization brand color scheme
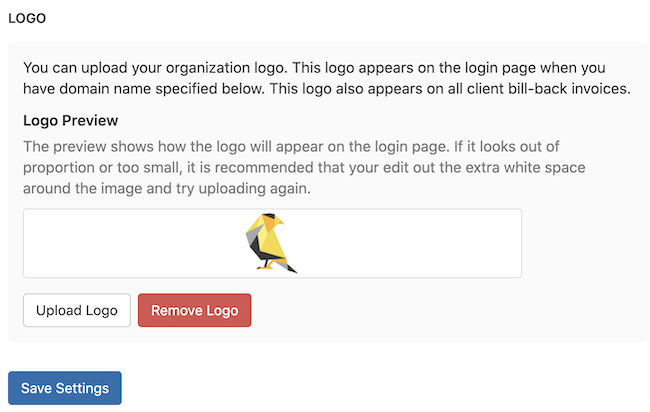
- Upload an organization logo
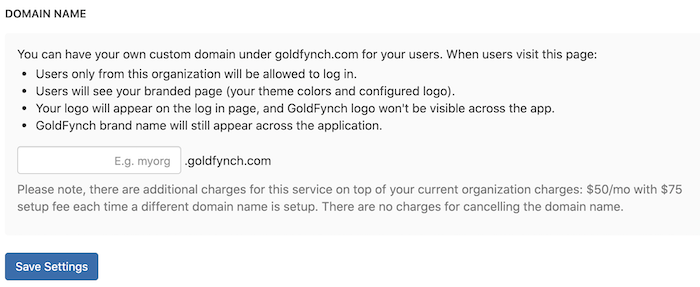
- Request for setting up a custom domain name
Setting a custom organization brand color scheme
Step 1. Click on one of the two color swatches
Step 2. Choose a color using the color spectrum/slider or enter a red/green/blue combination
Step 3. Hit the Return key
Step 5. Click on the Save Settings button once you are happy with your color combination. You can change your color scheme at any time.
Setting a custom organization logo
Step 1. Click on the Upload Logo button.
Step 2. Select an image file on your computer to upload.
Step 3. Click on the Save Settings button.
Setting a custom domain name
Step 1. Enter a domain name into the text box
Step 2. Click on the Save Settings button
Viewing App Activity using the Audit Log
You can track and view the app activity for the organization and also all cases associated with the organization using the Audit Log.
Click on the Audit Log tab, all the activity for the organization and the cases associated with it for the last 24 hours will be displayed by default.

In case you want to view the details of a particular event, you need to click on the ... button against the event.
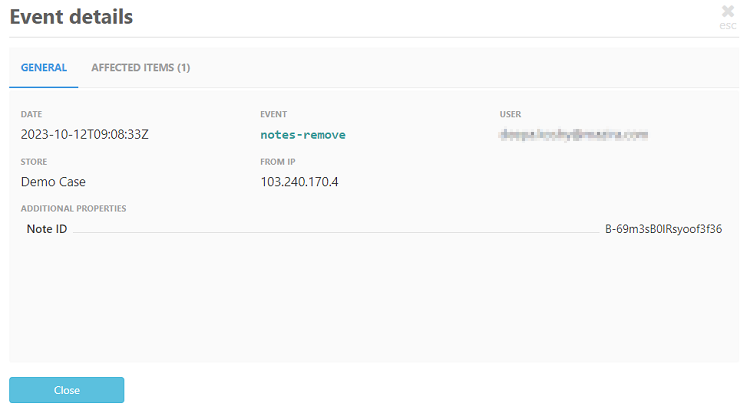
You can filter the transactions in the listing based on the fields:
- User - The complete email ID of the user you want to filter by needs to be entered
- IP Address - The complete IP Address you want to filter by needs to be entered
- Event - This refers to the action that has been performed, e.g., case-create, notes-add, tag-remove, move-items, etc.
- Item ID - This refers to the GoldFynch ID of the file which can be obtained by opening the file in the Document Viewer
- Tag - You can select the tags you want to filter by from the list of available tags in the case
- Store - Using this you can select the case by which you want to filter the transactions
You can view upto a year's work of transactions for your organization using the audit log
To change the date/time range you need to click the date/time displayed at the top-right corner of the page

A popup will be displayed and from this, you can -
- Set a custom date range by selecting the corresponding start and end date/time.
-
Select a relative time from one of the listed options
- Last 24 hours
- Last week
- Last month
- Last 6 months
- Last year
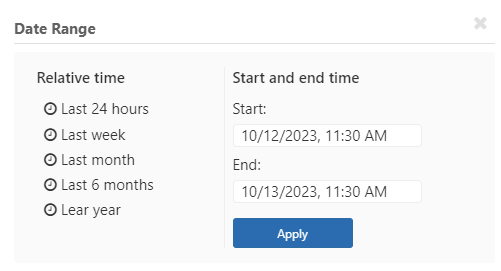
Click on the Apply button once you have made your selection. Then the organization activity for the selected period will be displayed on the screen.
Note: The functions of the Organization level audit log is similar to that for individual cases, the only difference being the additional field (Case) in the display listing. Click here to learn more about audit logs
Organization pricing
Base price per month - $200
Custom subdomain - $50 extra per month
One time custom subdomain set up fee - $75
 GoldFynch Documentation
